0 likes | 1 Views
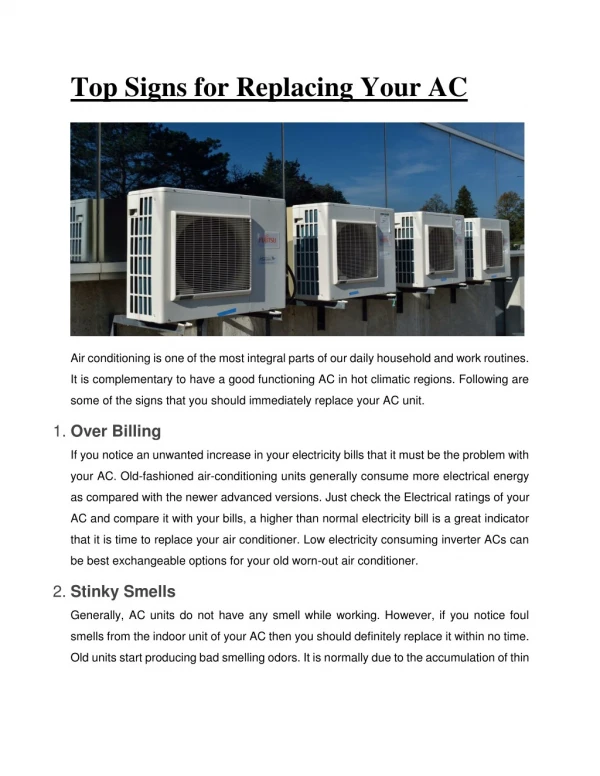
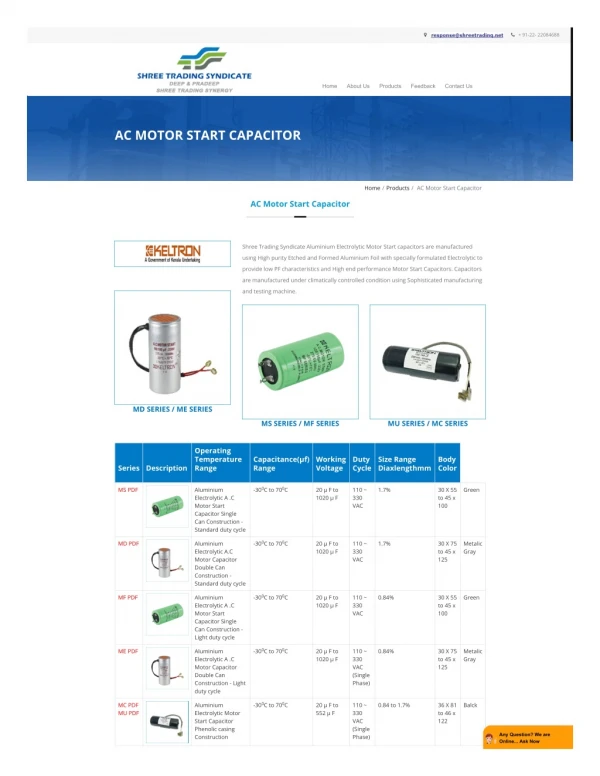
Replacing an AC capacitor involves identifying the faulty capacitor, safely disconnecting power, and swapping the old part with a new one that matches specifications. Capacitors store electrical energy to help start and run the compressor and fan motors. Signs of a failing capacitor include a humming noise or the AC unit not starting properly. It is important to discharge the capacitor before handling it to avoid electrical shock. Following safety protocols and using the right tools ensures a successful replacement and restores the air conditioneru2019s functionality.
E N D
Introduction Is your AC unit struggling to perform? The culprit might be a failing capacitor. This small but critical component acts as an electrical battery, storing and delivering energy to start and run your AC motors efficiently. As capacitors age, they can deteriorate, leading to noticeable issues like inefficient cooling, unusual noises, or complete system failure. Recognizing these warning signs early can save you from uncomfortable indoor temperatures and costly emergency repairs. In this comprehensive guide, we'll walk you through everything you need to know about HVAC capacitor replacement4from identifying symptoms of failure to executing a proper replacement with our detailed, step-by-step instructions. Whether you're a DIY enthusiast or simply want to understand the process before calling a professional, this guide will equip you with essential knowledge for maintaining your cooling system.
What Is an AC Capacitor? An AC capacitor is a critical electrical component that resembles a small cylinder or rectangle. It's designed to store and release electrical charge to help power the motors in your air conditioning system. Capacitors come in three main types: A start capacitor provides initial boost to start motors The run capacitor maintains steady power during operation The dual capacitor combines both functions in one unit Capacitors for AC units are typically used in conjunction with the compressor and fan motor to provide the initial boost of energy needed for startup. They temporarily store electrical charges and then discharge them when required. AC capacitors come in different sizes and capacitance ratings, which determine their energy storage capacity. Without a functioning HVAC capacitor, an AC system may struggle to start or run efficiently.
What Does the Capacitor Do in an AC Unit? Powerful Startup Assistance 1 Delivers the critical surge of electrical energy required to overcome motor inertia in both compressor and fan motors, which demand 4-8 times more power during startup than during regular operation. Voltage Regulation 2 Acts as an electrical reservoir that stabilizes power delivery throughout the entire cooling cycle, protecting sensitive electronic components from harmful voltage fluctuations and power surges. Reliable System Support 3 Functions continuously during both operational and standby phases, making it among the most vital and heavily utilized components in your entire HVAC system. A deteriorating or failed capacitor directly impacts your system's efficiency and longevity. Without this crucial component functioning properly, your AC unit will struggle with startup, consume excessive electricity, deliver inconsistent cooling, and potentially suffer catastrophic component failure.
How Do I Know If My AC Capacitor Is Bad? (Signs) AC Not Blowing Cold Air When your air conditioner struggles to produce cold air despite proper thermostat settings, a failing capacitor may be preventing the compressor from operating efficiently. The system might run continuously without reaching target temperatures, indicating insufficient electrical charge to power critical components. High and Rising Energy Bills A deteriorating capacitor forces your HVAC system to draw excessive current to maintain operation, resulting in significantly increased power consumption. This inefficiency typically manifests as a sudden spike in energy bills disproportionate to actual usage patterns or seasonal changes. Humming Noise A distinctive electrical humming sound accompanied by delayed startup indicates the capacitor is struggling to deliver sufficient starting torque to the motor. This strain on the system can also manifest as clicking sounds or brief operational attempts followed by system shutdown. Old HVAC System Capacitors typically have a service life of 10-15 years under optimal conditions. In older systems, especially those exposed to extreme temperatures or voltage fluctuations, capacitor degradation becomes increasingly common. Intermittent operation, delayed response to thermostat commands, or complete system failure are telltale signs in aging units.
AC Turns Off On Its Own When your air conditioner abruptly powers down during operation without completing its cooling cycle, a deteriorating capacitor is likely the culprit requiring attention. AC Doesn't Turn On Immediately Experiencing a noticeable lag between activating your thermostat and your AC unit starting up signals a weakening capacitor struggling to deliver the necessary startup power surge. AC Won't Turn On Complete system failure where your air conditioner remains unresponsive despite proper power supply and thermostat settings strongly indicates a completely failed capacitor requiring immediate replacement. Know more about How to clean an Air Conditioner by yourself.
How Do I Know If My AC Capacitor Is Bad? (Testing) Using a Digital Multimeter Set multimeter to capacitance function (¿F symbol) Ensure capacitor is fully discharged Place probes on appropriate terminals (C-FAN, C-HERM) Compare reading to capacitor label specifications Valid readings should be within ±10% of rated value Resistance Test Alternative Set the multimeter to resistance (ohms). When probes touch terminals, the needle should jump toward zero, then gradually return to infinity. No movement indicates a failed capacitor. Know more about the cost of an AC installation.
How to Find the Right Capacitor for AC? Identify the Capacitor Type Determine the type of capacitor your AC unit requires. Common types include run capacitors, start capacitors, and dual-run capacitors. Check the specifications of your AC unit or consult the manufacturer's manual to find the correct type. Check the Capacitor Rating Capacitors have ratings such as microfarads (µF) and voltage. Note down the ratings of your old capacitor to ensure you choose a replacement with the same or compatible ratings. Physical Size and Shape Air conditioning capacitors come in various sizes and shapes. Measure the dimensions of your current capacitor, including diameter, height, and lead spacing. Ensure the replacement capacitor matches these physical characteristics. Consult an HVAC Professional If you're unsure about selecting the right replacement capacitor or if you encounter any difficulties during the process, it's recommended to consult an HVAC professional. They can provide expert guidance and help you choose the correct HVAC capacitor.
Safety Precautions Before Replacement 1 Power Disconnection Completely shut off electricity at both the main circuit breaker panel and the thermostat control. For maximum safety, also remove the disconnect fuse or switch located directly at the outdoor condensing unit. 2 Protective Equipment Wear ANSI-approved safety glasses and electrical-rated insulated gloves (class 00 minimum). Never handle capacitor terminals with bare hands, even after power disconnection, as residual charge may remain. 3 Discharge Capacitor Using an insulated-handle screwdriver or dedicated discharge tool, carefully bridge both capacitor terminals simultaneously to safely release stored electrical energy into the tool rather than your body. 4 Waiting Period After power disconnection, allow a minimum of 5-10 minutes for the capacitor to partially self-discharge before attempting any service work. This crucial step reduces electrical hazard risk substantially.
AC Capacitor Replacement Step 1: Access Panel 1. Locate your outdoor condenser unit, typically positioned on a concrete pad beside your home 2. Identify the electrical access panel, usually a metal rectangle secured with multiple screws 3. Using the appropriate screwdriver (typically Phillips-head), remove all screws from the panel 4. Store screws in a magnetic tray or small container to prevent loss 5. Carefully remove the access panel, exposing the internal electrical components The capacitor is typically mounted near the top or side of the electrical compartment and resembles a small can or cylinder with terminals on top.
Step 2: Discharge & Disconnect Discharge the Capacitor 1 Using a properly insulated screwdriver (minimum 1000V rating), carefully bridge across the capacitor terminals to safely dissipate any stored electrical charge. A brief spark may occur during discharge4this is expected and indicates proper energy release. Document Wire Connections 2 Capture detailed photographs of all terminal connections before removal. Note that capacitor terminals are standardized as C (common), FAN (fan motor), and HERM (hermetic compressor). This precise documentation ensures accurate wire placement during reassembly. Disconnect Wires 3 Utilize insulated needle-nose pliers (preferably with rubber-coated handles) to firmly grasp each wire connector at its base and pull directly perpendicular to the terminal. Never apply tension to the wire itself, as this can damage the internal conductors or terminal crimping.
Step 3: Safely Remove the Old Capacitor Mounting Hardware Removal Using the appropriate screwdriver (typically Phillips-head), carefully loosen and remove all mounting bracket screws. Place the mounting bracket/strap and screws in your parts container for reuse with the new capacitor. Gently lift the old capacitor straight up and out of its compartment, avoiding contact with other components. Proper Disposal Capacitors contain environmentally harmful materials that require special handling. Never dispose of them in regular household waste. Take the old capacitor to a certified electronic waste recycling center, check with your local HVAC supplier about manufacturer take-back programs, or contact your municipal waste management for proper disposal guidelines.
Step 4: Install New Capacitor 1 Position New Capacitor Align the replacement capacitor in identical orientation to the original unit. Ensure terminal positioning matches exactly to maintain proper wire routing and prevent strain on connections. 2 Secure Mounting Hardware Reinstall the metal retention bracket or mounting strap around the capacitor body. Apply 1/4 turn past finger-tight on mounting screws4 excessive torque can compromise the capacitor's hermetic seal and internal components. 3 Reconnect Wiring Referencing your documentation, attach each wire to its designated terminal (C, FAN, HERM). Press each connector firmly onto its terminal post until you feel a positive engagement or hear an audible click confirming proper seating. 4 Verify Connections Conduct a thorough inspection of all terminal connections against your reference photos. Confirm zero exposed conductor material, proper fastener tension, and complete connector engagement before proceeding to system restoration. Know more about the HVAC parts and accessories.
AC Capacitor Troubleshooting Tips When replacing an AC capacitor, certain issues may arise that can hinder the process. It's important to be aware of these common problems and know how to troubleshoot them effectively. One common issue is selecting the wrong capacitor with incorrect specifications, which can lead to system malfunction. To address this, always check the required capacitor specifications before purchasing a replacement. Another issue is improper wiring, resulting in capacitor failure or system damage. To troubleshoot this, double-check the wiring connections and ensure they are correctly installed. Additionally, be cautious of any signs of physical damage or leakage in the capacitor, as these indicate a faulty unit that should be replaced immediately.
Conclusion Proper AC capacitor replacement is essential not only for restoring your cooling system but also for enhancing its overall performance and extending its service life. By carefully following the diagnostic and replacement procedures outlined in this guide, you can confidently address capacitor issues while maintaining safety standards and protecting your investment. Remember that attention to detail4from discharge procedures to terminal connections4 ultimately determines both system reliability and personal safety. For dependable HVAC components that meet manufacturer specifications, PartsHnC provides certified AC capacitors and precision-engineered replacement parts backed by technical expertise. Our commitment to quality assurance, responsive customer support, and rapid delivery ensures your air conditioning system operates at peak efficiency year-round.
FAQs 1 Is it worth replacing the capacitor on a unit? Replacing a faulty capacitor on your AC unit is often worth it, as it can restore the proper functioning of the system and prevent further damage. However, it is recommended to assess the overall condition of your AC unit and consult a professional if you're unsure. 2 How often should you replace an AC capacitor? The lifespan of an AC capacitor can vary depending on factors like usage, environmental conditions, and quality. On average, replace AC capacitors every 5 to 15 years, but it's best to monitor their performance and consult a professional for guidance.