Download
1 / 39
1.01k likes | 3.39k Views
2. What is adhesion?. The force that binds two dissimilar materials together when they are brought into intimate contactIn dentistry, bonding refers to the process of attaching a restorative material to tooth structure by adhesion. 3. Basic principles in the bonding process . Surface preparation to remove plaque

E N D
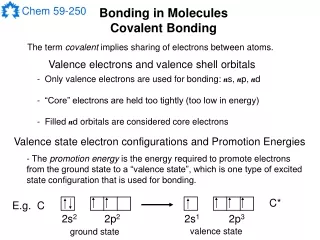
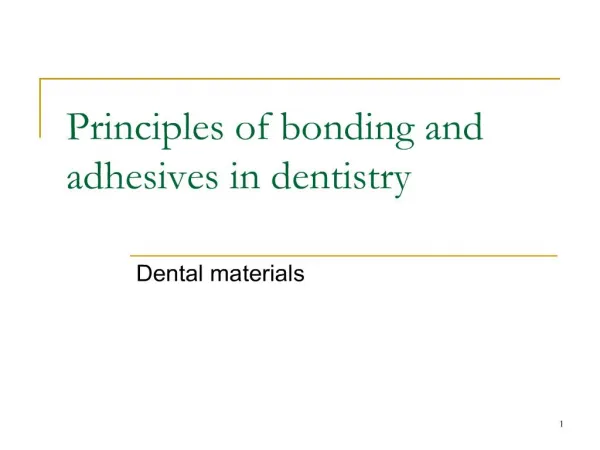
1. 1 Principles of bonding and adhesives in dentistry Dental materials
2. 2
3. 3 Basic principles in the bonding process Surface preparation to remove plaque & debris
Acid etching with phosphoric acid, to remove mineral, create porosity, wettability
Bonding agent applied and flows to fill the porosities and create resin tags (micromechanical retention)
Resin applied and bonds chemically to underlying bonding agent (primary bonding)
4. 4 Adhesion For proper adhesion to occur, intimate contact between the adhesive and the substrate is needed. This intimate contact is affected by:
Wettability of the substrate surface
The viscosity of adhesive
The morphology or surface roughness,
5. 5 Factors affecting adhesion Wettability and surface energy
High surface energy low surface energy (solid)
Surface energy: the attraction of atoms to a surface (directed inward). In liquids, it is called surface tension
6. 6 Continue, Viscosity of bonding agent
Interpenetration (formation of hybrid zone)
Micromechanical interlocking
Chemical bonding
7. 7
8. 8 Enamel etching Introduced by Michael Buonocore in 1950s
Etching time: 10-30 seconds (around 15 seconds)
Primary teeth and fluoride treated teeth require more time
Etched enamel looks frosty white when dried
Etching produces a rough surface (pits) into which resin flows and forms resin tags = micromechanical retention
9. 9 Enamel etching Resin tags may penetrate to a depth of 10-20 microns in etched enamel
The depth of penetration depends on:
Etching time
Rinsing time
These two actors determine how effective etching was, and how well debris were removed from enamel surface
10. 10 Enamel etching Liquid or gel (the gel is made by adding colloidal silica to the acid) phosphoric acid 30-50% (usually 37%). Concentrations higher than 50% lead to deposition of phosphate monohydrate on surface preventing further dissolutionConcentrations higher than 50% lead to deposition of phosphate monohydrate on surface preventing further dissolution
11. 11 Procedure Acid etch is applied, how ?
Etchant is applied for 15 seconds, or longer as mentioned previously
Rinsing for 20 seconds then drying. Appearance of enamel?
Enamel should be kept clean and contaminant free (saliva, blood, etc)
If contamination occurs? Re-etch.
12. 12 Enamel bonding In the past, etching and bonding involved only enamel. Currently, total etch technique is done, and bonding agents are applied to both enamel and dentine.
Bonding agents used for enamel bonding were made from resin combined with diluents to lower viscosity. (Bis-GMA + TEGDMA)
13. 13 Dentine etching and bonding What makes dentine a challenge when it comes to adhesive bonding:
Dentine is a living tissue (50% HA, 30% collagen, 20% fluid)
Tubular nature of dentine (dentinal fluid)
Branching patterns in tubules, may enhance retention
Smear layer presence
Possible side effects on the pulp
14. 14 Dentine etching 1979 etching was done for dentine as well as enamel using 37% phosphoric acid. Research proved enhanced bonding
Over etching, effects on dentine structure and pulp?
Over etching dentine leads to weaker bond and sensitivity
Over drying should be avoided to prevent collapse of collagen and occluding tubules Exposed collagen will act as a barrier to dentine bonding agent coatingExposed collagen will act as a barrier to dentine bonding agent coating
15. 15 Continue,
Another study showed how resin tags from bonding agents in dentine infiltrated a surface layer of collagen in demineralized dentine to form the HYBRID LAYER
16. 16
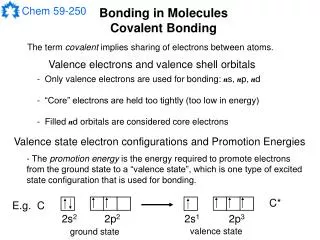
17. 17 Bonding agents Several years ago, it was believed that bonding to dentine can be achieved by chemical bonding between resin and either collagen or mineral content of dentine. Molecules designed for these purposes had the following presentation: M-R-X: M is a methacrylate group, R is a spacer such as hydrocarbon chain (ensure mobility of M group when X is immobilized), an X is a functional group that can bond to calcium in HA (usually an acidic group)
18. 18 Generations of bonding agents First generation (1950s): based on silane coupling agents model. Based on M-R-X model:
M=methacrylate group
R= hydrocarbon group
X= glycerolphosphoric acid dimethacrylate
Success rate was low, due to high polymerization shrinkage and high CTE in unfilled resins used in those time
19. 19 Bonding agents Second generation ( late 60s early 70s): similar concept to first generation agents. Low success rate. Attempts were made to deal with the smear layer
Third generation agents: same as the previous generation, however attempts were made to modify or remove the smear layer which consists of:
20. 20 Bonding agents Smear layer: it is weakly bonded to dentine
Dentine particles
Bacteria
Salivary constituents.
Procedure in 3rd generation agents:
Application of dentine conditioner (HEMA, or 2% nitric acid, or maleic acid)
Application of primer (dentine bonding agent based on M-R-X)
Application of adhesive (unfilled resin)
Placement of resin composite
21. 21 Bonding agents Fourth generation: procedure,
Total etch technique for enamel and dentine, dentine conditioned for 15 seconds.
Rinse and dry but do not over dry to prevent collapse of collagen fibers
Slightly moisten dentine
Absorb excess water with cotton
Apply hydrophilic primer (contains resin that polymerizes within collagen and a solvent that evaporates to ensure drying of tooth surface).
Apply adhesive (bonding resin) then cure
Composite applied and cured
22. 22 Bonding agents Fifth generation agents: fewer steps, better results. Rely on micromechanical retention involving:
Penetration into partially opened dentinal tubules
Formation of hybrid layer (hydrophilic monomer penetrate and polymerize to form interpenetrating network with collagen fibrils
Chemical interactions involving 1st and 2nd order bonds
23. 23 Continue, Self-etching primers
Acidic groups are added to etch tooth surface
No need for rinsing and drying
May not be effective on unprepared enamel
Self priming adhesive: most commonly used now
24. 24 5th generation
25. 25
26. 26 Continue, Sixth generation systems (all-in-one)
27. 27
28. 28
29. 29
30. 30 Microleakage Occurs when the restoration does not completely seal the surrounding margins of the cavity preparation
Possible outcomes of microleakage?
What contributes to microleakage?
31. 31
32. 32 Factors that prevent good bonding
33. 33 Measurements of bond strength Tests used:
Shear bond strength
Tensile bond strength
Data were variable due to variability of tooth surface, and different testing methods
Microtensile and microshear bond strength: less variability.
Current bonding agents shifted the bonding failure from cohesive to adhesive
34. 34 Amalgam bonding Older amalgam restorations leak less due to corrosion products
Technique:
Cavity preparation then isolation
Etching of enamel and dentine to remove smear layer
Primer applied and cured
Self-cure or dual cure bonding resin applied then amalgam is applied
35. 35 Clinical applications of bonding Porcelain bonding and repair involves:
Sandblasting
Special etchant (hydrofluoric acid)
Silane applied for 30 seconds then dried to evaporate solvent (leaving a layer of vinyl that bonds resin to adhesive)
Bonding agent applied
Composite applied
36. 36 Continue, Metal bonding:
PFM
Resin bonded bridges (Maryland)
Lab. And clinical techniques for bonding:
Sandblasting for micromechanical retention
Electrochemical etching or placing a layer of tin by electroplater
Surface cleaned and dried, then coated with bonding resin and cemented
37. 37 Metal bonding continue, For repair of fractured porcelain on a PFM or bridge:
Porcelain and metal are prepared as described previously
Bonding resin applied and cured for 20 seconds
An opaque masking resin applied, cured 20 seconds
Proper shaded composite applied and cured 20 seconds
38. 38 Pit and fissure sealants Filled and unfilled resins
GIC
Success depends on good wetting, intimate contact through etching which will also ensure longevity of the sealant.
PRR: minimal cavity preparation, resin composite placement, sealant placement on top.
39. 39 Thank you Reference,
Philips science of dental materials,
Chapter 14
Dental materials, clinical application for dental assistants and dental hygienists,
Chapter 5