Download

1 / 10
0 likes | 5 Views
The Cricut app is among the best companion programs that help crafters to a great extent. It comes with a large number of features and allows the users to upload images to customize it. The process of uploading is easy, but not everyone knows how to do it.

E N D
Adding new images to Cricut Design Space allows you to personalize and create unique crafts. You can open up more possibilities when you have your own artwork. In addition, you can customize your projects for special occasions or specific needs. Not only does uploading new images elevate personalization, but it also allows you to test out designs before purchasing them. You can craft a variety of stickers and shapes by converting the uploaded images. For advanced crafting projects, you can use vector or raster images. These can be resized without losing quality and separated into layers for more detailed work.
Common Problems When Uploading Images to Cricut When you try to upload images to Design Space, you might encounter the following potential problems: • Internet connection issues • File size limitations • Unsupported items • Complexity of the image • Incorrect file format
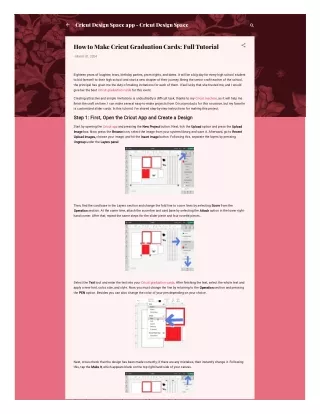
Steps to Upload Images Into Cricut Design Space You can understand how to upload an image to Cricut in a few easy steps. Follow these steps to upload images to the Design Space software: Step 1: Open up Canvas in Cricut Design Space and click Upload on the left panel.
Step 2: Click Upload image, then drag and drop the image. Step 3: Or click Upload Image, click Browse, select the image and open it.
Step 4: You’ll be presented with three image type options: simple, moderately complex, and complex. Step 5: To select the image type, consider the details, color, and contrast between foreground and background.
Step 6: Select the image type and click Continue, and you’ll be presented with a Background Remover screen. Step 7: You can remove the background automatically by clicking Remove Background in the Automatic section.
Step 8: Or remove the background manually; to do this, click Select under Manual, then click the areas you want to remove. Step 9: Once done, click Apply & Continue, select Cut Image, then click Upload.
Bottom Line Enhance your crafting experience with uploaded images. Adhere to the steps mentioned above to upload images to Cricut. Add elements such as logos or handwriting to your crafts and give a personalized touch. If you ever need help on how to upload image on Cricut Design Space, remember that professional help is just a call away.
THANKS FOR VISITING US https://mannymaker.com/ US +1-786-866-5932 UK +44-203-983-0480