Submersible Pump Installation Process
SUBMERSIBLE PUMP INSTALLATION PROCESS By Pump Supplies

Submersible Pump Installation Process
E N D
Presentation Transcript
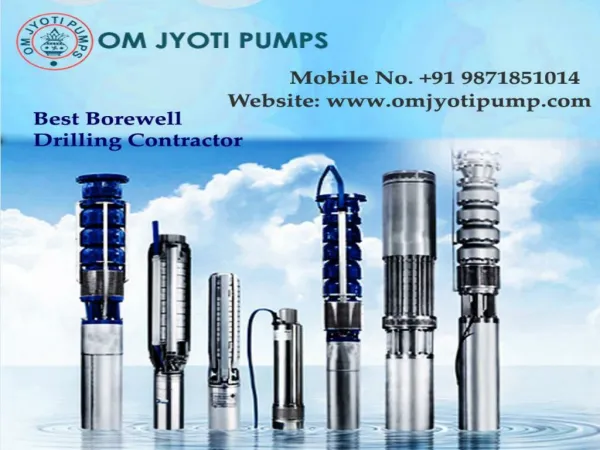
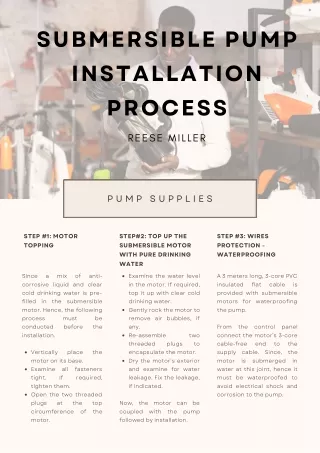
SUBMERSIBLE PUMP INSTALLATION PROCESS REESE MILLER P U M P S U P P L I E S STEP #1: MOTOR TOPPING STEP#2: TOP UP THE SUBMERSIBLE MOTOR WITH PURE DRINKING WATER STEP #3: WIRES PROTECTION - WATERPROOFING Since corrosive liquid and clear cold drinking water is pre- filled in the submersible motor. Hence, the following process conducted installation. a mix of anti- Examine the water level in the motor. If required, top it up with clear cold drinking water. Gently rock the motor to remove air bubbles, if any. Re-assemble threaded encapsulate the motor. Dry the motor’s exterior and examine for water leakage. Fix the leakage, if indicated. A 3 meters long, 3-core PVC insulated flat provided with submersible motors for waterproofing the pump. From the control connect the motor’s 3-core cable-free end supply cable. Since, the motor is submerged water at this joint, hence it must be waterproofed to avoid electrical shock and corrosion to the pump. cable is must before be the panel two to plugs to the Vertically motor on its base. Examine tight. tighten them. Open the two threaded plugs at circumference motor. place the in all If fasteners required, the top the Now, the motor can be coupled with the pump followed by installation. of
STEP#4: CHECK THE VALVES STEP#5: CHECKING MOTOR’S DIRECTION OF ROTATION STEP#6: CHECKING ROTATION For a durable water well that allows water flow in a single direction, checking the valves is important. The valves prevent water flow into the well when the pump is not operational. It eliminates physical stress on the pump. Additionally, the valve ensures proper and immediate water flow in the tank when the motor is switched on. Use the check valve with a brass flap inside, as they durability. Further, they make a little clicking noise but offer higher water flow as compared to the silent, spring- activated valves. The check valve is installed between the water pipe that enters your home and the pressure tank. Subsequently, it is easily accessible for regular checks and replacements. Once the connection joint between the supply cable and submersible motor cable is waterproofed, now check for the motor's rotation direction. Rotate the motor’s shaft to match the direction marked on the cable box top- end. Rotate the shaft in a counter- clockwise direction to suitably fit it. Now, connect the open end of the cable to the control panel, and startup the motor for a few seconds. To remove heat generated by running the motor, pour clean water over the sand guard, continuously. Re-check the connection, if the motor shaft’s rotation doesn’t match the cable box markings, interchange any two lead wires in the control panel, re-check to confirm. The pump and motor should rotate freely, and the properly moves in an upward downward before pump set coupling. shaft and direction initiating offer enhanced STEP#7: COUPLING SUBMERSIBLE MOTOR TO PUMP Erect the tripod with a chain block. Open submersible pump, remove strainer and cable guard. Vertically erect the submersible motor. Use the grub screw to couple the motor/pump shaft. Apply threading mixture to the internal thread of the delivery casing and external area of the short length delivery pipe. Use the screw to fit the delivery casing with a short length of delivery pipe. Lift the shaft when assembled to examine the play. The coupling is mounted on the motor shaft for some products, while for others it’s fixed to the pump shaft by a grub screw. Carefully lower the pump with coupling mounted on the shaft to align it correctly until the bottom of the inlet bracket sits on the top housing. Additionally, the studs on top housing should easily pass through the holes of the inlet bracket. Use hexagonal nuts to screw tightly the motor's top housing with the inlet bracket. Lift the pump shaft with coupling to check the play. Check for free rotation. Re-fit the strainer and cable guard; ensure the cable guard properly covers the cable. At a distance of 20 feet from the Borewell’s bottom, install the pump. Fit the delivery pipe with a supporting clamp. Use the chain block to suspend the submersible pump.
STEP#8: ELECTRICAL INSTALLATION STEP#9: SEALED CONNECTIONS Connect Submersible Motor with a single wire. Ensure the joint is waterproof to prevent electrical shocks. Do not coil the cable length; instead cut the access wire for a safe connection. Consider low voltage when selecting cable size. the Control Panel and Use a propane torch to heat seal the black polyethylene pipe, before using the screw clamps for a durable connection. STEP#10: SAFELY LOWER THE PUMP On the pitless adapter put a T- handle to tie half-inch of poly rope to lug on the pump. Next, tie both ends of the safety rope to the top of the inner well cap, complete the power to the pump wire connections, and finally fasten the outer well cover on the pump. Note: Control Panel The Control panel should contain the following features. Protection against phase failure, over and under voltage. Ammeter and Voltmeter. Dry run preventer. FOR MORE, VISIT- HTTPS://PUMPSUPPLIES.CO.UK/SUBMERSIBLE-PUMP- HIRE/