Download
1 / 2
20 likes | 119 Views
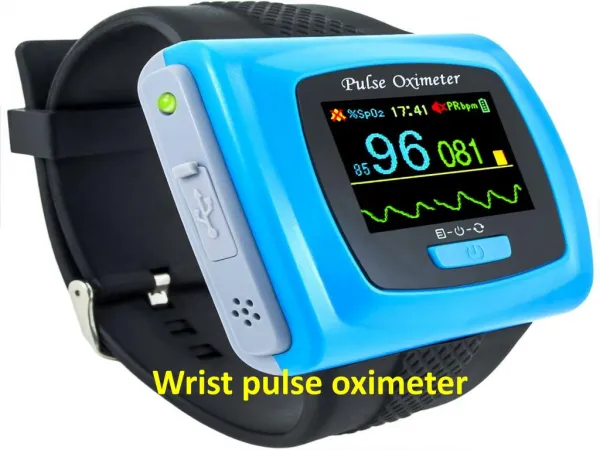
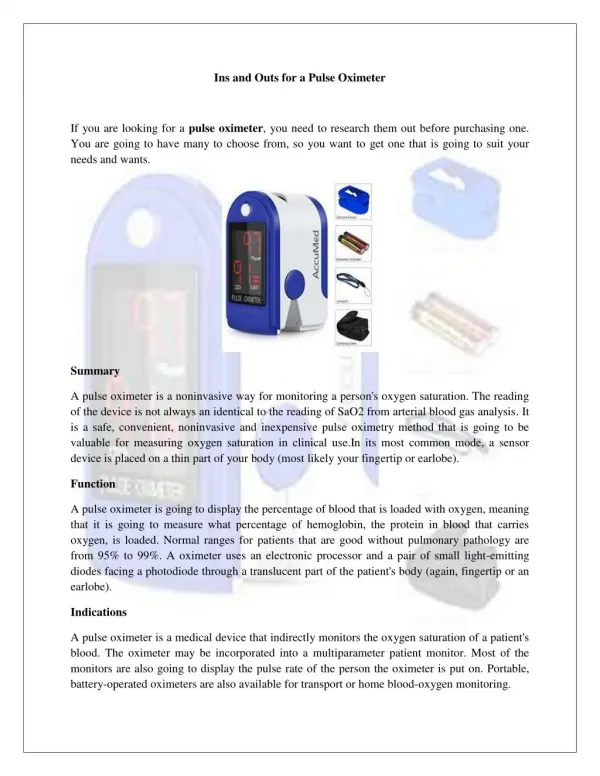
The newly upgraded SantaMedical SM-165 Finger Pulse Oximeter is an affordable and accurate way to check pulse rates and blood oxygen saturation levels. Self-adjusting finger clamp plus simple one-button design allows for easy operation. Small portable size makes it easy to handle and carry. Helpful for athletes and pilots to obtain quick and accurate oxygen saturation readings.TECHNICAL SPECIFICATIONS: Display-->Type : LED, Parameters : SpO2, PR, Pleth bar., Information : low power ::SPO2-->Measure Range : 35-99%, Resolution : ±1%, Accuracy : 75%-99%:±2, 50%-75%:±3, 0%-50%:unspecified::Pulse Rate-->Range : 30-254 BPM, Resolution : ±1bpm, Accuracy : ±2bpm::Battery--> Type : 2 AAA Alkaline batteries or rechargeable, batteries Power Consumption : less than 30Ma, Voltage : 2.6-3.6V::Environmental-->Operating Temperature : 0'C-50'C, Storage Temperature : -10'C - 60'C, Operating Humidity : 15%RH - 95%RH, Storage Humidity : 10%RH - 95%RH, It can be used by a variety of sports enthusiasts, including mountain climbers, hikers, skiers, bikers, and others interested in measuring oxygen saturation and pulse rate, it is not for medical use.

E N D
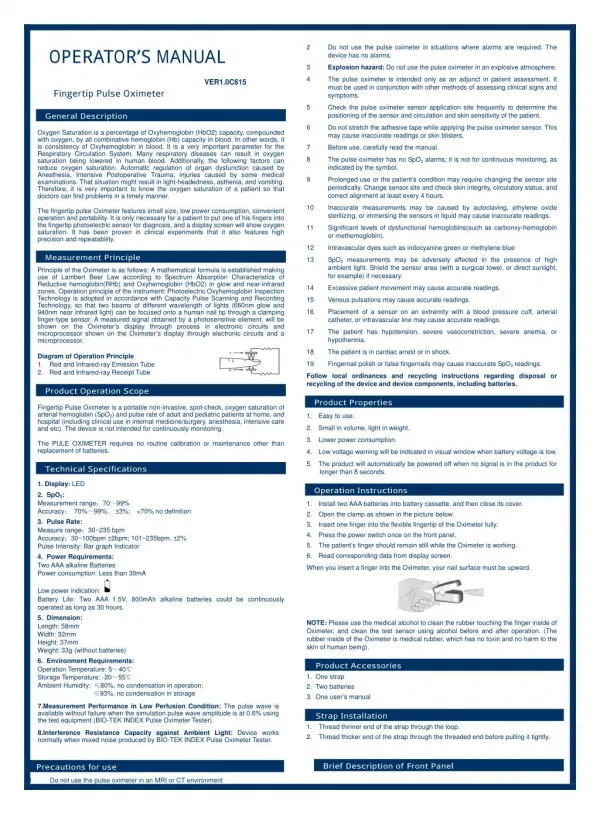
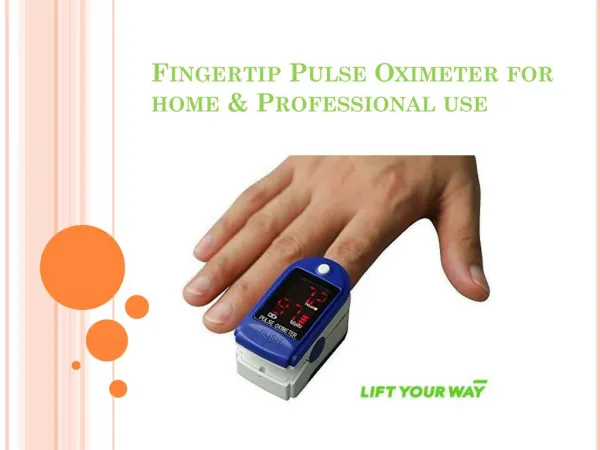
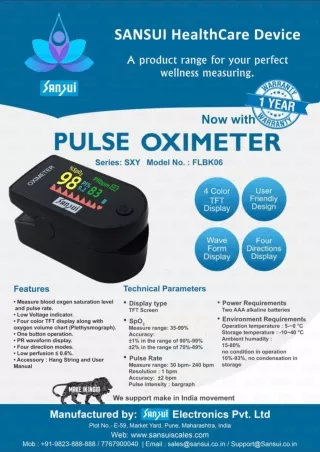
2 Do not use the pulse oximeter in situations where alarms are required. The device has no alarms. OPERATOR’S MANUAL 3 Explosion hazard: Do not use the pulse oximeter in an explosive atmosphere. 4 The pulse oximeter is intended only as an adjunct in patient assessment. It must be used in conjunction with other methods of assessing clinical signs and symptoms. VER1.0C615 Fingertip Pulse Oximeter 5 Check the pulse oximeter sensor application site frequently to determine the positioning of the sensor and circulation and skin sensitivity of the patient. General Desc ription 6 Do not stretch the adhesive tape while applying the pulse oximeter sensor. This may cause inaccurate readings or skin blisters. Oxygen Saturation is a percentage of Oxyhemoglobin (HbO2) capacity, compounded with oxygen, by all combinative hemoglobin (Hb) capacity in blood. In other words, it is consistency of Oxyhemoglobin in blood. It is a very important parameter for the Respiratory Circulation System. Many respiratory diseases can result in oxygen saturation being lowered in human blood. Additionally, the following factors can reduce oxygen saturation: Automatic regulation of organ dysfunction caused by Anesthesia, Intensive Postoperative Trauma, injuries caused by some medical examinations. That situation might result in light-headedness, asthenia, and vomiting. Therefore, it is very important to know the oxygen saturation of a patient so that doctors can find problems in a timely manner. 7 Before use, carefully read the manual. 8 The pulse oximeter has no SpO2 alarms; it is not for continuous monitoring, as indicated by the symbol. 9 Prolonged use or the patient’s condition may require changing the sensor site periodically. Change sensor site and check skin integrity, circulatory status, and correct alignment at least every 4 hours. 10 Inaccurate measurements may be caused by autoclaving, ethylene oxide sterilizing, or immersing the sensors in liquid may cause inaccurate readings. The fingertip pulse Oximeter features small size, low power consumption, convenient operation and portability. It is only necessary for a patient to put one of his fingers into the fingertip photoelectric sensor for diagnosis, and a display screen will show oxygen saturation. It has been proven in clinical experiments that it also features high precision and repeatability. 11 Significant levels of dysfunctional hemoglobins(such as carbonxy-hemoglobin or methemoglobin). 12 Intravascular dyes such as indocyanine green or methylene blue Measurement Princ iple 13 SpO2 measurements may be adversely affected in the presence of high ambient light. Shield the sensor area (with a surgical towel, or direct sunlight, for example) if necessary. Principle of the Oximeter is as follows: A mathematical formula is established making use of Lambert Beer Law according to Spectrum Absorption Characteristics of Reductive hemoglobin(RHb) and Oxyhemoglobin (HbO2) in glow and near-infrared zones. Operation principle of the instrument: Photoelectric Oxyhemoglobin Inspection Technology is adopted in accordance with Capacity Pulse Scanning and Recording Technology, so that two beams of different wavelength of lights (660nm glow and 940nm near infrared light) can be focused onto a human nail tip through a clamping finger-type sensor. A measured signal obtained by a photosensitive element, will be shown on the Oximeter’s display through process in electronic circuits and microprocessor shown on the Oximeter’s display through electronic circuits and a microprocessor. 14 Excessive patient movement may cause accurate readings. 15 Venous pulsations may cause accurate readings. 16 Placement of a sensor on an extremity with a blood pressure cuff, arterial catheter, or intravascular line may cause accurate readings. 17 The patient has hypotension, severe vasoconstriction, severe anemia, or hypothermia. 18 The patient is in cardiac arrest or in shock. Diagram of Operation Principle 1. Red and Infrared-ray Emission Tube 2. Red and Infrared-ray Receipt Tube 19 Fingernail polish or false fingernails may cause inaccurate SpO2 readings. Follow local ordinances and recycling instructions regarding disposal or recycling of the device and device components, including batteries. Produc t Operation S c ope Produc t Properties Fingertip Pulse Oximeter is a portable non-invasive, spot-check, oxygen saturation of arterial hemoglobin (SpO2) and pulse rate of adult and pediatric patients at home, and hospital (including clinical use in internal medicine/surgery, anesthesia, intensive care and etc). The device is not intended for continuously monitoring. 1. Easy to use. 2. Small in volume, light in weight. 3. Lower power consumption. The PULE OXIMETER requires no routine calibration or maintenance other than replacement of batteries. 4. Low voltage warning will be indicated in visual window when battery voltage is low. 5. The product will automatically be powered off when no signal is in the product for longer than 8 seconds. Technic al S pec ific ations 1. Display: LED 2. SpO2: Measurement range:70~99% Accuracy: 70%~99%, ±3%; <70% no definition 3. Pulse Rate: Measure range:30~235 bpm Accuracy:30~100bpm ±2bpm; 101~235bpm, ±2% Pulse Intensity: Bar graph Indicator 4. Power Requirements: Two AAA alkaline Batteries Power consumption: Less than 30mA Operation Instruc tions 1. Install two AAA batteries into battery cassette, and then close its cover. 2. Open the clamp as shown in the picture below. 3. Insert one finger into the flexible fingertip of the Oximeter fully. 4. Press the power switch once on the front panel. 5. The patient’s finger should remain still while the Oximeter is working. 6. Read corresponding data from display screen. When you insert a finger into the Oximeter, your nail surface must be upward. Low power indication: Battery Life: Two AAA 1.5V, 800mAh alkaline batteries could be continuously operated as long as 30 hours. 5. Dimension: Length: 58mm Width: 32mm Height: 37mm Weight: 33g (without batteries) 6. Environment Requirements: Operation Temperature: 5~40℃ Storage Temperature: -20~55℃ Ambient Humidity: ≤80%, no condensation in operation; ≤93%, no condensation in storage NOTE: Please use the medical alcohol to clean the rubber touching the finger inside of Oximeter, and clean the test sensor using alcohol before and after operation. (The rubber inside of the Oximeter is medical rubber, which has no toxin and no harm to the skin of human being). Produc t Ac c essories 1. One strap 2. Two batteries 3. One user’s manual 7.Measurement Performance in Low Perfusion Condition: The pulse wave is available without failure when the simulation pulse wave amplitude is at 0.6% using the test equipment (BIO-TEK INDEX Pulse Oximeter Tester). Strap Installation 1. Thread thinner end of the strap through the loop. 2. Thread thicker end of the strap through the threaded end before pulling it tightly. 8.Interference Resistance Capacity against Ambient Light: Device works normally when mixed noise produced by BIO-TEK INDEX Pulse Oximeter Tester. Prec autions for use Brief Desc ription of Front Panel 1 Do not use the pulse oximeter in an MRI or CT environment
SpO2 or PR can not be shown normally 1.Finger is not plugged correctly 1. Retry by plugging the finger. 2.Patient’s Oxyhemoglobin value is too low to be measured. 2. Try some more times, If you can make sure about no problem existing in the product. Please go to a hospital for exact diagnosis. SpO2 or PR is shown unstably 1.Finger might not be plugged deeply enough. 1.Retry by plugging the finger. 2.Try not to move. 2.Finger is trembling or patient’s body is in movement status. The Pulse Bar graph displays the strength of the pulse rate signal. The height of the bar graph shows the patient’s pulse strength. The can powered on Oximeter not 1.Power inadequate or not be there at all. of batteries might be 1.Please replace batteries be 2.Please reinstall the batteries 2.Batteries incorrectly. might be installed Battery Installation 3.Please contact with local customer service centre. 1. Put the two AAA batteries into battery cassette in correct polarities. 3.The Oximeter might be damaged. 2. Press the button down along the arrow and push the battery cover shown as below: Indication lamps are suddenly off 1.The powered off when no signal is detected longer than 8 seconds product is automatically 1.Normal 2.Replace the batteries Notes: 2. Lower power ? Battery polarities must be correctly installed to avoid damage to the device. “Error3”or “Error4” displayed screen. 1 Low power 1 Change new batteries. is on 2 Receiving tube being shielded or damaged together connector. 2 Please contact with local customer service center. with broken ? Please insert or remove batteries in right order, or may cause damage to the device bracket. 3 Please contact with local customer service center. 3.Mechanical receive-emission tube malfunction for ? Please remove batteries if the Oximeter will not be used for a long time. 4 Please contact with local customer service center. 4 Amp circuit malfunction. S ymbol Definitions Maintenanc e and S torage 1. Replace batteries in time when low voltage lamp is lighted. Symbol Definition 2. Clean surface of the fingertip Oximeter before it is used in diagnosis for patients. Type BF applied part 3. Remove batteries inside the battery cassette if the Oximeter will not be operated for a long time. Attention, consult accompanying documents. 4. It is best to preserve the product in a place where ambient temperature –20~55 ℃and humidity is <93%, no condensation. SpO2﹪ ﹪ Oxygen saturation 5. It is recommended that the product should be kept in a dry environment anytime. A wet ambient might affect its lifetime and even might damage the product. Pulse rate (BPM) 6. Please follow the law of the local government to deal with used batteries. Low power indication Calibrating the Oximeter NOT for continuous monitoring 1. The functional tester cannot be used to assess the accuracy of the oximeter. S N Serial No. 2. The test method used to establish the SpO2 accuracy is clinical testing. The oximeter used to measure the arterial haemoglobin oxygen saturation levels and these levels are to be compared to the levels determined from arterial blood sampling with a CO-oximeter. Applic able models SM-210 SM-220 3. Index 2 that made by Bioteck company is a function tester. Set Tech to 1, R curve to 2, and then users can use this particular calibration curve to measure the oximeter. Note: The illustrations used in this manual may differ slightly from the appearance of the actual product. Declaration EMC of this product complies with IEC60601-1-2 standard. The materials which the user can come into contact have no toxicity and no action on tissues, comply with ISO10993-1, ISO10993-5 and ISO10993-10. Guidance and manufacture’s declaration – electromagnetic emissions-for all EQUIPMENT and SYSTEMS Guidance and manufacture’s declaration – electromagnetic emission The Pulse Oximeter is intended for use in the electromagnetic environment specified below. The customer or the user of the Pulse Oximeter should assure that it is used in such and environment. Emission test Compliance Electromagnetic environment – guidance RF emissions CISPR 11 Group 1 The Pulse Oximeter uses RF energy only for its internal function. Therefore, its RF emissions are very low and are not likely to cause any interference in nearby electronic equipment. RF emission CISPR 11 Class B :IRoams Network Manufactured for: The Pulse Oximeter is suitable for use in all establishments, including domestic establishments and those directly connected to the public low-voltage power supply network that supplies buildings used for domestic purposes. :713 W. Duarte Rd #G810 Add: Arcadia, CA 91007 USA ALL RIGHTS RESERVED Issue date: 2011-2-18 Possible Problems and resolutions Problems Possible reason Solution