Download
1 / 3
30 likes | 51 Views
Home focuses and car retailers offer limit packs comprising of an elastic edge strip and paste (in addition to here and there a caulking firearm). Basically stick the flood barriers or another barriers for all time to the garage floor so the entryway lays on it when shut. @

E N D
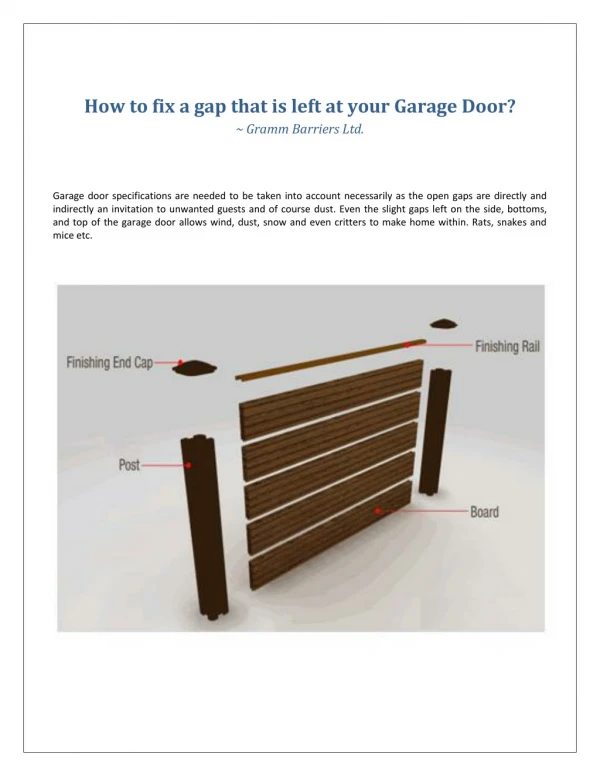
How to fix a gap that is left at your Garage Door? ~ Gramm Barriers Ltd. Garage door specifications are needed to be taken into account necessarily as the open gaps are directly and indirectly an invitation to unwanted guests and of course dust. Even the slight gaps left on the side, bottoms, and top of the garage door allows wind, dust, snow and even critters to make home within. Rats, snakes and mice etc.
Can anytime and anyhow enter the smallest of spaces easily. Apart from all this, a person simply do not like the gaps as they quickly lose the appeal of the entire exterior and the efforts that have been there in the making. Well on the contrary, eliminating door gaps is easier and just needs to appoint a pro in fixing varied barriers including flood barriers if needed. How to fix the gaps along sides and top of the door? Consider the stops: Take a look at the door stops and the strips of the trims that runs alongside the door’s sides and tip covering the edges of the door either using flexible flap or flange. If you find them in an inefficient working condition, then you probably need to be moved more closer or replaced. Check tracks: Your door might look appealing at first instance but in real it is not perfectly closed or fixed. Keep a check on the vertical sections as they must hold the door at a consistent distance from the sides. If not settled perfectly, loosen the mounted bolts and nudge the tracks a bit. How to fix the gaps along the bottom of the door? Supplant the seal. The seal itself might be the guilty party, because of age and ordinary wear and tear. DIY substitution is genuinely simple. Buy a seal substitution unit from your garage entryway maker or found online through a legitimate provider. Establishment, which shifts by producer, might be as basic as driving screws through pre-configured openings or more mind boggling, expecting you to encourage the garage entryway seals along a channel or track. On the off chance that you have the sliding assortment, producers will frequently prescribe a unique ointment to influence the activity to go all the more easily. Adjust for settling In either the garage's encircling or the garage floor, or both. On the off chance that the entryway is wood and the hole isn't extreme, trim the way to pursue the floor. Set a compass to coordinate the largest piece of the garage entryway hole, at that point drag the compass along the floor, utilizing its pencil end to check a cut line along the base entryway board (or substitute a wood square and craftsman's pencil). Cut the entryway with a jigsaw (most secure for tenderfoots) or a roundabout saw (for cutting edge DIY mortgage holders), at that point sand and resurface the cut end before including new weatherstripping. Supplant the weatherstripping. For metal entryways, supplant the weatherstripping to settle gapping along the floor, utilizing one of two unique sorts. The first is a globule seal, similar to an extremely shaky garden hose with a T-molded spine along its best. The spine slides into a solitary depression in the base edge of the entryway board. The second is U-formed with two best edges that slide into two diverts in the entryway. Ensure the weatherstripping is tall enough to cover your garage entryway hole: for globule type stripping, pick the biggest width you can discover; for U-formed, pick the most stretched out (allotted when laid level).
Add more concrete to the floor. It's normal for solid garage floors to move or drop subsequent to being poured. This can be troublesome since solid chunks only from time to time move in even or parallel ways. Add a layer of cement to give a level, level surface for the garage entryway seals to lay on. Introduce a barrier. Home focuses and car retailers offer limit packs comprising of an elastic edge strip and paste (in addition to here and there a caulking firearm). Basically stick the flood barriers or another barriers for all time to the garage floor so the entryway lays on it when shut. Preferred standpoint: disposes of a garage entryway hole and protects flood water from streaming in if your garage inclines toward the garage. Drawback: makes a slight hindrance against clearing or hosing stuff out of the garage. Call a professional. Call an expert for garage entryway modification if the entryway is out of level - or for substitution if the base board is drooping. Source Page : https://bit.ly/2QkBQTh