Download
1 / 9
0 likes | 14 Views
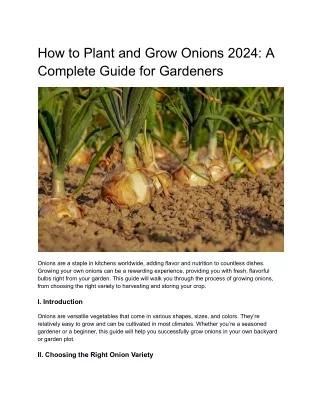
Onions are a staple in kitchens worldwide, adding flavor and nutrition to countless dishes. Growing your own onions can be a rewarding experience, providing you with fresh, flavorful bulbs right from your garden. This guide will walk you through the process of growing onions, from choosing the right variety to harvesting and storing your crop.<br>

E N D
How to Plant and Grow Onions 2024: A Complete Guide for Gardeners Onions are a staple in kitchens worldwide, adding flavor and nutrition to countless dishes. Growing your own onions can be a rewarding experience, providing you with fresh, flavorful bulbs right from your garden. This guide will walk you through the process of growing onions, from choosing the right variety to harvesting and storing your crop. I. Introduction Onions are versatile vegetables that come in various shapes, sizes, and colors. They’re relatively easy to grow and can be cultivated in most climates. Whether you’re a seasoned gardener or a beginner, this guide will help you successfully grow onions in your own backyard or garden plot. II. Choosing the Right Onion Variety
Before you start planting, it’s important to choose the right onion variety for your climate and growing conditions. Onions are typically categorized into three types based on the daylight hours they need to form bulbs: 1. Long-day onions: These varieties need 14–16 hours of daylight to form bulbs and are best suited for northern regions. 2. Short-day onions: These onions require 10–12 hours of daylight and are ideal for southern regions. 3. Day-neutral onions: Also known as intermediate-day onions, these varieties can be grown in most regions as they form bulbs regardless of day length. Some popular onion varieties include: ● ● ● Yellow onions: Sweet Spanish, Walla Walla, Vidalia Red onions: Red Burgundy, Red Creole, Red Baron White onions: White Sweet Spanish, Southport White Globe Consider your local climate, cooking preferences, and storage needs when selecting onion varieties for your garden. III. Preparing the Soil Onions thrive in well-draining, fertile soil with a pH between 6.0 and 6.8. Follow these steps to prepare your soil for onion planting: 1. Choose a sunny location: Onions need full sun to grow properly, so select a spot that receives at least 6–8 hours of direct sunlight daily. 2. Test your soil: Use a soil testing kit to determine the pH and nutrient levels of your soil. Adjust the pH if necessary by adding lime to raise it or sulfur to lower it. 3. Loosen the soil: Use a garden fork or tiller to loosen the soil to a depth of 12–15 inches. This will improve drainage and allow onion roots to grow easily. 4. Remove debris: Clear the area of rocks, weeds, and other debris that might hinder onion growth. 5. Amend the soil: Mix in 2–4 inches of well-rotted compost or aged manure to improve soil structure and fertility. This will provide essential nutrients for your onions. 6. Level the soil: Rake the area smooth to create an even planting surface. IV. Planting Onions Planting onions correctly is a critical step in ensuring a successful harvest. Let’s dive deeper into the three main methods of planting onions: A. From Seeds
Starting onions from seeds offers the widest variety of options and can be the most economical method, though it requires more time and patience. 1. Timing: Start seeds indoors 8–10 weeks before the last expected frost date in your area. This gives seedlings enough time to develop before transplanting outdoors. 2. Seed starting mix: Use a sterile, well-draining seed starting mix to prevent damping-off disease and provide optimal growing conditions. 3. Sowing technique: Sow seeds 1/4 inch deep and 1/2 inch apart in rows or cells. You can sow multiple seeds per cell and thin them later. 4. Germination conditions: Keep the soil consistently moist but not waterlogged. Maintain a temperature between 60–70°F (15–21°C) for optimal germination. 5. Light requirements: Once seedlings emerge, provide 14–16 hours of light daily. Use grow lights if necessary to prevent leggy growth. 6. Seedling care: When seedlings reach 2–3 inches tall, trim them to 1 inch to encourage stronger growth. Repeat this process every few weeks. 7. Hardening off: About a week before transplanting, start exposing seedlings to outdoor conditions gradually to acclimate them. 8. Transplanting: When seedlings are 4–5 inches tall and outdoor temperatures are suitable, transplant them to the garden, spacing them 4–6 inches apart in rows 12–18 inches apart. B. From Sets
Onion sets are small, immature bulbs that offer a quicker and easier way to grow onions, especially in regions with shorter growing seasons. 1. Selecting sets: Choose firm, disease-free sets about the size of a marble. Avoid larger sets as they’re more likely to bolt (produce flowers) rather than form bulbs. 2. Timing: Plant sets in early spring as soon as the soil can be worked, usually 2–4 weeks before the last expected frost date. 3. Soil preparation: Ensure the soil is well-drained and rich in organic matter. Work in compost or well-rotted manure before planting. 4. Planting depth: Create furrows 1–2 inches deep. In heavier soils, plant sets more shallowly to prevent rotting. 5. Spacing: Place sets 4–6 inches apart in rows 12–18 inches apart. For green onions, you can plant them closer together. 6. Orientation: Plant sets with the pointed end facing up. This helps them emerge from the soil more easily. 7. Covering: Gently cover the sets with soil, leaving just the tip exposed. Firm the soil around them to eliminate air pockets. 8. Watering: Water thoroughly after planting to settle the soil around the sets. C. From Transplants Transplants are young onion plants started from seed by commercial growers. They offer a balance between the variety of seeds and the ease of sets. 1. Choosing transplants: Select healthy, green plants about the thickness of a pencil. Avoid any with yellowing or damaged leaves. 2. Timing: Plant transplants in early spring, typically 4–6 weeks before the last expected frost date. 3. Soil preparation: As with sets, ensure the soil is well-prepared, loose, and enriched with organic matter. 4. Planting depth: Dig holes 2–3 inches deep, or deep enough to accommodate the roots without bending them. 5. Spacing: Plant transplants 4–6 inches apart in rows 12–18 inches apart. 6. Root care: Gently separate the roots if they’re tangled, and spread them out in the planting hole. 7. Soil firming: After placing the transplant, fill in with soil and gently firm it around the plant to eliminate air pockets. 8. Watering: Water thoroughly after planting to help settle the soil and reduce transplant shock. 9. Fertilizing: Apply a balanced, water-soluble fertilizer about a week after planting to give transplants a good start. V. Caring for Your Onion Plants
Proper care is essential for growing healthy, flavorful onions. Let’s explore the key aspects of onion plant care in more detail: A. Watering Consistent moisture is crucial for onion growth, but overwatering can lead to problems. Here’s how to get it right: 1. Watering frequency: In general, provide about 1 inch of water per week, either from rainfall or irrigation. However, adjust based on your climate and soil type. 2. Soil moisture check: Before watering, check the soil moisture by sticking your finger about an inch into the soil. If it feels dry at this depth, it’s time to water. 3. Watering technique: Use drip irrigation or soaker hoses to deliver water directly to the soil, avoiding wetting the foliage. This helps prevent fungal diseases. 4. Morning watering: If possible, water in the morning. This allows foliage to dry during the day, reducing disease risk. 5. Mulching: Apply a 2–3 inch layer of organic mulch around plants to help retain soil moisture and suppress weeds. Keep mulch away from the plant stems to prevent rot. 6. Adjusting for growth stages: Increase watering during the bulb formation stage, typically when daylight hours are longest. Reduce watering as bulbs mature and tops begin to fall over. 7. Watering during dry spells: In periods of drought or extreme heat, you may need to water more frequently. Look for signs of stress such as wilting or yellowing leaves. B. Fertilizing Onions are heavy feeders and benefit from regular fertilization throughout their growing season. 1. Initial fertilization: Before planting, incorporate a balanced, all-purpose fertilizer (10–10–10) into the soil according to package instructions. 2. Nitrogen focus: Once plants are established, switch to a nitrogen-rich fertilizer. Nitrogen promotes leaf growth, which is crucial for onion bulb development. 3. Side-dressing schedule: Apply a side-dressing of nitrogen-rich fertilizer every 3–4 weeks during the growing season. Use about 1/2 cup per 10 feet of row. 4. Application method: Spread the fertilizer in a band about 4 inches from the plant bases and water it in thoroughly. 5. Organic options: If you prefer organic methods, use composted manure, blood meal, or fish emulsion as nitrogen sources. 6. Foliar feeding: For an extra boost, you can apply a diluted fish emulsion or seaweed extract as a foliar spray every 2–3 weeks. 7. Timing: Stop fertilizing when bulbs begin to push the soil away and emerge from the ground, typically about 4 weeks before harvest.
C. Weeding Keeping your onion patch free from weeds is crucial as onions don’t compete well with other plants. 1. Regular inspection: Check your onion bed at least once a week for emerging weeds. 2. Hand weeding: For small areas, hand-pulling weeds is the safest method to avoid damaging onion roots. 3. Shallow cultivation: If using a hoe or other tool, cultivate shallowly to avoid disturbing onion roots, which are close to the surface. 4. Mulching: Apply organic mulch around plants to suppress weed growth. Straw, grass clippings, or shredded leaves work well. 5. Timing: Weed when the soil is slightly moist but not wet to make the task easier and minimize soil disturbance. 6. Weed identification: Learn to identify onion seedlings to avoid accidentally removing them while weeding. 7. Avoid herbicides: Chemical weed killers can harm onion plants, so it’s best to avoid them in your onion patch. VI. Managing Pests and Diseases
While onions are relatively pest-resistant, they can still face some challenges. Here are common issues and how to address them: Pests: 1. Onion maggots: Rotate crops and use row covers to prevent infestations. 2. Thrips: Spray plants with insecticidal soap or neem oil. 3. Cutworms: Place cardboard collars around seedlings to protect them. Diseases: 1. Downy mildew: Improve air circulation and avoid overhead watering. 2. Botrytis leaf blight: Remove infected leaves and ensure proper spacing between plants. 3. Fusarium basal rot: Plant resistant varieties and practice crop rotation. VII. Harvesting Onions Knowing when and how to harvest your onions is crucial for getting the best flavor and storage life. 1. Look for signs of maturity: The tops of the onions will begin to yellow and fall over when they’re ready to harvest. 2. Stop watering when about half of the tops have fallen over. 3. Allow the soil to dry out for a few days before harvesting. 4. Gently pull or dig up the onions on a dry, sunny day. 5. Shake off excess soil but don’t wash the onions.
VIII. Storing Onions Proper storage can help your onions last for several months. 1. Cure onions by spreading them out in a single layer in a warm, dry, well-ventilated area for 7–14 days. 2. Once the outer skins are papery and the necks are completely dry, trim the roots and cut the tops to 1 inch above the bulb. 3. Store cured onions in a cool (32–40°F), dry place with good air circulation. 4. Use mesh bags or open crates to allow air movement around the onions. 5. Check stored onions regularly and remove any that show signs of spoilage. IX. Tips for Success Here are some additional tips to help you grow the best onions possible: 1. Practice crop rotation to prevent soil depletion and reduce disease risk. 2. Companion plant onions with carrots, beets, or lettuce to maximize garden space. 3. Avoid planting onions near peas or beans, as they can stunt each other’s growth. 4. Keep onion beds weed-free to reduce competition for nutrients and water. 5. Use drip irrigation or soaker hoses to provide consistent moisture without wetting foliage. 6. Harvest green onions (scallions) when they reach 6–8 inches tall for a quick crop.
7. Save your largest, best-quality onions for seed production if you want to try saving seeds. X. Conclusion Growing onions can be a satisfying and rewarding experience for any gardener. With the right variety selection, proper soil preparation, and consistent care, you can enjoy a bountiful harvest of flavorful onions. Whether you’re growing them for fresh eating, cooking, or long-term storage, homegrown onions are sure to add a special touch to your culinary creations. Remember that gardening is a learning process, and each growing season brings new experiences and insights. Don’t be discouraged if your first attempt isn’t perfect — keep experimenting with different varieties and techniques to find what works best in your garden. By following the steps and tips outlined in this guide, you’ll be well on your way to growing delicious, homegrown onions that will elevate your meals and impress your friends and family. Happy gardening, and enjoy the fruits (or rather, bulbs) of your labor! <<Ready to take your gardening to the next level? Start your journey with the Medicinal Garden Kit, perfect for growing your own healing herbs>>