Download
1 / 9
0 likes | 12 Views
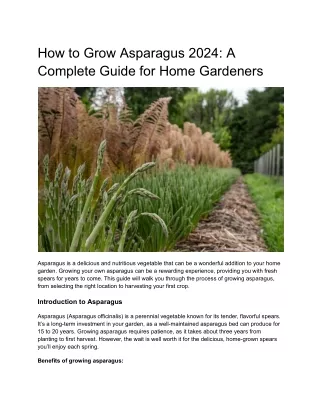
Asparagus is a delicious and nutritious vegetable that can be a wonderful addition to your home garden. Growing your own asparagus can be a rewarding experience, providing you with fresh spears for years to come. This guide will walk you through the process of growing asparagus, from selecting the right location to harvesting your first crop.<br>

E N D
How to Grow Asparagus 2024: A Complete Guide for Home Gardeners Asparagus is a delicious and nutritious vegetable that can be a wonderful addition to your home garden. Growing your own asparagus can be a rewarding experience, providing you with fresh spears for years to come. This guide will walk you through the process of growing asparagus, from selecting the right location to harvesting your first crop. Introduction to Asparagus Asparagus (Asparagus officinalis) is a perennial vegetable known for its tender, flavorful spears. It’s a long-term investment in your garden, as a well-maintained asparagus bed can produce for 15 to 20 years. Growing asparagus requires patience, as it takes about three years from planting to first harvest. However, the wait is well worth it for the delicious, home-grown spears you’ll enjoy each spring. Benefits of growing asparagus:
● ● ● ● Fresh, high-quality produce Long-term crop with minimal maintenance once established Nutrient-rich vegetable high in vitamins and minerals Attractive foliage that can serve as an ornamental plant Choosing the Right Location Selecting the perfect spot for your asparagus bed is crucial for long-term success. Consider the following factors: Soil Requirements: Asparagus thrives in well-draining, fertile soil. The ideal soil pH for asparagus is between 6.5 and 7.0. Sandy loam or loamy soil types are best for asparagus growth. Heavy clay soils can lead to poor drainage and root rot, so avoid these if possible. Sunlight Needs: Asparagus plants require full sun to produce healthy, vigorous spears. Choose a location that receives at least 6 to 8 hours of direct sunlight daily. Insufficient sunlight can result in weak, spindly growth and reduced yields. Climate Considerations: Asparagus is hardy in USDA zones 3–8. It requires a period of winter dormancy to produce well in the spring. In warmer climates, choose varieties that are better suited to mild winters. Avoid planting in low-lying areas where frost can settle, as late spring frosts can damage emerging spears. Preparing the Soil Proper soil preparation is the foundation for a thriving asparagus bed. Since asparagus plants can produce for up to two decades, investing time and effort in soil preparation will pay off in the long run. Testing Soil pH: Start by testing your soil pH. Asparagus prefers slightly acidic to neutral soil with a pH between 6.5 and 7.0. You can test your soil using a home testing kit available at most garden centers, or send a sample to your local cooperative extension office for a more detailed analysis. If your soil pH is below 6.5, add lime to raise it. For every 0.1 increase in pH needed, apply about 4 pounds of lime per 100 square feet. If the pH is above 7.0, add sulfur to lower it. Apply 1 pound of sulfur per 100 square feet to lower the pH by about 0.5 units. Always follow the recommendations based on your specific test results. Amending the Soil: Asparagus plants are heavy feeders and thrive in rich, organic soil. Here’s how to amend your soil effectively: 1. Remove any existing vegetation and weeds from the planting area. 2. Dig the soil to a depth of 12 to 15 inches, breaking up any large clumps. 3. Spread a 2 to 3-inch layer of well-rotted compost or aged manure over the entire bed. 4. Work the organic matter into the soil thoroughly, ensuring it’s evenly distributed. 5. Add a balanced fertilizer (such as 10–10–10) at a rate of 2 pounds per 100 square feet.
6. If your soil is sandy, consider adding some clay or loam to improve water retention. 7. For heavy clay soils, add coarse sand or perlite to improve drainage. Creating Raised Beds (Optional): Raised beds can be an excellent option for growing asparagus, especially if you have heavy or poorly draining soil. Here’s how to create a raised bed for asparagus: 1. Choose a location that receives full sun and has good drainage. 2. Build beds that are at least 12 inches high and 3 to 4 feet wide. You can use materials like cedar boards, concrete blocks, or landscaping timbers. 3. Line the bottom of the bed with hardware cloth if you have issues with burrowing pests. 4. Fill the bed with a mixture of 1/3 high-quality topsoil, 1/3 compost, and 1/3 well-rotted manure. 5. Add a slow-release balanced fertilizer to the mix before planting. Raised beds offer several advantages for asparagus: ● ● ● ● Better drainage, which prevents root rot Soil warms up faster in spring, promoting earlier growth Easier to maintain and harvest Can be filled with ideal soil mix from the start Remember, thorough soil preparation sets the stage for healthy, productive asparagus plants that will reward you with bountiful harvests for years to come.
Selecting Asparagus Varieties Choosing the right asparagus variety can make a big difference in your growing success. Consider these options: Popular Varieties: ● ● ● ● ● Jersey Knight: All-male hybrid, disease-resistant, and high-yielding Mary Washington: Heirloom variety, good flavor, and disease-resistant Purple Passion: Purple spears with a sweeter, nuttier flavor Apollo: All-male hybrid, tolerant of fusarium wilt Atlas: High-yielding, suitable for warmer climates Male vs. Female Plants: Many gardeners prefer all-male hybrid varieties. Male plants produce more spears because they don’t expend energy producing seeds. Female plants produce seeds that can self-sow, potentially leading to overcrowding. However, some gardeners enjoy the ornamental red berries produced by female plants in the fall. Planting Asparagus Proper planting techniques are crucial for establishing a healthy asparagus bed. Follow these guidelines:
When to Plant: Plant asparagus crowns in early spring as soon as the soil can be worked. In warmer climates, fall planting may be possible. Avoid planting in waterlogged soil or during periods of frost. How to Plant Crowns: 1. Dig a trench 12 inches wide and 6 to 8 inches deep. 2. Create a small mound of soil in the center of the trench. 3. Place the crown on top of the mound, spreading the roots out evenly. 4. Cover the crown with 2 inches of soil. 5. As the plants grow, gradually fill in the trench with soil. Spacing and Depth: Space crowns 12 to 18 inches apart in rows that are 3 to 4 feet apart. This allows plenty of room for the plants to mature and makes maintenance easier. By the end of the growing season, the crowns should be about 6 inches below the soil surface. Caring for Young Asparagus Plants Proper care during the first few years is critical for establishing a productive asparagus bed. Focus on these key aspects: Watering: Keep the soil consistently moist but not waterlogged. Young asparagus plants need about 1 to 2 inches of water per week. Water deeply to encourage deep root growth. Mulching can help retain moisture and suppress weeds. Fertilizing: In the first year, apply a balanced fertilizer (10–10–10) about 4 weeks after planting. In subsequent years, fertilize in early spring before growth begins and again after the harvest period. Avoid over-fertilizing, as this can lead to weak, spindly growth. Weed Control: Asparagus doesn’t compete well with weeds, so keep the bed weed-free. Hand-pull weeds carefully to avoid disturbing the shallow roots. Apply a thick layer of organic mulch to suppress weed growth and retain moisture.
Maintaining Established Asparagus Beds Once your asparagus bed is established, it requires relatively little maintenance. Follow these tips for long-term care: Annual Care Routine: ● ● ● ● In early spring, remove any dead foliage from the previous year. Apply a layer of compost and a balanced fertilizer before new growth emerges. After harvest, allow the ferns to grow and develop fully. In late fall, cut back the yellowed ferns to ground level. Mulching: Apply a 2 to 3-inch layer of organic mulch around the plants each spring. This helps retain moisture, suppress weeds, and add nutrients to the soil as it breaks down. Use materials like straw, shredded leaves, or well-rotted compost. Pest and Disease Management: Monitor your plants regularly for signs of pests or diseases. Common issues include asparagus beetles, fusarium wilt, and asparagus rust. Practice good garden hygiene, remove affected plants promptly, and consider using organic pest control methods when necessary. Harvesting Asparagus
Harvesting asparagus correctly is crucial for maintaining plant health and ensuring continued production. Here’s an expanded look at the harvesting process: When to Start Harvesting: Patience is key when it comes to harvesting asparagus. Here’s a timeline to follow: ● ● First year: Do not harvest any spears. Allow all growth to develop into ferns. Second year: You may harvest a few spears, but limit yourself to 2–3 per plant over a two-week period. Third year: Harvest lightly for about 3–4 weeks. Fourth year and beyond: You can harvest for 6–8 weeks each spring. ● ● Signs that it’s time to stop harvesting for the season: ● ● ● Spear diameter decreases to less than 3/8 inch (pencil-size) Spear height decreases Spears begin to open quickly into ferns Proper Harvesting Techniques: Harvesting asparagus correctly helps maintain plant health and productivity. 1. Harvest when spears are 6 to 8 inches tall and about as thick as your finger. 2. For green asparagus, cut or snap spears off at ground level when they reach the desired height. 3. For white asparagus (blanched by mounding soil over the crowns), cut the spears about 1–2 inches below the soil surface when the tips begin to emerge. 4. Use a sharp knife or asparagus knife to cut the spears, or snap them off by hand. 5. When snapping, grasp the spear near the base and bend it toward the ground. It will break naturally at the point where it becomes woody. 6. Harvest every other day or so during the season to encourage continued production. 7. Remove any tall, skinny, or woody spears to promote the growth of new spears. Harvesting Frequency: During the peak season, check your asparagus bed daily. In warm weather, spears can grow several inches in a single day. Regular harvesting encourages the plants to produce more spears. Storing and Preserving Asparagus: To maintain freshness and flavor, proper storage is essential: ● ● Fresh asparagus is best eaten within 2–3 days of harvesting. Store unwashed spears in the refrigerator with the cut ends wrapped in a damp paper towel. Place the bundle in a plastic bag and store upright in the refrigerator. ● For longer-term storage, consider these preservation methods:
1. Freezing: Blanch spears for 2–4 minutes, cool in ice water, drain, and freeze in airtight containers. 2. Pickling: Use a vinegar-based pickling solution to preserve spears for several months. 3. Canning: Pressure can asparagus for long-term storage, following safe canning practices. Post-Harvest Care: After the harvest season ends: ● ● ● ● Allow the remaining spears to grow into ferns. These ferns will photosynthesize and provide energy for next year’s crop. In late fall, after the ferns have turned yellow or brown, cut them back to ground level. Apply a layer of compost or well-rotted manure to nourish the plants for the next growing season. By following these harvesting guidelines, you’ll ensure a sustainable and productive asparagus bed that provides delicious spears for many years to come. Troubleshooting Common Issues Even with proper care, asparagus plants can sometimes face challenges. Here are some common issues and how to address them:
Addressing Poor Growth: If your plants are growing slowly or producing thin spears, check soil fertility and pH. Ensure the plants are receiving enough sunlight and water. Consider adding compost or a balanced fertilizer to boost growth. Dealing with Pests: Asparagus beetles are a common pest. Handpick beetles and larvae, or use insecticidal soap for larger infestations. Encourage beneficial insects like ladybugs and lacewings to help control pests naturally. Managing Diseases: Fusarium wilt and asparagus rust can affect asparagus plants. Choose resistant varieties when possible. Ensure good air circulation by proper spacing and avoid overhead watering. Remove and destroy infected plants to prevent spread. Conclusion Growing asparagus requires patience and care, but the reward of fresh, homegrown spears is well worth the effort. By choosing the right location, preparing your soil properly, and providing consistent care, you can enjoy bountiful asparagus harvests for many years to come. Remember, the key to success lies in giving your asparagus plants a strong start and maintaining them with regular attention. Happy gardening, and enjoy your homegrown asparagus! Ready to grow your own asparagus and more? Take your gardening to the next level with our Medicinal Garden Kit!