Download

1 / 11
0 likes | 12 Views
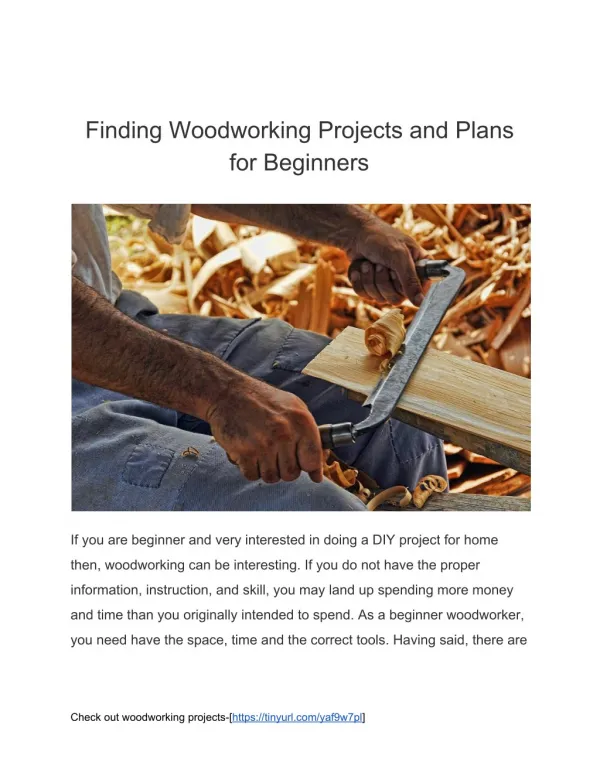
Discover "The Ultimate Guide to DIY Woodworking Projects" designed for everyone, from beginners to seasoned experts! Whether you're just starting out or looking for advanced challenges, this guide offers a range of projects that will elevate your woodworking skills. Build furniture, create decor, and master woodworking techniques with easy-to-follow instructions. Perfect for hobbyists and professionals alike, this guide will inspire your next woodworking adventure. Get creative and bring your ideas to life!

E N D
"The Ultimate Guide to DIY Woodworking Projects: From Beginners to Experts"
Table of Contents 1. How to build a wooden bookshelf 2. Step-by-step guide to building a wooden coffee table 3. Creative ideas for making wooden picture frames 4. Building a wooden plant stand for indoor plants 5. DIY wooden wall art projects 6. Designing and constructing a wooden desk organizer 7. Crafting a wooden wine rack 8. Making a wooden serving tray 9. Building a wooden outdoor bench
Topic: 1. How to build a wooden bookshelf Building a wooden bookshelf can be a fun and rewarding DIY project. To start, you will need to gather your materials including wood planks, screws, a saw, drill, sandpaper, and wood finish. Begin by measuring and cutting the wood planks to the desired dimensions for the shelves and sides of the bookshelf. Make sure to sand down any rough edges to create a smooth surface. Next, assemble the bookshelf by attaching the shelves to the sides using screws. Make sure to pre-drill holes to prevent the wood from splitting. Once the shelves are securely attached, you can add any additional features such as a decorative trim or backing. Finally, finish the bookshelf with a wood finish of your choice to protect the wood and give it a polished look. Your new wooden bookshelf will not only be a practical storage solution but also a beautiful piece of furniture to display your favorite books and decorative items. Start a Profitable Home-Based Woodworking Business >>>
Topic: 2. Step-by-step guide to building a wooden coffee table To start building a wooden coffee table, first decide on the dimensions of the table and gather all the necessary materials and tools such as wood boards, screws, a saw, a drill, and sandpaper. Next, cut the wood boards to the desired lengths for the tabletop, legs, and apron of the table using the saw. Then, assemble the tabletop by attaching the boards together using screws. Once the tabletop is completed, attach the legs to the corners of the tabletop using screws and make sure they are securely fastened. Next, attach the apron to the underside of the tabletop to add stability to the table. Sand down any rough edges and surfaces of the table to create a smooth finish. Finally, apply a wood stain or paint of your choice to protect the wood and give it a polished look. Once the stain or paint has dried, your wooden coffee table is now ready to be used and enjoyed in your home. Start a Profitable Home-Based Woodworking Business >>>
Topic: 3. Creative ideas for making wooden picture frames One creative idea for making wooden picture frames is to incorporate different types of wood for a unique and visually appealing design. For example, combining lighter woods like maple or birch with darker woods like walnut or mahogany can create a striking contrast that adds depth and interest to the frame. Additionally, using wood with different natural grains and patterns can further enhance the overall aesthetic of the frame. Another creative idea for making wooden picture frames is to incorporate intricate wood carving or engraving techniques. This can include carving elaborate designs, patterns, or even personal messages directly into the wood to add a personalized touch to the frame. Additionally, adding embellishments such as metal accents, beads, or other decorative elements can further enhance the frame and make it truly one-of-a-kind. Overall, incorporating unique wood combinations and intricate detailing can help elevate a simple wooden picture frame into a true work of art. Start a Profitable Home-Based Woodworking Business >>>
Topic: 4. Building a wooden plant stand for indoor plants Building a wooden plant stand for indoor plants can be a fun and rewarding DIY project for any plant lover. Not only does it provide a stylish way to display your indoor greenery, but it also adds a personal touch to your home decor. To start, you will need to gather the necessary materials such as wood boards, screws, a saw, measuring tape, and a drill. Once you have all your materials, begin by measuring and cutting the wood boards to the desired dimensions for the plant stand. Next, assemble the pieces using screws and a drill to create the frame of the stand. Make sure to add additional support pieces for stability. Once the frame is complete, you can add shelves or platforms at different heights to accommodate a variety of plant sizes. Finally, sand down any rough edges and apply a coat of wood stain or paint to match your home decor. With a little time and effort, you can create a beautiful and functional plant stand that will showcase your indoor plants in style. Start a Profitable Home-Based Woodworking Business >>>
Topic: 5. DIY wooden wall art projects DIY wooden wall art projects are a great way to add a personal touch to your home decor. Whether you are a seasoned crafter or just starting out, there are endless possibilities for creating beautiful and unique pieces of art using wood. From simple geometric shapes to intricate designs, there is something for everyone to try. One popular idea is to create a rustic wooden sign with a meaningful quote or saying that resonates with you. This can be done by painting or stenciling the words onto a piece of reclaimed wood and adding a frame for a finished look. Another fun project is to create a wooden wall hanging with a 3D effect. This can be achieved by cutting out different shapes and layering them onto a wooden background to create depth and dimension. You can also add a pop of color by painting the shapes in vibrant hues or using different types of wood for a contrasting effect. The possibilities are truly endless when it comes to DIY wooden wall art projects, and the best part is that you can customize them to fit your own style and taste. So grab some wood, tools, and creativity, and start designing your own unique pieces of art to adorn your walls. Start a Profitable Home-Based Woodworking Business >>>
Topic: 6. Designing and constructing a wooden desk organizer Designing and constructing a wooden desk organizer can be a fun and rewarding DIY project. To start, you will need to sketch out a design for your organizer, taking into consideration the size and number of compartments you want. Once you have a clear plan in mind, you can gather your materials which will typically include wood boards, wood glue, nails or screws, sandpaper, and a saw. Next, you can begin cutting the wood into the necessary pieces according to your design. Assemble the pieces together using wood glue and nails or screws. You may also choose to add decorative elements such as dividers or a drawer for added functionality. Once the organizer is fully constructed, sand down any rough edges and apply a coat of paint or wood stain to give it a polished finish. Your wooden desk organizer is now ready to be placed on your desk and used to keep your workspace tidy and organized. Not only is it a practical addition to your desk, but it also adds a personal touch with its unique design and craftsmanship. Start a Profitable Home-Based Woodworking Business >>>
Topic: 7. Crafting a wooden wine rack Crafting a wooden wine rack can be a fun and rewarding DIY project for any wine enthusiast. To begin, you will need to gather the necessary materials, such as wood boards, screws, a saw, sandpaper, and a drill. Choose a sturdy and durable wood, such as oak or pine, that will be able to hold the weight of multiple wine bottles. Next, you will need to measure and cut the wood into the desired size and shape for your wine rack. You can choose to create a simple rectangular design or get creative with a more intricate pattern. Once the pieces are cut, sand down any rough edges to ensure a smooth finish. Assemble the pieces together using screws and a drill, making sure to secure them tightly to prevent the wine rack from collapsing under the weight of the bottles. Once assembled, you can add a coat of stain or sealant to give the wine rack a polished look and protect it from any damage. Finally, place your favorite bottles of wine in the rack and admire your handiwork. Crafting a wooden wine rack is a great way to showcase your love for wine while also adding a functional and stylish piece to your home decor. Start a Profitable Home-Based Woodworking Business >>>
Topic: 8. Making a wooden serving tray Making a wooden serving tray can be a rewarding and satisfying woodworking project. To start, gather all the necessary materials including a piece of hardwood, such as oak or cherry, wood glue, clamps, a saw, sandpaper, and a finish such as polyurethane. Begin by measuring and cutting the hardwood to the desired dimensions for the tray. Next, sand down all the edges and surfaces of the wood to ensure a smooth and even finish. Once the wood is prepped and ready, apply a thin layer of wood glue to the edges of the wood and carefully join them together to form the tray shape. Use clamps to hold the pieces in place while the glue dries. After the glue has set, sand down any rough edges or uneven surfaces to create a seamless look. Finally, apply a coat of finish to the tray to protect the wood and enhance its natural beauty. With a little time and effort, you can create a beautiful and functional wooden serving tray that will impress your friends and family at your next gathering. Start a Profitable Home-Based Woodworking Business >>>
Topic: 9. Building a wooden outdoor bench Building a wooden outdoor bench can be a rewarding DIY project that not only enhances the aesthetics of your outdoor space but also provides a comfortable seating option for relaxation. To start, gather all the necessary materials such as wood slats for the seating surface, two long pieces for the side panels, and additional pieces for the support structure. Measure and cut the wood pieces according to your desired bench size and design, ensuring that all pieces are cut to the correct dimensions for a cohesive final product. Next, assemble the bench by attaching the side panels to the seating surface using wood glue and screws. Make sure to secure the support structure underneath the bench to ensure stability and weight-bearing capacity. Sand down any rough edges and apply a weather-resistant finish to protect the wood from the elements. Finally, place the completed bench in your outdoor space and enjoy a relaxing spot to sit and unwind. Building a wooden outdoor bench not only adds functionality to your outdoor area but also allows you to showcase your woodworking skills and creativity in crafting a piece of furniture that will be enjoyed for years to come. Start a Profitable Home-Based Woodworking Business >>>


![[PDF] DOWNLOAD PARACORD CRAFTS: Ultimate Guide to DIY Wilderness Survival Projects Using Paracords](https://cdn7.slideserve.com/12406062/slide1-dt.jpg)