Download
1 / 5
50 likes | 66 Views
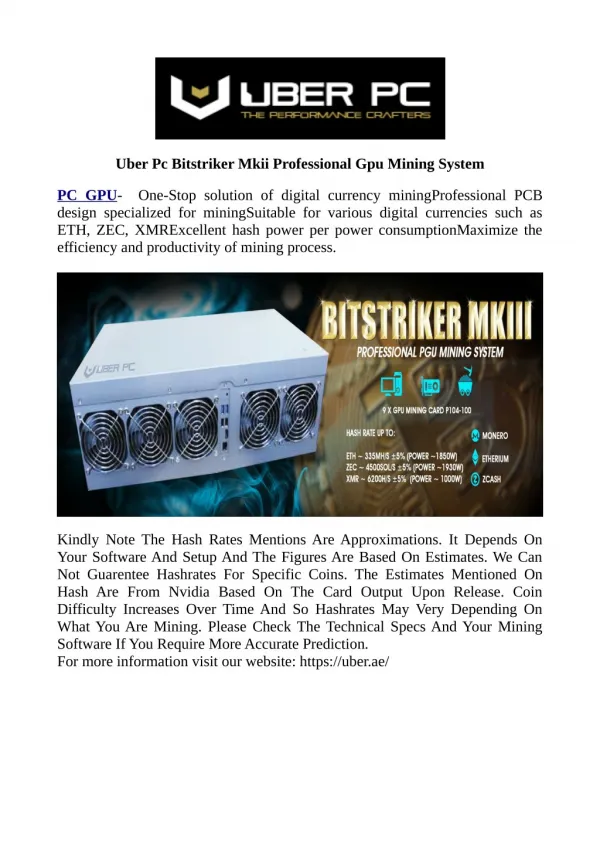
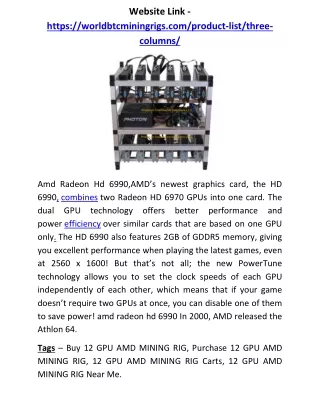
Crypto Mining Rig kit 6 GPU<br>Buy 6 GPU online: Absolutely Assembled Crypto Mining Rig package geared up to mine cryptocurrencies like Ethereum and Bitcoin. Further, We give pre-built GPU Mining Rig ultra smooth to apply. Learn how to mine Ethereum with our blanketed manual.<br>

E N D
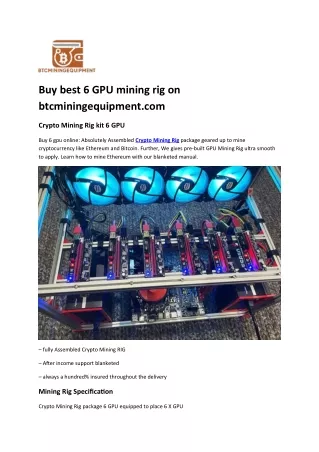
Buy best 6 GPU mining rig on btcminingequipment.com Crypto Mining Rig kit 6 GPU Buy 6 gpu online: Absolutely Assembled Crypto Mining Rig package geared up to mine cryptocurrency like Ethereum and Bitcoin. Further, We gives pre-built GPU Mining Rig ultra smooth to apply. Learn how to mine Ethereum with our blanketed manual. – fully Assembled Crypto Mining RIG – After income support blanketed – always a hundred% insured throughout the delivery Mining Rig Specification Crypto Mining Rig package 6 GPU equipped to place 6 X GPU
Pre-established with hiveos or Simple Mining GPU Mining rig will can help you mine Crypto like Ethereum, Ethereum classic, Ravencoin, Bitcoin Can mine extraordinary algorithms like Ethash, Etchash, kawpow, and greater Stackable tube so you can build a Mining tower Distance between risers 78 mm Fifty one x 35 x 35 cm ( L. X W. X H. ) Total weight 8kg Run on 110V-240V AC Components – Buy 6 gpu online ATX Mining Motherboard intel LGA 1151 CPU Intel LGA 1151 4Gb of RAM DDR4 6 PCI-E CABLE dual 6+2 PIN ( overall 12 X 6+2 PIN PCI-E ) 6 X USB three.zero PCI-E 1X to 16X Extender Riser Adapter Silver Aluminum frame Choose YOUR MINING OS IN the option Pick out YOUR MINING electricity supply IN choice Functions Holds: 6pcs pix (video) cards Holds: 1pcs motherboard(ATX/MATX) Holds: 5PCS 120mm enthusiasts Dual PSU layout Measurement(LWH): 640*365*380mm Package includes 1x 6 GPU ETH Miner rig case Buy 6 gpu online, Cryptocurrency mining requires the proper hardware, software, and a mining pool. It takes a whole lot of knowledge, steerage, and staying power to initialize the complete process.
What’s a Mining Rig? A Mining rig is hardware that is liable for adding new coins into the prevailing circulating deliver of any cryptocurrency. It’s far a key technique that permits cryptocurrencies to work as a P2P network. Cryptocurrency mining gets rid of the need for a governing, 0.33-celebration, centralized entity. Review of Mining Rig to Be constructed We can construct an Nvidia-primarily based mining rig strolling on windows 10 OS. However, this tutorial can be used with any working machine and or an AMD photographs card as well. Buy 6 GPU online Whilst evaluating Nvidia and AMD photos playing cards, the primary distinction is inside the chips at the middle. Every is like minded with a bunch of different cryptocurrency algorithms. It’s far recommended to use an Nvidia GPU because one requires high expertise for AMD playing cards to be mounted effectively. You’ll want numerous laptop components, peripherals, an operating system, mining software program, and a pockets to collect the mined cryptocurrency. We will be the usage of an Nvidia GTX 1070 for this bitcoin miner academic. A listing of opportunity gpus is also covered. The whole system can be completed within three hours if the whole thing is going correctly. Cryptocurrencies That can be Mined using the Rig Buy 6 gpu online, Your Nvidia gpus are able to coping with many algorithms for mining. Those consists of Lyra2REv3, MTP, X16RT, X25X, Ethash, cryptonightgpu, Cuckaroo29s, and Zhash, simply to name a few.
The way to build a Mining Rig Once you’ve correctly collected all of the components needed, you may must begin assembling the rig. It is able to appear like a frightening undertaking to begin with, however it’s like constructing a Lego set if you observe the instructions appropriately. Step 1) Attaching the Motherboard Your 6 GPU+ capable motherboard ought to be positioned outside the mining body. Specialists recommend setting the package deal container with foam or an anti-static bag underneath it. Earlier than going for the following step, ensure that the lever preserving down the CPU socket safety has been released. Step 2) Attaching the processor Next, you have to attach your processor to the Motherboard. Insert your preferred CPU into the motherboard socket. Be cautious even as eliminating as there can be some thermal paste caught to the CPU fan. Make a mark on both the motherboard socket in addition to the side of the CPU. Those markings want to be done on the equal side whilst attaching them, or the CPU will no longer healthy into the socket. However, you need to be more careful with the CPU pins even as setting your processor into the motherboard socket. They could easily bend, with the purpose to harm the complete CPU. You want to take the thermal paste and use it on the warmth sink’s floor before you attach the processor. The heat sink’s electricity cable ought to be linked to the pins titled “CPU_FAN1”. You should test your motherboard guide to find it in case you don’t spot it effortlessly. Step 3) putting in RAM The next step entails installing the RAM or gadget memory. It is quite easy to insert the RAM module into the RAM socket inside the Motherboard. After establishing the motherboard slot’s aspect brackets, carefully start to push the RAM module into the RAM socket. Step 4) solving Motherboard to border Relying in your mining body or anything you’re using rather, you have to carefully area the Motherboard onto the frame. You should take more care when dealing with the Motherboard as you do now not want to scratch the bottom. If you have a mining rig with a metal body, the Motherboard must only contact the body on the point in which the holes for screws are present. Tightly restorative the screws to connect the Motherboard firmly. Step 5) Attaching the strength supply Unit Your power supply Unit need to be located someplace close to the Motherboard. Make sure you have got sufficient area in the mining rig to include the PSU in it. Search for the 24-pin strength connector found in motherboards. They normally have a unmarried 24 pin connector.
They have to be attached to the Motherboard firmly, or the mining rig will now not boot. The CPU’s eight-pin electricity connector should be related to the Motherboard positioned closest to the processor. You have to always be careful not to mix up PCI-e 6+2 power conductor and the CPU connector as they are each 8 pin connectors. CPU cables are thicker in comparison to the PCI-e cable. Step 6) Attaching USB risers The x16 USB riser needs to be assembled with the PCI-e x1, that’s the shorter PCI-e x1 connector. This needs to be linked to the Motherboard. To power the risers, you need an electric-powered connection. This relies upon in your riser model as you would possibly need either a PCI- e six-pin connector, a SATA cable, or a Molex connector to connect it. Step 7) Attaching gpus The photographs playing cards should be located firmly on the body using the USB riser. Plug the PCI-e 6+2 energy connectors into your GPU. You have to connect most of these connectors to the final 5 gpus later. Buy 6 gpu online Step 8) very last Steps ultimately, you want to make certain if the cables are efficiently connected. The pix card, which is linked to the main PCI-E slot should be linked for your reveal. After connecting the mouse and keyboard, proceed to show your rig on. Try this with the aid of connecting the energy transfer to electricity pins at the Motherboard. In case you’re now not sure wherein to locate it, you may test the motherboard manual. Installing other 5 GPU’s – Buy 6 GPU online You need to method this subsequent step with caution as it may get quite elaborate. The following steps will guide you through the entire procedure to set the final five gpus. Earlier than beginning, make sure that the mining rig is powered off, such as the master power at the PSU. Cross ahead and connect the Riser card and GPU for the open slot that is closest to the processor. Join the Motherboard with the riser card. Strength up the PSU to turn the mining rig on. Subsequent, login and go to display adapters below device manager. You must see the NVIDIA geforce GTX 1070 card listed. If now not, refresh the page a couple of times until it appears. Repeat the above steps until you get all the playing cards on the tool manager without any “alert” icon present. Contact Us At: +124041077041 Email Us At: bitcoinnmining@outlook.com