Download
1 / 8
80 likes | 91 Views
Microbiology Laboratory Techniques in GMP Laminar flow and biohazard cabinets Airflow patterns of a laminar flow cabinet (LFC) In a laminar flow cabinet. For more:

E N D
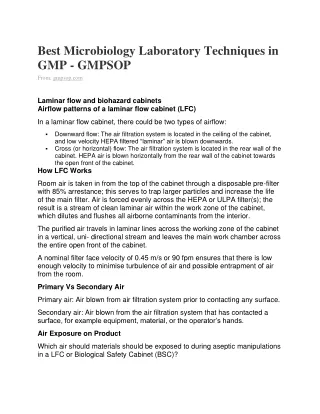
Best Microbiology Laboratory Techniques in GMP - GMPSOP From: gmpsop.com Laminar flow and biohazard cabinets Airflow patterns of a laminar flow cabinet (LFC) In a laminar flow cabinet, there could be two types of airflow: ▪Downward flow: The air filtration system is located in the ceiling of the cabinet, and low velocity HEPA filtered “laminar” air is blown downwards. ▪Cross (or horizontal) flow: The air filtration system is located in the rear wall of the cabinet. HEPA air is blown horizontally from the rear wall of the cabinet towards the open front of the cabinet. How LFC Works Room air is taken in from the top of the cabinet through a disposable pre-filter with 85% arrestance; this serves to trap larger particles and increase the life of the main filter. Air is forced evenly across the HEPA or ULPA filter(s); the result is a stream of clean laminar air within the work zone of the cabinet, which dilutes and flushes all airborne contaminants from the interior. The purified air travels in laminar lines across the working zone of the cabinet in a vertical, uni- directional stream and leaves the main work chamber across the entire open front of the cabinet. A nominal filter face velocity of 0.45 m/s or 90 fpm ensures that there is low enough velocity to minimise turbulence of air and possible entrapment of air from the room. Primary Vs Secondary Air Primary air: Air blown from air filtration system prior to contacting any surface. Secondary air: Air blown from the air filtration system that has contacted a surface, for example equipment, material, or the operator’s hands. Air Exposure on Product Which air should materials should be exposed to during aseptic manipulations in a LFC or Biological Safety Cabinet (BSC)?
Aseptic manipulations should only be conducted in primary air within a LFC or BSC to reduce the risk of adventitious agent contamination (for example, bacteria, fungi or contaminants from the environment, including the operator). Airflow patterns of a biological safety cabinet (BSC) There are different classes and types of biological safety cabinets. For example, Class II cabinets have downward airflows, and provide both sample and operator protection. In addition to a laminar flow cabinet, air in a BSC is drawn into the cabinet via a grill at the front where the operator sits, to provide containment of air blown from the cabinet. Transferring materials to and from safety cabinets Transferring materials into a safety cabinet ▪Wrap materials to avoid contamination. ▪Sterilise external surface if wrapping is not possible. ▪Unload materials directly into cabinet. ▪Seal materials and transfer directly to a Biological Hazard bag, as they may be contaminated. Transferring materials into a safety cabinet When transferring materials into a LFC or BSC, the risk is that the materials may be contaminated with adventitious agents. Therefore, materials should be sterilised prior to the transfer. In preparing materials for sterilisation they should be wrapped. This will enable removal of an outer layer when the material is transferred to environments of higher quality or lower bioburden, for example, when transfering items from a lab into a LFC or BSC. Should the wrapping of materials to facilitate this transfer not be possible, the external surface of the material should be thoroughly sanitised, using physical contact (friction) with the surface in conjunction with a chemical sanitant that is lethal to the micro-organisms present on the surface of the material. Transferring materials out of a safety cabinet When transferring materials out of a LFC or BSC, the risk is that the materials may be contaminated and thus contaminate the environment and operator (which is a safety concern). Therefore, all materials to be removed from the cabinet should be sealed prior to removal and transferred directly to a Biological Hazard bag. It will then undergo controlled destruction by an operator wearing gloves, which should also be placed in another Biological Hazard bag.
Media preparation and QC Importance of media Media is a nutrient used for growing bacteria, yeasts and moulds in containers. If the media is poorly prepared it may not support growth and important micro-organisms may not be detected. A test may read “negative”, but the result may be due to poor media preparation that has not supported growth. Or, a test may read “positive” because the media itself was contaminated. It is very important to carefully test and prepare media in strict accordance with the Microbiology laboratory procedures. Dried Media Storage General guidelines for the storage of dehydrated media include: ▪Store media in tightly capped bottles in a cool, dry place protected from light. Monitor the storage temperature. ▪Keep a limited supply on hand – turn over the stock regularly. ▪Practice first-in, first-out (FIFO) – use older stocks first. ▪Do not exceed the supplier’s expiration date. ▪Be alert to any physical signs of deterioration, such as discoloration. Points to note during media preparation 1.Select and document the correct media and check that it is within its expiry date. 2.Prepare the media as per the manufacturer’s instructions. 3.Check key measurements, such as pH. 4.Prepare the media with water of appropriately low bioburden. 5.Prepare the media shortly prior to sterilisation to assure a low bioburden challenge to the sterilization process. Issues When Heat Sterilising When sterilising by heat, there is a potential concern of destroying the nutrients or other ingredients that maintain the media’s growth promotion properties if the media is over cooked. If it is undercooked it may not be sterilised properly. The former would lead to a false negative result, the latter to a false positive result. Therefore, manufacturer’s instructions regarding sterilising conditions must be strictly adhered to. Sterilisation should be conducted using specific validated sterilising cycles that have demonstrated that media subsequently has maintained all of its required characteristics (fertility, growth, sterility, pH, selective inhibition). Issues When Filtration Sterilising Media
Filtration is conducted using a bacterial retentive filter and should be performed in accordance with manufacturer’s instructions. Filtration may remove certain ingredients in the sterilising process, so it is important that the fertility and key characteristics of media are confirmed post- filtration as a quality control test. Media and Reagents Microbiological media and test reagents should be tested tor their performance. This should be done for pre-prepared media and media formulated in the laboratory. Some tips for media preparation and quality control: 1.Develop SOPs and worksheets to record the preparation 2.Ensure there is documented traceability from source media to each batch 3.Perform quality control on dehydrated media when purchased 4.Media can deteriorate if not stored correctly: protect from exposure to moisture, heat or oxidation. Do not use past expiry periods. 5.Accurately weight dried media on calibrated balances 6.Accurately weight or measure water in calibrated glassware 7.Ensure the glassware is not contaminated or dirty 8.Use purified clean water to reconstitute the media – do not use tap water 9.Ensure complete mixing or solubilization of ingredients during preparation 10.Pre-melt agar before sterilization to ensure even mixtures 11.Validate the autoclave to ensure there is no overheating of media during sterilization – overheating may reduce media efficacy 12.Accurate pH of media is important for optimum performance 13.Perform quality control on finished prepared media Quality control tests Key QC tests to be conducted include the following ▪Fertility ▪Micro-organism selectivity ▪pH ▪Defined media characteristics ▪Sterility Key QC Tests Fertility: The ability to support micro-organisms that the media is claimed to support. Micro-organism selectivity: The ability of media to selectively support growth of specific organisms, whilst selectively inhibiting the growth of other micro-organisms.
pH: The pH of the media is important because some bacteria will only grow well in a narrow pH range. Defined media characteristics: When acid is produced, the resulting change in pH may cause the media to change colour. This colour change can aid in the identification of organisms. Sterility: The media must be sterile (free of all living organisms) before it is used – conduct a sterility test on the media to verify it is suitable before using it. Storage conditions and expiry dating The effectiveness of media is dependent on its ability to support the growth of organisms. Like all active materials, over time, dried media loses its effectiveness and stability. It is important to: ▪Store dried and prepared media under approved temperature conditions ▪Never use expired media ▪Always test incoming media supplies before use Effectiveness of Media The media’s effectiveness is dependent on its fertility (ability To support growth) which in turn depends on its stability being maintained. The key factors affecting stability are time and temperature. Therefore, the storage conditions in which the media is stored (temperature and sometimes humidity) and the duration they are stored for (must be within expiry date) are critical to maintaining the media’s characteristics, including fertility. Importance of Traceability Media lot number traceability is critical because: ▪it provides us with the means to trace problems in media batches and identify other batches that may be affected. ▪it provides the ability to trace information supporting batches of media manufactured. ▪it is a GLP requirement. Reading Exposure Plates Environmental monitoring Pharmaceutical companies are required to regularly monitor the environment for bacteria, yeasts and moulds, which would alert personnel to poor sanitation practices, air supply problems or even possible product risk.
A number of different means can be used to do this: ▪Air sampling using a volumetric air sampler ▪Exposure (settle) plates ▪Surface swabs ▪Contact plates or RODACs This monitoring helps you understand the number and types of undesirable micro-organisms in the environment and near you products, if numbers exceed expectations, then investigations should be carried out. What involves in Environmental Monitoring: 1. Exposure Plates Exposure Plates are sterile petri dishes containing sterile media. They are utilised to detect the number of micro-organisms in the environment. They rely on micro-organisms in the air. Or attached to particles in the air, falling onto the media surface. After having been exposed to the environment for a defined period (often 2 hours), the plates are closed, and then incubated for a defined period. The number of micro-organisms ate then counted. 2. Air sampling method ▪A common method ▪“Active” sampling of air volume ▪Easy to use – machine must be calibrated ▪Microbes ore drawn into the sampler by an Impeller ▪Sample 10-20 minutes for 1 cubic meter of air ▪Incubate strip at 20 -25°C and 30 – 35°C for 3 – 5 days ▪Use selective strips for bacteria and yeast/mould 3. Settle Plate method ▪Most common method ▪Easy to use and cheap ▪“Passive” sampling ▪Particle must fall on plate ▪Bacteria must be attached to a particle ▪Easy to influence the result ▪Open for 2 – 4 hours ▪Way dry out ▪Incubate 20 -25°C and 30 – 35°C for 3 – 5 days ▪Use selective plates for bacteria and yeast/mould Microbiological plating techniques There are two basic techniques for enumerating (counting) colonies in a pharmaceutical quality control test: 1.Membrane Filtration Technique 2.Direct plate method
Membrane Filtration (MF) Technique The MF technique is most useful when looking for low numbers of colonies in a sample, for example, less than 10 cfu in 100mL of highly purified water. The technique allows you to filter large volumes and trap the organisms on the filler face. The filter can then be placed onto a plate to allow the organisms to grow into countable colonies. Direct Plate Method The Direct Plate method is preferred when you are trying to detect relatively large numbers of organisms in the sample volume. In this method, an amount, say 0.2mL of the sample, is directly spread or poured onto a sterile plate, and then the plate is incubated. This method is more direct and easier to use, however its sensitivity is not as good as the MF method. The advantages of the membrane filtration technique include: ▪Large samples volumes can be tested ▪Low organism numbers car be detected (it is a sensitive method) ▪Allows isolation and enumeration of discrete colonies of bacteria ▪Allows for removal of bacteriostatic or bocteriocidal agents by washing of the filter Membrane Filtration test method ▪Filter must be sterile hydrophobic 0.45um – 47 – 50mm ▪3 by 100mL final washes of filter – less if validated Incubation Conditions 5 days @ 30 – 35°C for Total Aerobic Microbial Count (TAMC) Direct plate techniques There are two basic direct plating techniques used: 1.Spread Plate technique: a sample is aseptically “spread” directly onto the agar surface. 2.Pour Plate technique: a sample is applied to the plate, then agar is poured thinly over the top. Three different media can be used to enumerate organisms by the PP technique: Nutrient Agar (NA), R2A agar, and SAB agar. All of these media are generally non-selective: they supply nutrients and support growth for a variety of heterotrophic micro-organisms. Incubation Conditions – Pour Plate Method 5 days @ 30 – 35°C for TAMC 5 days ® 20 – 25°C for yeasts and moulds
Reliability of exposure (settle) plates The following factors affect the reliability of exposure plates: 1.The media type selected for different types of micro-organisms (SAB plates support mould and yeast, and nutrient agar supports most bacteria). 2.Time of plate exposure (1, 2 or 4 hours) affects the number of organisms trapped. 3.Time and temperature of incubation either supports or retards colony growth. Reading plates and recording results ▪Reading or counting plates after incubation requires a good technique, ▪Read under 10-15X microscope. ▪Use a grid pattern approach. ▪Be careful not to count colonies twice. ▪If the count is > 300, record as “Too Numerous to Count”, or TNTC. ▪Check for confluent (spreading) growth across the plate. ▪Record the result and the morphology of the major types. Counting Colonies At the completion of the incubation, the plates are removed and the colonies counted. The number of colonies are recorded, as should be the units. The media type determines the colony count units. For example, 38 colony forming units (cfu) on Saboraud Dextrose Agar is 38 cfu fungi per x hours of plate exposure to the environment.