Download
1 / 3
30 likes | 40 Views
If the user wants to change the account type of their Account means Standard User account to Admin account and Admin account to Standard User, then you can follow the below method.<br><br>https://office.com-setup.com/blog/how-to/how-to-change-user-account-type-and-user-name-in-window-10/<br>

E N D
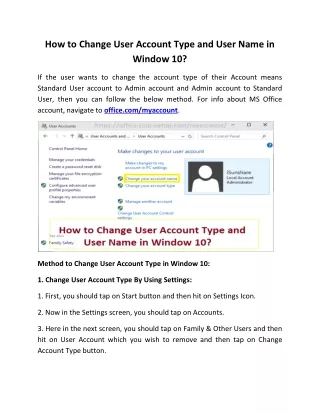
How to Change User Account Type and User Name in Window 10? If the user wants to change the account type of their Account means Standard User account to Admin account and Admin account to Standard User, then you can follow the below method. For info about MS Office account, navigate to office.com/myaccount. Method to Change User Account Type in Window 10: 1. Change User Account Type By Using Settings: 1. First, you should tap on Start button and then hit on Settings Icon. 2. Now in the Settings screen, you should tap on Accounts. 3. Here in the next screen, you should tap on Family & Other Users and then hit on User Account which you wish to remove and then tap on Change Account Type button.
4. Then in the next screen, you should choose Standard User or Administrator option. 5. At last, you should tap on OK button to finish the User Account Type change in your device. 2. Change User Account Type By Using Control Panel: 1. First, you should open Control Panel in your device. 2. Now in the Control Panel Screen, in “Category” view and under User Account, you should tap on Change Account Type link. 3. In the next screen, you should tap on choose User Account which you want to change. 4. Then in the next screen, you should tap on Change Account Type option in the sidebar menu. 5. Here in the next screen, you should choose either Standard or Administrator option, according to your preference of Account Type to “Admin” or “Standard User” Account. 6. At the end, you should tap on Change Account Type button to finish the procedure. Method To Change User Name in Window 10: 1. Change Local User Name in Windows 10: 1. First, you should right-tap on Start button and hit on Run button. 2. In the Run Command Window, you should type control panel and then tap on OK button. 3. In the Control Panel screen, in “Category” view and you should tap on User Accounts.
4. Next, you have to tap on Change your account name link. 5. Lastly in the next screen, you need to type the New User Account Name and then tap on Change Name button. 2. Change MS User Account Name in Windows 10 1. For this, you should visit to Settings and then tap on Accounts. 2. Then in the Accounts screen, you should tap on Email and Accounts and then go to Manage my Microsoft Account link. It opens the web browser in your computer and then loads your Microsoft Account Profile. 3. After this, go to the Accounts Page and then tap on Edit Name option, which is located next to your Name. 4. In the next screen, you can change your First Name and Last Name and then hit on Save button. 5. At last, you should restart your computer in order to view if the changes made have synced back to your PC. In future, if you login to your computer by using MS Account, then you can view your New Name. In case, you do not view the change, then you should wait for a few hours so that the changes to sync to your computer. Keep in mind the changes which you have made will be reflected in your online ID and MS Email Account. Through this way, you can change User Account type and User Name in Window 10. For info about MS Account, visit to office.com/myaccount. Also Read Here - How you can Change Microsoft Account Password in Window 10?