Tips To Move Quickbooks Data Migration Services
70 likes | 99 Views
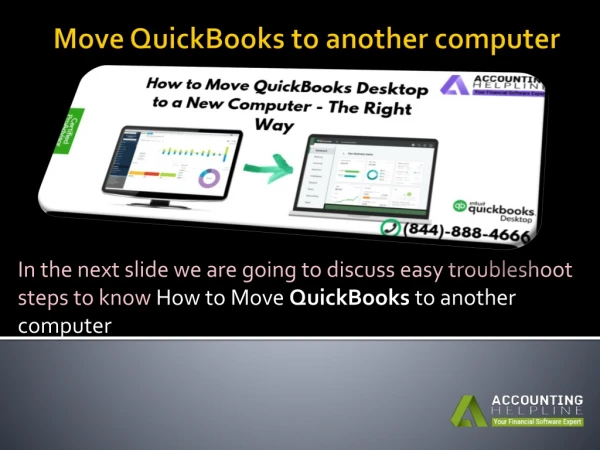
u2018QuickBooks Data Migration Servicesu2019 refers to the process of correctly migrating QB Desktop data to a new computer. This can be done by shifting the QB data to a USB flash drive from the old system and then successfully transferring the QB data to the new computer via the flash drive. You can simply access the complete process in this blog, or you can dial 1-855-856-0042 to connect with a QB Specialist.<br>

Tips To Move Quickbooks Data Migration Services
E N D
Presentation Transcript
QuickBooks users often need to migrate QB data to a different computer due to several reasons, and the process to migrate QB data to a separate system is referred to as ‘QuickBooks Data Migration Services’. Usually, QB Desktop users tend to migrate QB data when they decide to avail the updated features and tools available on the newly-released computer version in the market. Here’s a full technical guide that will show you the exact step-wise process to successfully migrate QB data to a new system. DO YOU WANT RELIABLE TECHNICAL HELP FOR ‘QUICKBOOKS DATA MIGRATION SERVICES’? YOU CAN DIAL 1-(855)-856-0042 TO EASILY REACH OUT TO OUR QB TECHNICAL PROFESSIONALS TEAM.
Main Factors That Need to Be Fulfilled Before Migrating QB Data to a New Computer Before initiating the QB data migration to a new computer, you will require to satisfy the following factors explained below: • The new system must have accurate and uninterrupted access to high-speed internet. • A fresh USB flash drive is also needed, which must have free space of up to 250 MB to save the required files. Effective Step-Wise Process to Successfully Migrate QB Desktop Data to a New System The steps mentioned below should be properly implemented in order to successfully migrate QB Desktop data to a new system:
Step 1: Easily copy all the QB Desktop files inside the ‘USB flash drive’ from your old system • First & foremost, just access the QB Desktop application on your old system in order to tap on the ‘File’ menu, after which you shall just click on the ‘Utilities’ tab so that you are able to choose the ‘Move QuickBooks to another computer’ option. • Next, instantly go forward to strike the ‘I’m Ready’ button & then you must generate a fresh one-time password on the window that will be used in the next step. • Now, carefully choose the attached USB flash drive so that all the selected QB Desktop files get copied into it.
Step 2: Utilize the Migrator Tool to successfully transfer the QB data files to the new computer • In this step, first & foremost, easily attach the ‘USB flash drive’ to the new computer, and then you will have to launch the ‘USB flash drive’ to be able to successfully open up the ‘Move_QuickBooks.bat’ file on the system. • Afterward, the ‘QB Migrator Tool’ will commence its execution, following which you shall type the one-time password that you had created in the previous step. • Now, just tap the ‘Let’s go’ button in order to easily transfer all the QB data files to the new computer via the ‘Migrator Tool’. Step 3: Operate all the required services on the new computer via the correct procedure Here, in the final step, you shall simply access & operate the payroll services and Intuit Data Protect service on your new computer so that the QB Desktop application can be successfully utilized.
These valid steps, if properly implemented, will surely help you regarding ‘QuickBooks Data Migration Services’. For further help, dial 1-(855)-856-0042 to easily connect with our QB Technical Specialists Team.