Download
1 / 11
110 likes | 158 Views
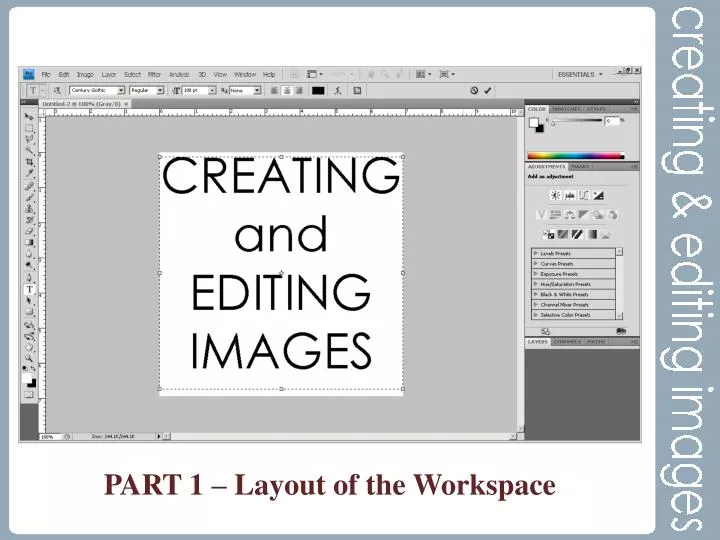
PART 1 – Layout of the Workspace. Why Photoshop?. Information includes not only text and numbers, but images as well. The expression "a picture is worth a thousand words" is as true today as ever.

E N D
Why Photoshop? • Information includes not only text and numbers, but images as well. The expression "a picture is worth a thousand words" is as true today as ever. • Adobe Photoshop is the industry-standard tool for digital imaging, which makes Photoshop expertise a valuable commodity in the workplace. Learning Photoshop is also a good way to learn imaging concepts. Concepts you learn from working with Photoshop apply to other imaging tools as well (including Photoshop Elements or Fireworks, which has a very similar user interface and features). Courtesy of http://guides.hsl.unc.edu/photoshop
Getting Started Courtesy of http://guides.hsl.unc.edu/photoshop
Getting Started cont. The Menu Bar The menu bar, at the top of the Photoshop desktop, includes several dropdown menus for choosing commands. Image Window The image window displays the current image. The name of the image file appears at the top edge of the image window. If rulers are turned on, they appear at the top and left edges of the image window. To display or hide rulers, choose Ctrl-R or View>Rulers. About Rulers: Rulers show the size of your image. Courtesy of http://guides.hsl.unc.edu/photoshop
Getting Started cont. The Toolbox The toolbox contains tools for working with images in Photoshop (or Fireworks). Only one tool is selected at any given time. To select a tool, click on its icon in the toolbox. Some important tools are briefly described below. Toolbox tools are used for most Photoshop tasks. Courtesy of http://guides.hsl.unc.edu/photoshop
Getting Started cont. The Status Bar The status bar at the bottom of the Photoshop desktop provides information about your current view and other information that you can specify by choosing from a dropdown menu (in this example, the view is now 33.33% and the document dimensions are 8.371" x 8.371"). Courtesy of http://guides.hsl.unc.edu/photoshop
Getting Started cont. Palettes Palettes enable you to perform a wide variety of tasks in Photoshop. To display or hide particular palettes, go to the Window menu and choose a palette name. Palettes are usually organized into groups. In the above example, Layers, Channels, and Paths are a group. You can easily move a palette group by dragging its blue bar (at the top of the group). To shrink a palette group, double-click on its blue bar. To hide a palette group, click its close box (the "X" on the right side of the blue bar). You can drag the tabs of palettes to move them around, or to combine them into other groups. To reset palette locations to the default, choose Window>Workspace>Reset Palette Locations. Courtesy of http://guides.hsl.unc.edu/photoshop
Images into Photoshop • When you first launch Photoshop, the Photoshop desktop (described in previous slides) appears. But in order to do anything, you need to have an image. There are 3 main ways you can bring an image into Photoshop: • You can open an existing image file by choosing File >Open or File>Browse. This would include images you have downloaded to your computer from a digital camera or from the internet. Photoshop can open most image file types. • If your computer is connected to a scanner with a Photoshop plug-in that has been properly installed, you can scan an image into Photoshop by Choosing File > Import. • You can create a new Photoshop file from scratch. Courtesy of http://guides.hsl.unc.edu/photoshop
Moving Images When editing images, you can do many tasks more effectively if you zoom in and move around the image. To zoom in, choose the Zoom tool and then click or click and drag in the image. When you zoom in, the zoom percentage (or view size) increases. The current zoom percentage is shown in the status bar. The zoom percentage shows the magnification at which you are viewing the image (not the actual size of the image). A quick way to go to 100% view size is to double-click on the zoom tool icon in the toolbox. Courtesy of http://guides.hsl.unc.edu/photoshop
Moving Images cont. • To zoom out, press the ALT key while you click with the zoom tool. • Use the Hand tool to move around the image in the window when you are zoomed-in. • When using another tool, you can press the spacebar to temporarily access the hand tool. You can then drag to move around the image. When you stop pressing the spacebar, you will return to using the other tool. Courtesy of http://guides.hsl.unc.edu/photoshop
Part 1 REVIEW Menus: Similar to the menu found in Microsoft Office Image Window: The image window displays the current image Toolbox: The toolbox contains tools for working with images in Photoshop (or Fireworks). Only one tool is selected at any given time. Status Bar: The status bar at the bottom of the Photoshop desktop provides information about your current view Palettes: Palettes enable you to perform a wide variety of tasks in Photoshop. Palettes are usually organized into groups such as Layers, Channels, and Paths. Courtesy of http://guides.hsl.unc.edu/photoshop