Download
1 / 3
30 likes | 138 Views
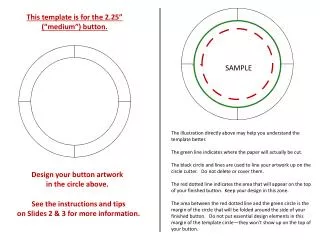
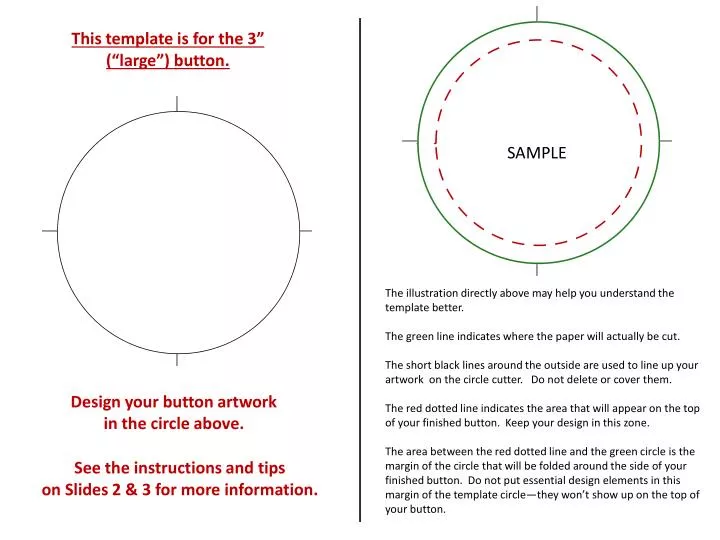
This template is for the 3” (“large”) button. SAMPLE. The illustration directly above may help you understand the template better. The green line indicates where the paper will actually be cut.

E N D
This template is for the 3”(“large”) button. SAMPLE The illustration directly above may help you understand the template better. The green line indicates where the paper will actually be cut. The short black lines around the outside are used to line up your artwork on the circle cutter. Do not delete or cover them. The red dotted line indicates the area that will appear on the top of your finished button. Keep your design in this zone. The area between the red dotted line and the green circle is the margin of the circle that will be folded around the side of your finished button. Do not put essential design elements in this margin of the template circle—they won’t show up on the top of your button. Design your button artworkin the circle above. See the instructions and tipson Slides 2 & 3 for more information.
You may want to print these instructions. If you are in TRAC, we will gladly provide you with a printed copy. Design your artwork in the template on the left of Slide 1 by inserting textboxes, word art, and graphics. You can add background color by formatting the circle. Use plain paper no thicker than your average 20 lb copy paper. Thicker paper and glossy paper will not wrap around the sides of the button well and your button will probably be ruined. If you must use thick or glossy paper, you will have to cut the design out in a smaller circle so that the design lays on the top of the button and does not wrap around the sides at all. In this case the edge of your button will be silver metal. If you use thick or glossy paper, be sure to ask us to assist you in cutting smaller circles when you visit TRAC. After perfecting your button artwork , GROUP your artwork and the circle template so they can be copied as a single unit. How to group: When you design your button, you will have several elements making up your design. “Grouping” allows you to lump all of those elements together into a single unit so they move and copy as one. Using your mouse, hold the left-click button down while you select/highlight everything you want included in the grouping. Go to “Drawing Tools” then “Format” then “Group” at the top of the screen. From there you may choose to group or ungroup items. After grouping, copy and paste your artwork to put 3 per page on a new PowerPoint slide, spaced as shown: Print your artwork . We recommend printing one page and making a test button before printing a lot of pages. If there is any problem with your design, it will show up on the test button. After making a test button, print as many copies as you like plus an extra sheet or two in case some are damaged in the button-making process. Bring your prints to TRAC to use the circle cutter and button maker. You will use the circle cutter in TRAC to cut out your artwork circles after completing your design. Do not cut your circles out with scissors.
Additional Notes: • If you need help, call us at 770-423-6420 or bring your project to TRAC to request assistance. We will not do your project for you, but we will help with simple design questions and problems if we are able. If you are entirely unfamiliar with using PowerPoint, we recommend taking one of the free workshops offered to KSU students and employees by the campus ITS Department. We do not teach PowerPoint in TRAC. • TRAC only sells button supplies in small quantities, no more than 40 buttons per customer per project. If you need a large quantity, please purchase your supplies online at www.badgeaminit.com, then bring them to TRAC to use with our equipment. This is more economical for you, and prevents depletion of our limited supply. There is no charge for using TRAC’s equipment, only for the supplies; if you bring your own supplies and artwork, you will not owe TRAC anything. • Badge-A-Minit is the vendor we purchase our supplies from, so we know for certain that the supplies will work well with our machines. We do not recommend purchasing from any other vendor because some supplies on the market have not performed well in our equipment. • Badge-A-Minit has competitive prices and fast delivery. The website also offers lots of good button-making ideas, and sells pre-made artwork and button accessories. • If you are viewing this document in a PDF format, the template will not be functional. Please call TRAC to request that a template be emailed to you. We will send you a PowerPoint version of this same document, and you will be able to design in that template. • Sometimes button-making takes longer than inexperienced customers expect. We encourage you to plan well ahead of your event to allow plenty of time to complete a test button, order supplies, and then make all of your buttons. All of TRAC’s equipment is available on a first-come/first-serve basis.