Download
1 / 37
370 likes | 496 Views
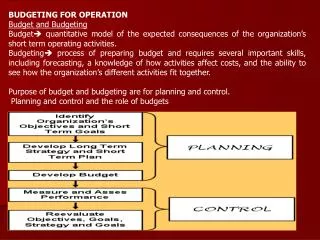
BUDGET DEVELOPMENT Budgeting for Operations. Allie Olson Budget Analyst 994-2990 allison.olson@montana.edu Megan Bergstedt Budget Analyst 994-1834 mbergstedt@montana.edu. Important Information to Keep in Mind.

E N D
BUDGET DEVELOPMENTBudgeting for Operations • Allie Olson Budget Analyst 994-2990 allison.olson@montana.edu • Megan Bergstedt Budget Analyst 994-1834 mbergstedt@montana.edu
Important Information to Keep in Mind • Budgeting at a high level is allowed as long as you are not using account codes that end in “00” such as 62800. • If you are pulling budget into these accounts, the budget should be moved and those accounts ending in “00” deleted. • All accounts that contain $0 in their budget need to be deleted. • A maximum of $10,000 is allowed in 62899 • Use A10OL1 as the Budget Phase when entering your budget information. • DO NOT budget IDC accounts. These are funds that are 436% and 437%.
Logging in to Budget Development • Click on the MyInfo link on the MSU Homepage
Enter your User ID and PIN and click the “Login” button to access MyInfo
Select the Finance Services tab at the top of MyInfo and then click the Budget Development link in the menu below
From here there are 3 options. Choose “Create Budget Worksheet”
Click the “Create Query” button without changing any other parameters on the screen.
Make sure that at least the top two boxes are checked when selecting columns to display amounts.
Selecting and Adding Your Index • Click on the Index button to select the proper index. This process ensures the proper FOP components are pulled in with your index.
You index will display on your screen with a link. Click on the link under the Index heading.
If you are not sure of your index, enter part of the index and a “%” for a wildcard search (i.e. 4%)
A list will be returned. Locate the index that you want to budget and click on the link below the Index heading.
Once you have clicked the link, the correct FOP components will pull into the screen. The index will not display at this point.
Once you have chosen your index, type A10OL1 in the Budget Phase, do not change the next section, and check all of the boxes. Click the Submit button.
Making Changes to Your Budgets • 3 Options for Making Changes: • Decreasing the current budget amount • Increasing the current budget amount • Creating budgets for additional account codes
To start, the program will automatically pull in the accounts that are currently budgeted within your index as well as the budgets associated with them.
Leave the rounding at 1.00 to round to the nearest whole dollar amount.
Decreasing Budget Amounts • Enter the amount, in whole dollars, by which you would like to decrease each specific account code with a “-” in front of the amount.
Increasing Budget Amounts • Enter the amount, in whole dollars, by which you would like to increase each specific account code.
Adding Budget to New Account Code • There is an area for adding new rows at the bottom or the screen. Enter the account code in which you wish to add budget as well as the proposed budget amount, in whole dollars.
Calculating Changes • Once you have entered all of your information, you can click the “Calculate” button to see the proposed changes you have made to your budget.
You will now see the amounts that you entered in the “cumulative change” column and the calculated new budget in the “new budget” column.
Posting Budgets • Once you have verified that your budget amounts are correct, press the “Post” button.
Summary of Changes Posted • After posting, there will be a summary of changes by account type at the bottom of the screen. In most instances your cumulative change should be $0.00
Deleting Accounts • After posting, if you have any accounts codes with the New Budget column equal to zero, these need to be deleted. Check the Delete Record box and hit the “Post” button again.
Although the account code still appears after posting the change, it now has a notation in the status column (DEL) that indicates it will be deleted.
Looking Up Account Codes • If you need to add an account code, but are not sure of what it is, use the account/ program code lookup. First, click on the link.
In the code criteria box, enter part of the account code with a “%” to do a wildcard search. Change the max rows returned to the highest number possible.
Downloading Budget to Excel • When you are finished you can download your budget to Excel. Use the “Download Selected Worksheet Columns” button.
When prompted, save the file and click okay. Once you have saved the file, you will need go to the file location and open it to view the spreadsheet in Excel.
Once opened, you will see your data in Excel formatted and separated into columns.
Additional Reporting Tool • There is a report out on the SAIS Website that will bring in both your Salary Planner AND Budget Development Info. It is under Finance Reports and is called “Budget Preliminary Summary”