Download
1 / 17
170 likes | 258 Views
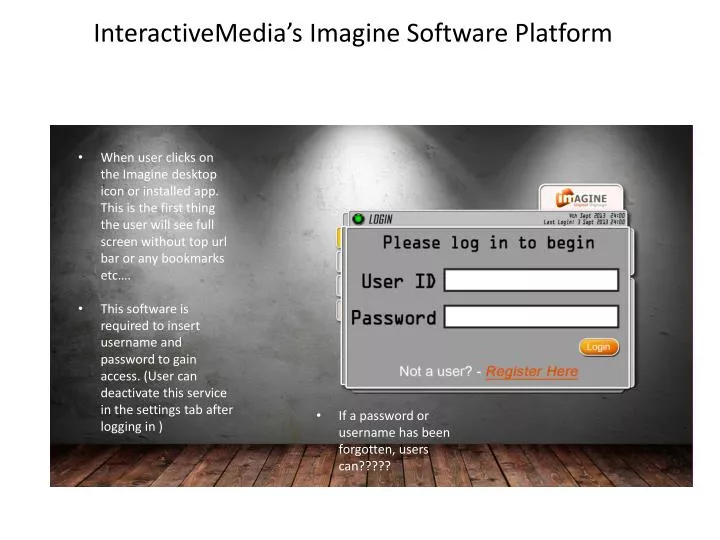
InteractiveMedia’s Imagine Software Platform. When user clicks on the Imagine desktop icon or installed app. This is the first thing the user will see full screen without top url bar or any bookmarks etc….

E N D
InteractiveMedia’s Imagine Software Platform • When user clicks on the Imagine desktop icon or installed app. This is the first thing the user will see full screen without top url bar or any bookmarks etc…. • This software is required to insert username and password to gain access. (User can deactivate this service in the settings tab after logging in ) • If a password or username has been forgotten, users can?????
Flow of a user: When a user logs in, this is shown in the bottom right corner as well as the last logged in time As soon as the user logs in, Home tab will provide the next step with the available options(start blank layout, open template, etc..) In the main design window (Imagine logo) will be displayed until user clicks one of the options. The green light in the bottom left lets a user know they are connected to the Internet, if user is not connected this will turn red Home screen • Notes: • Please follow new design layout • Please add the “imagine logo” in start design screen. • Add the late login time • All tabs and buttons must be disabled unless layout is saved. • Export Layouts • Add the Internet connection icon.
Flow of a user: When a user logs in, Home screen is displayed with Imagine logo on the design screen If user selects blank setup, Imagine logo will disappear. After blank setup has ben clicked user will be directed to the setting/info tab which will require the user to save the file before he can do anything else. All icons and buttons must be disabled until user has named and saved the blank layout Start a blank setup IMAGE OF SAVING A BLANK SETUP
Flow of a user: Once “Open a template” has been clicked, move to settings tab. User must now save the brand new layout whilst also selecting which template and aspect ratio they need. Once selected, User must click save. Once saved design window will implement the changes with the new region templates. All icons and buttons must be disabled until user has named and saved the blank layout Open a template IMAGE OF SAVING A TEMPLATE • Notes: • 12 different template options • 4 different aspect ratios • All buttons disabled until user names and saves • When regions are added via the template, each region must be a different colour
Flow of a user: Once “Open a saved layout” has been clicked, move to the setting icon. User must now select the correct file they wish to load. Once selected, User must click save. Once saved design window will implement the changes with the previously saved layout features including all backgrounds, content (timings) and setup. User can also highlight multiple files and click delete. Open a saved layout • Notes: • Files will be listed vertically • Users can highlight multiple files and click delete. • User must highlight one file and click “open”
Flow of a user: Once “Export/import a saved layout” has been clicked, stay on home screen with the correct settings User must now select the correct file they wish to export or import as well as the location they wish to store Once selected, User must click “Export or Import” Once Exported or Imported, A message will say “Success”. Once message disappears user can locate the imported file in the “saved layouts,” Exported files will be in the users saved location. Exporting of saved layouts must include all features; Media files, timings, background, fade in features, and region layouts. User can now Export and import a saved layout IMAGE OF EXPORTING AND IMPORTING FILES
Create a new user Flow of a user: User can add new users in the portal, User must complete form and accept the changes
Contact Details • info
Flow of a user: User customizes entire software settings through the settings tab. User can decide length and transition time in these settings. User can also deactivate login and password. Customize Settings Notes: • Users can select whether they want a password or not • Password protection must be added when user pushes play (user must be required to insert password in order to go back to the design screen.)
Flow of a user: User changes background by clicking on the background Icon on the right. When user clicks the background icon, the settings tab on the left will appear . User can now upload or delete new backgrounds. User can also add colours or a background image If user has made the selection this will auto preview on the design window,. If users is happy with the look, user can accept or decline the changes. Adding Background Notes: • User can upload a background or select a colour • Users can delete and upload new backgrounds • Please follow the new PSD designs.
Flow of a user: User starts with a Blank layout Clicks orange + icon Region setting tab will pop up on the left hand side User fills in form to add a new region User clicks save and region is added as per settings. If user clicks no, region will not be added and goes back to home screen icon. If a region is added, the left tab must be on the Timeline icon once save has been clicked. Adding a region • Notes: • Please take note of the design layout (colour, alignment and spacing) • When a user clicks save- the left tab will go straight to the timeline icon (“NO MEDIA ADDED” IN RED)
Flow of a user: Users use the + to add media into the library. User can upload all media files via the + icon. Once media files have been selected from root file and updated, the % bar will appear. When the files are 100% uploaded, user must accept this with a tick icon. Media files will now appear in media inventory User can drag and drop media files directly into the regions listed under active regions As soon as media is updated onto the region this will show in the timeline. If users is happy with the look, user can accept or decline the changes. Media Library Notes: • Add a tick box after media files have been updated • Users can delete and upload new backgrounds • Please follow the new PSD designs.
Flow of a user: To add media, user can either drag camera and TV feed or go to the Media Library icon. Once in the media Library users can chose to add new files into software from the + icon or drag and drop existing files into regions available If user is adding new media, once media is uploaded they must click the accept icon. If user does not accept files will not be added User can now change file name, and duration of media When yellow icon is clicked, this will give content overview of all media library files with images. (similar to region content overview) Timeline Notes: • When there is no media in the timeline, “NO MEDIA ADDED” must be red. • When a region is highlighted- tab on left will adjust to the timeline icon. • Users must accept uploaded files . • The icons on the regions must direct you to the “Timeline and region settings” • When media is added onto a region, The region must say “4 Media files added” • Users must be able to highlight multiple files and drag and drop
Flow of a user: • When a user highlights media files in the timeline and clicks edit, the content overview screen will appear. The overview screen will also appear when a user clicks in the media library when the regions are shown. • User can now add multiple fade in and out features. Delete, and edit timing and file name • Timing of media files is found in the settings tab Content overview Notes: Add the delete button on each media file. Please follow new design layout Add new fade in and out features as many as possible. (wipe in, fly in, slide in, bounce in, etc…) Media files are numbered in top right corner of the media image as listed in the timline
Text & RSS &Webpage Feeds • Flow of a user: • User can now select to display a webpage, RSS feed or custom text feed. • If text feed is selected, URL link must be disabled. • User can now add scrolling text feeds in the form below. Once saved this will be saved in the media library. Where user can again edit or delete the text
Flow of a user: When a user clicks the notepad tab on the left, the first image will appear, allowing users to direct to that specific page When curser goes over text, content will highlight orange. Once user has selected a page, user can go to the next page, go back a page or go back to the list of available pages. Once I user is in a page, user can now amend the text by clicking the edit button. User can not use the text editor to add and remove content. Note pad
New features- costs please • Users can change the software background, exactly like the current background option for design window.. This will be changed in the Settings screen in the Home page • Adding Widgets bar • Adding Background paint editor?