Download
1 / 12

E N D
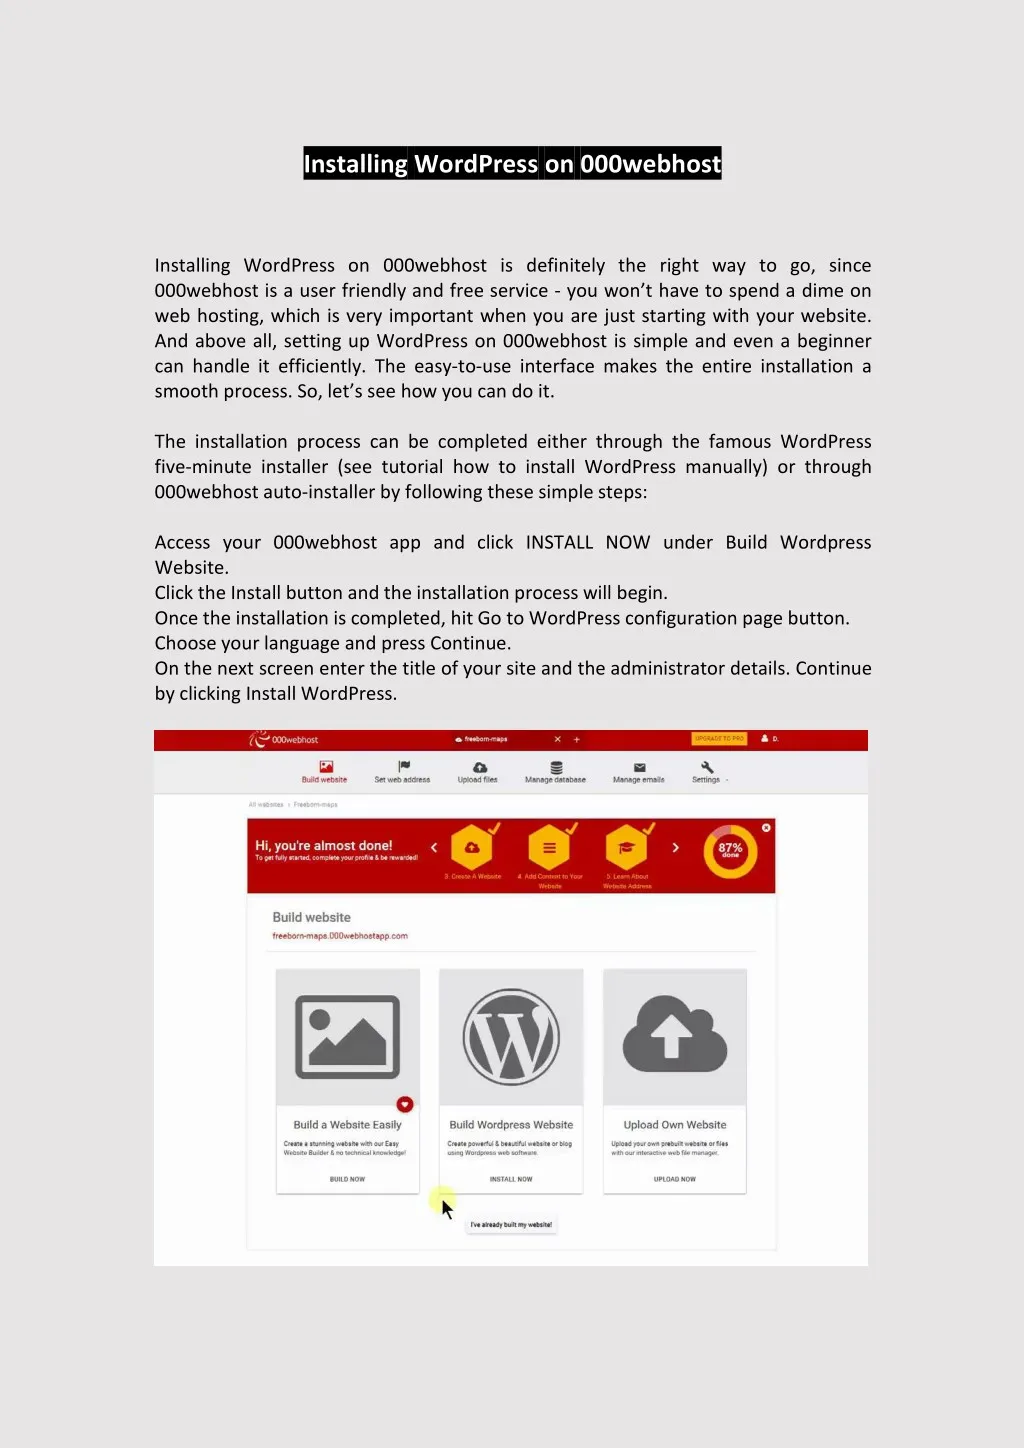
Installing WordPress on 000webhost Installing WordPress on 000webhost is definitely the right way to go, since 000webhost is a user friendly and free service - you won’t have to spend a dime on web hosting, which is very important when you are just starting with your website. And above all, setting up WordPress on 000webhost is simple and even a beginner can handle it efficiently. The easy-to-use interface makes the entire installation a smooth process. So, let’s see how you can do it. The installation process can be completed either through the famous WordPress five-minute installer (see tutorial how to install WordPress manually) or through 000webhost auto-installer by following these simple steps: Access your 000webhost app and click INSTALL NOW under Build Wordpress Website. Click the Install button and the installation process will begin. Once the installation is completed, hit Go to WordPress configuration page button. Choose your language and press Continue. On the next screen enter the title of your site and the administrator details. Continue by clicking Install WordPress.
WordPress is now installed, and you can proceed with creation of your WordPress website. Managing a WordPress Website As you can see WordPress installation is a straightforward process. Especially on 000webhost! In the following WordPress tutorial section you will find out how to manage a WordPress website. Accessing WordPress Dashboard After the installation process is completed, you will be forwarded directly to WordPress administrator dashboard. Anytime later you will have to use one of the following URLs to access WordPress admin area: http://yoursite.com/wp-admin http://yoursite.com/wp-login.php You will need to use WordPress administrator credentials you have entered during installation in order to access the dashboard. If you forget the password, you may reset it by pressing the Lost your password? button.
Navigating in WordPress Dashboard WordPress Dashboard is built to help you manage your site. You will find the Welcome to WordPress section at the top of the page. In this section, you can quickly access everything you need to start off with WordPress, like writing your first blog or adding an about page, or viewing your site, or managing widgets, comments, etc. If Welcome to WordPress is not there or you removed it unintentionally, go to Screen Options on your upper right-hand corner and then check Welcome. You’ll find several other sections on the administrator home page: At a Glance shows which theme you are running, the number of posts and pages you have and other recent activity. Another section is the Quick Draft to be used when you want to add a quick post. However, you will not get the various formatting features that you will get in the posts section but this is a quick way of creating a draft post. Activity box shows latest posts and comments. On WordPress News box you can see latest news related to WordPress Over on the left of your screen, you have the main navigation bar that you will use to get around your WordPress dashboard.
Main WordPress Settings Let’s take a look at the basic settings you need to know to use your WordPress site. So when you go down to Settings on the navigation bar, you will find: General. Here you can change the main URL, the time zone, the title and the description of your website. Writing. On this section you can setup your default category and post format. Want to submit posts via email? Configure this feature here. Reading. Here you can choose what the front page looks like: whether it will show the latest post or a static page. You can also control how many blog pages are shown and whether your visitors will see the full post or just a summary. Discussion. In this section you can configure settings, related to comments. You can start by setting default comment settings. Media. In this section you can change the default image size and choose the way you want your files organized. Permalinks. Permalinks allow you to control the URL structure of your posts. Posting Your First Post One of the many benefits of WordPress is that it’s extremely easy to publish fresh content by adding new posts. To create a new post, click the Add New button under the Posts section. You will find yourself on a content creator page which looks a lot like any word processor. The content section comes in two tabs: the visual, and the text view. The visual view shows the text as it would appear on the finished page and the text view will show you the post in HTML format. Right above the content section, there is a post editor toolbar which will help you format your post. It has a variety of features, for example: Bold (which would bold your text), italic (which would italicize your text), underline (which would underline the desired text), add media (where you can insert photos and videos in your post), HTML tags, text alignment and others.
On the right hand, you will find a Draft button that allows you to save your work and come back to it later. Next to the Draft button, there is a Preview button that shows you how the post will look on the blog when you’ll have published it. Next, you can change the visibility of your post. The Public option allows you to stick the post on the front page. This section also allows you to schedule the post for later rather than publishing it immediately. Moving down the page, you have a section that allows you to choose a Category and add Tags to your post.
Using Categories And Tags WordPress Categories allow you to arrange your posts by subjects to make your content easier to find. To add a new category, go to Posts and Categories: Click on Category. Name the category and add a Slug which is a shortened URL for your category. If you want, you can even add hierarchy to the category and put it under the parent category. You can also add the WordPress tags in the same way. Click Tags on the Dashboard. Give a proper name and a slug, as you did for categories, in order to add a new tag. There is a significant difference between WordPress categories and WordPress tags. WordPress categories are based on the fact that Categories help group your post with other similar posts, but Tags are used for creating groups that fit into multiple categories. Example: beauty is a category, while lips, eyes, hair form the tags. You’re getting the drift, right? Creating Page on WordPress Pages are designed for static content, even though you can change or update them whenever you like. To see the pages your site currently has, choose All pages from the navigation section. You can add new pages by clicking on the Add New button under Pages section. Adding a new page is very similar to adding a new post, except that you don’t have the option to use categories or tags for pages. However, pages can have parent pages. So, if you wish to have the page as a child of another page, you just need to indent the page column in the menu section and it will appear as a drop down menu item from the parent page. You should take into account that a new page doesn’t get automatically added to the menu. To do that, you have to go to the Menu section and add the new page to the custom menu. The Menu can be found under Appearance in the navigation section of the Dashboard. You can add the page to the menu by checking the box on it and clicking Add to Menu.
Managing WordPress Comments Each post has an area beneath it for visitors to leave their comments. This is what makes the posts interactive. The Comments section on the dashboard allows you to approve, reply, edit, trash or spam a comment from the dashboard itself. The comment will appear live on the website beneath your post only when you approve it.
Customizing WordPress Website One of the best parts of a WordPress website is the quickly customizable options that it provides you with on the go. Check out the rest of our WordPress guide to see the various ways you can customize a WordPress site. Installing Small Business WordPress Themes A theme allows you to control the look and design of your WordPress website including colors, page layout, and fonts. You can get a free theme or you can pay for a premium one. In our guide we will mainly focus on the free themes. To manage WordPress themes, choose Appearance and Themes from the navigation section in your dashboard. To install a new theme simply click the Add New button. It will take you to a directory of free themes. Use search or filters to find a theme you want to use. Once you have chosen the theme that you like, click on Preview button to see how it looks on your site. If you’re happy with the result, press Install button. You can further customize your already installed theme with the help of a theme customization tool in WordPress. Simply click on Appearance in the left menu, and click on Customize. From there, you can customize the current theme as per your
needs by changing site identity, colors, background image, menus, widgets and so on. That’s all it takes to change the look of a WordPress website! Installing WordPress Plugins Plugins are extensions that can be installed on WordPress in order to extend its functionality and add new features to your website. There are plugins for almost everything. From social media sharing to improving the security of your site to giving you data about how the people visit your site and search engine optimization. To add a new plugin, click on the Add new button under Plugins section. Choose from Featured, Popular, Recommended, Favorites or enter keyword in the search field to find the plugin you want. To install the plugin, press Install Now and then Activate buttons. The Upload Plugin button on top allows you to upload plugins that have been purchased.
Most plugins will give you a new item on your navigation menu: this is where you will control your plugin from. You may like to check: best wordpress custom field plugin Adding Widgets Widgets allow you to change the layout and the content of your site simply and quickly. Widgets can be accessed from the dashboard, under Appearance section. You will see a list of available widgets. On the side, you have areas where you can place your widgets. By default you should have the Primary Sidebar, a Content Sidebar, and a Footer Widget Area. However, the number of widgets depends on the WordPress theme you are using. To add a widget, you simply need to expand the area where you want the widget to be, drag and drop the widget there and click Save. To remove a widget, simply click and drag it away from the widget area. If you want to add your own text to a widget, choose a plain text widget and then put the text or HTML code in there.
Updating WordPress Site WordPress handles small updates itself, so you don't have to worry about it. The larger ones will give you the option to update at your chosen time. Meanwhile you can look at the features of the update or put your site on maintenance mode. There are three things you must always update on your WordPress site: WordPress itself, themes and plugins. You can update your site from the Update section in the navigation bar. It is very important to keep your whole WordPress site up to date. That is because when a plugin or a theme is updated, you may get new functionalities and bug fixes. It is also a crucial part to keeping a WordPress website secure and fast.