Download
1 / 93
940 likes | 1.14k Views
Blackboard Collaborate. Essentials. Learning Manager: Catherine Musgrove. South Carolina Department of Education, Office of eLearning. Getting Started:. Demo of how to create a session Check email for link to our practice session Once in session—do Audio Set up Wizard. Introductions.

E N D
Blackboard Collaborate Essentials Learning Manager: Catherine Musgrove South Carolina Department of Education, Office of eLearning
Getting Started: • Demo of how to create a session • Check email for link to our practice session • Once in session—do Audio Set up Wizard
Introductions • Introduce yourself using Chat. • If you have webcam turn it on, click Preview - and then Video - when you are ready to send you video image.
Essentials Agenda Polling Changing to Response Options Hiding, Locking & Publishing Session Content Working with PowerPoint Whiteboard Tools Record a Session Recording Controls Sharing Applications Web Tours How to Create a Session • The User Interface • Orientation to the room • Views and Layouts • Communication Methods • Audio • Video • Telephony • Chat • Classroom Interaction • Participant Permissions • Activity and Status Indicators
User Interface… Orientation to the Room
User Interface… Orientation to the room Objectives: • Understand the user interface both Moderator and Participant • Identify the panels, tools, and features for Participants and for Moderators
The Participant Interface Introduce the participant interface. Highlight the four primary areas: Audio & Video panel, Participants panel, Chat panel and the Whiteboard or Content area.
The Moderator Interface Introduce the UI and make the point that the moderator and participants views are essentially the same. Highlight the four primary areas: Audio & Video panel, Participants panel, Chat panel and the Whiteboard or Content area. Point out the Whiteboard, Application Sharing and Web Tour buttons. Point to the Load Content, Record and Whiteboard navigation.
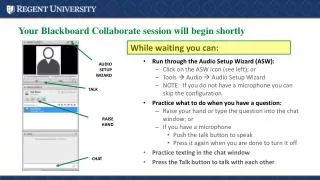
Practice as a Participant • Run the Audio Setup Wizard – • Change your layout - now go back to the default. • Polling: Click a response • Raise your hand… now lower it. • Step Away… now come back. • Show some emotion… Smiley Face, LOL, or Applause • Send a text message using Chat • Write on the Whiteboard
Knowledge Check Which button would you click to raise your hand? A B C D Change the poll responses to A, B, C, D (Global Options menu > Polling Type). Ask participants to respond. Publish the statistics to the whiteboard.
Communication Methods Audio, video and chat
Communication Methods… audio, video and chat Objectives • Identify different methods of communication – non-verbal, audio, video, and chat • Identify uses for emoticons, raise hand, step away and polling • Use VoIP audio single talker and simultaneous talkers to effectively communicate during a session • Use the live video with single video and simultaneous video • Use Chat to send and receive public, private, and announcement type messages
Telephony—new feature • Participants may opt to call in to use instead of mic and speakers, or on road and just want to listen in to session. • Email invite provide number and PIN—not toll free Active call in Click on to mute, again to un-mute
Audio Setup Wizard • Best Practice: Use the Audio Setup Wizard at the beginning of every session • Steps: • Select Audio Output Device – how you will hear • Select Audio Input Device – how you will speak
Troubleshooting Tips • Is the headset plugged in correctly? • Is there a mute switch on the headset? • Is the computer’s audio muted or turned way down? • Did the user select the correct audio input device? You may have more than one microphone or input device so double check. • Still need help? • http://support.blackboardcollaborate.com
Keys to Speaking Visual confirmation • Audio Permission – by default all Participants have the permission. • Mic On… Mic Off Participants must have permission (1) to use Talk button. Permission to use the audio is On by default. 2) Have participants practice turning on and off their microphone. Point out the visual indicator of the blue microphone icon on the Talk button when it is turned on. (3) the last indicator is the volume meter. When you are talking the meter will be moving up and down with the sound of your voice. Move the slider to the right if the audio is not loud enough.
Simultaneous Talkers Tips • Use headset or echo-cancelling microphone • Don’t talk over other Participants Encourage participants to use the feature but only if all session participants are using headsets. Also review the tips and etiquette of have multiple microphones on at the same time.
Simultaneous Talkers Audio comes out of the laptop speakers and into the open microphone… which causes the echo! Use a headset to prevent echo
Tips for Managing Simultaneous Talkers • Ensure that everyone using the audio has an echo cancelling device. • If someone in the session is using the audio without an echo cancelling device, consider moving back to the default of one talker at a time and take turns using the VoIP. • Remember that the Moderator can control the Participants audio. If a microphone is left on and is causing an echo, the Moderator can turn it off by temporarily removing audio permission. (right click on their name, click on mic icon to take mic off, click back on to make available again)
Transmit Live Video • Steps • Open the Audio & Video panel • Click Video or Preview • Note • Permission is on for all Participants by default • Permission can be turned off by the Moderator
Key Video Features • Maximum Simultaneous Cameras… - 1 to 6 • Make Video Follow Moderator Focus or Make Video Follow Speaker (when different speaker talks their video comes up) • Send Camera Snapshot To Whiteboard
Sending a Chat Moderator Participant Can send to the Room or private to other Moderators Type Message… hit Enter Explain how to send a public chat message. Highlight the difference between the Chat panel for participants and for moderators (i.e. Moderators tab for private moderator to moderator chat)
Private Chat • Right-click on the Participant’s name or choose Send a Private Chat from the Options menu. Explain the steps for sending a private chat message. Right click or Options menu or double click on the participants name…
Private Chat • Private chat conversations appear in tabs Each private chat conversation will appear in a separate tab.
Understanding the Tabs Supervised chat displayed for the Moderator Public Private Moderators only Private with new message waiting to be read
Chat Announcements Steps to send an announcement: • Options menu > Send Announcement… • Type the message and click Send
Classroom Interaction Managing participants
Classroom Interaction… managing participants Objectives: • Manage classroom interaction from the Participants panel • Give and take away the session permissions individually and globally • Interpret the Activity Indicators and Status Indicators to manage the classroom
Participants Panel Moderator Participant You Emoticons, Step Away, Raise Hand, Polling Have participants turn on and off their microphone, type in the chat or use a Whiteboard tool and map the use to the display of the indicator in the Participants panel. Have participants use the emoticons, step away, raise hand and polling tools. Be sure to point out how that information is displayed in the Participants panel.
Global Permissions • Default Global Permissions • On • Audio • Video • Chat • Whiteboard • Off • Application Sharing • Web Tour
Participant Permissions • Participant Options menu • Turn On or Off • Audio • Video • Chat • Whiteboard • Application Sharing • Web Tour • Closed-Captioning
Participant Permissions • Dominic • No Chat • Emma • Yes Web Tour • Jacob • Yes Application Sharing • No Audio • Sophia • Yes Closed Captioning • No Whiteboard
Activity & Status Indicators • Activity Indicator • Tool in use • Status Indicators • Reports delay • Red and Orange By keeping an eye on these indicators, you can adjust the pace of your session.
TAKE BREAK WHILE I CREATE BREAKOUT ROOMS Practice • You will be moved to a Breakout Room with a partner • One person will be a Moderator and the other a Participant. • As a Moderator practice: • using the audio • sending public, private and announcement chat messages • working with Global and Individual permissions • promote the Participant to be a Moderator • New moderator takes away your Moderator privilege • Now the new Moderator can practice • Click the green check when your tasks are complete and you are ready to move back to the main room
Polling Objectives • Change the Polling response options • Lock/unlock, hide/show and publish the Polling responses
Polling • Polling Types • Lock Responses • Make Responses Visible • Publish Responses to Whiteboard
Polling Exercise Debrief • Steps: • Change the polling type to multiple choice • Hide the results • Lock the responses • Publish the responses • Tips: • Unlock responses before moving on • Reset the polling options to the default yes/no • Polling results can be saved by saving the Whiteboard
Saving Polling Results • Publish & Save
Whiteboard Objectives • Load a PowerPoint file • Navigate and edit pages using the Page Explorer • Navigate the Pages using the Whiteboard navigation buttons • Utilize the Whiteboard tools
Load Content • Click Load Content button • Locate PowerPoint file • File will be converted to the Whiteboard format and loaded
Tips on PowerPoint • Loads as an image • No animation or transitions • No embedded audio and video • Add URLs via Whiteboard text tool NOTE: PPT file size limit= 20 MG IF your PPT is larger than that, see if you can reduce and re-save OR, split into 2 PPTs, upload one, show it, then delete at end –using Page Explorer (next slide)- upload part 2 PPT.
Page Explorer • Opens when content is loaded. • Can be used for navigation and editing
Navigation • Moving from page to page
Explore Mode • Use Explore Mode to explore other pages while leaving others on the current page. • Moderator only feature • Moderator’s button turns red when Explore Mode is on. • Red boundary displays around Whiteboard Page for Moderator