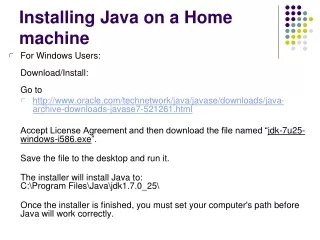
Download
1 / 36
450 likes | 767 Views
Exposure Java 2012. Installing Java. JCreator Settings Only. PowerPoint Presentation created by: Mr. John L. M. Schram and Mr. Leon Schram Authors of Exposure Java and First Exposure. Using This PowerPoint.

E N D
Exposure Java 2012 Installing Java JCreator Settings Only PowerPoint Presentation created by: Mr. John L. M. Schram and Mr. Leon Schram Authors of Exposure Java and First Exposure
Using This PowerPoint This PowerPoint presentation assumes you already have both the Java JDK and JCreator installed and all that you need is the proper JCreator settings.
The First 3 Screens The next 3 slides show windows that show up the first time JCreator is executed. It is possible that you might not see them when you execute JCreator.
This is the same directory where the JDK was installed. Do NOT make any changes!
Customizing JCreator Settings
We do NOT want to “Show tips on startup”. Remove the checkmark.
There are other settings we need to fix, including removing this Start Page.
Click the word “Java”.
Scroll down and click JDK Profiles.
This should be the ONLY Profile. It should be at the very top. It should NOT be red.
Change this to Run Application.
Select “Default” then “Edit”.
Remove “Capture output” checkmark and select “OK”.
Change this to “None”.
Remove the top checkmark and finally click “OK”.
Quit JCreator and reload it by double clicking the icon which should be somewhere in your desktop. if you cannot find it on the Desktop, go to the Start Menu.
The File View, Package View, and Class Viewwindows on the left are not needed for now. Click the [x] to close each.
This is how your JCreator screen should look.