Download
1 / 58
580 likes | 665 Views
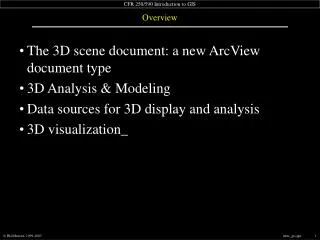
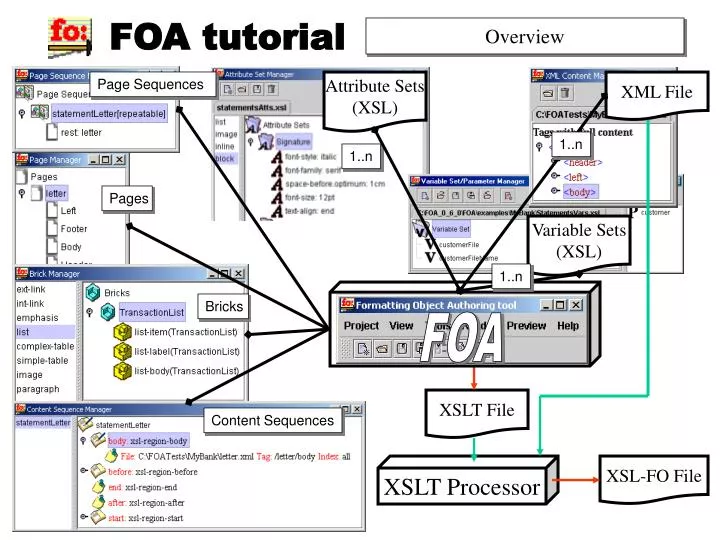
FOA tutorial. Overview. Page Sequences. Attribute Sets (XSL). XML File. 1..n. 1..n. Pages. Variable Sets (XSL). 1..n. Bricks. FOA. XSLT File. Content Sequences. XSLT Processor. XSL-FO File. FOA tutorial. Start a new Project. 1.

E N D
FOA tutorial Overview Page Sequences Attribute Sets (XSL) XML File 1..n 1..n Pages Variable Sets (XSL) 1..n Bricks FOA XSLT File Content Sequences XSLT Processor XSL-FO File
FOA tutorial Start a new Project 1 Click New Project or select New Project from the Project Menu 1 2 FOA initialises Page Manager, Page Sequence Manager and Brick Manager 2 2 2
FOA tutorial Create a new Page (1) 1 Left Click on Pages, Right Click and select New Page… 2 FOA opens Page Properties Dialog 1 3 Select a page format or insert the page dimensions 4 Select Margin tab if you want specify margins 5 Insert margin dimensions 4 2 3 5
FOA tutorial Create/Modify a Page Region 1 Left Click on a Page Region (e.g. Body), Right Click and select New Region… 2 From the Page Region Selection Dialog select a Region 3 From the Region Properties Dialog, insert the Region Extension 1 4 It is possible to specify all related properties (e.g. Borders) 3 2 4
FOA tutorial Create a New Page Sequence (1) 1 Left Click on Page Sequences, Right Click and select New Page Sequence… 2 • From the Page Sequence Selection Dialog select a type of Page Sequence. FOA allows: • single (an unrepeatable page) • repeated (a repeated page with optional first and/or last page) • alternating (odd and even pages and/or a first and/or a last) 1 3 Assign to every specific positions a page among the available ones 3 2
FOA tutorial Create a New Page Sequence (2) 1 The statementLetter sequence is an unbounded repeated sequence of the page letter without a first and last page. 2 Once the page sequence has been created, it is added to the Content Sequence Manager as well as every kind of region composing the pages of the sequence 1 Note: according to XSL-FO specs: header = before, footer = after, left = start, right = end (relative to the body or document flow). 2
FOA tutorial Open an XML content file 1 Click Open button from XML Content Manager 1 2 From the file chooser you can select the amount of content that you want to load from XML file. This can be useful when you have very large XML files. 3 Once opened, you have a tree representation of your XML file 3 2
FOA tutorial Attribute Sets: Creation 1 New Attrib. File, select a class of attrib. and then select New Attrib. Set 2 The “class” Properties dialog allows you to specify properties. According to XSL-FO Specs you have common and specific properties. 3 On the left tab panel you can select the property group 4 4 The saved set shows all its properties 1 2 3
FOA tutorial Attribute Sets: Add/Modify 1 Select the Attribute Set class and then an Attribute Set 2 When you choose to add and modify an Attribute Set, the “class” Property dialog shows the previous set properties with a (*) symbol 3 You can modify these values or change the values of new properties adding them to the Attribute Set 1 2 3
FOA tutorial Attribute Sets: Variants 1 Select New Variant of Attribute Set to create a new variant 2 The “class” Property dialog shows the SpecialText properties with a (*) symbol 3 When you update your variant, only the different properties and values are added to the variant. So when you style a text block with SpecialText1 you will use all the SpecialText properties ( ) and add/override them to the SpecialText1 ones. 1 2 3
FOA tutorial Attribute Sets: Export to CSS 2 1 1 Export the Attributes in a CSS2 file
FOA tutorial Adding content to a Sequence 1 Change Content Reference button allows you to select a tag from the XML content file. 2 Once selected, you can choose that particular occurrence or all those kinds of tags 3 3 In the Content Sequence Manager it is now possible to see the selected content. 1 Note: in this case the order is important, because it affects the flow content order into the XSL-FO document 2
FOA tutorial Update Content Sequence Properties 1 1 From the Content Sequence Manger right click on the Content Sequence and select to update the properties 2 These properties are related to the page numbering. You can select the initial page number and force the page counting. 2 3 This second set of properties is related to the page number formatting, see the Page Number Brick for more details 3
FOA tutorial Bricks: Fundamentals (1) <xsl:template match="" foa:name="" foa:class="" foa:group=“” foa:type=“”> <fo:element foa:name="" xsl:use-attribute-sets=""> <xsl:apply-templates [select=""]/> or <xsl:value-of select=""/> </fo:element> </xsl:template> Simple Brick 1 Complex Brick 2 Simple Brick Simple Brick Simple Brick Simple Brick 1 • The basic XSL transformational element in FOA is called Brick. A Brick is usually composed of some information: • name: identifies the Brick (univoque) • class: identifies the kind of FO class it is related to (e.g. block level, inline level) • group: identifies the Brick element (e.g. paragraph, emphasis, image …) • type: identifies the Brick part of the group (it will be the same if it is a Simple Brick) 2 A complex Brick can be achieved composing two or more simple Bricks. Every simple Brick must have the basic information, but can have different FO elements. A complex Brick can be a List, formed by the following simple Bricks: the List Brick, the Item Brick, the Label Brick and the Body Brick.
FOA tutorial Bricks: Fundamentals (2) <xsl:template match="" foa:name="" foa:class="" foa:group=“” foa:type=“”> <fo:block foa:name="" xsl:use-attribute-sets=""> <xsl:apply-templates [select=""]/> or <xsl:value-of select=""/> </fo:block> </xsl:template> 4 2 1 1 The Brick Dialog allows you to insert all required info. 2 The Match field gives the opportunity to set the Brick entry point into the XML content (XSL-T match) 3 Select a tag from the XML and the match will be automatically updated 4 Class, group and type are automatically chosen when you select the Brick element (e.g. paragraph) 3
FOA tutorial Bricks: Fundamentals (3) <xsl:template match="" foa:name="" foa:class="" foa:group=“” foa:type=“”> <fo:block foa:name="" xsl:use-attribute-sets=""> <xsl:apply-templates [select=""]/> or <xsl:value-of select=""/> </fo:block> </xsl:template> 1 1 Select a style among the defined ones. You will able to select a style among all the defined styles inside the Brick class 1 2 The default situation for the Brick is to have content inside the element. 2 3 If your content is outside the element, you can specify a new tag (also in a different XML file) from which the content will be taken 3 4 4 If the content is inside an attribute, you can select it
FOA tutorial Bricks: Matching (pattern path) 1 2 1 2 3 4 3 4 1 Full path selection: all the elements inside the match pattern /doc/section/chapt/par 2 Mid tag path selection: all the elements inside the match pattern //section/chapt/par 3 Mid tag path selection: all the elements inside the match pattern //chapt/par 4 Leaf tag path selection: all the elements inside the match pattern //par
FOA tutorial Bricks: Matching (position constr.) 1 1 2 2 1 Match all the elements, as expressed into the pattern path, which are second. 2 Match all the elements, without any pattern path, which are second Note: the position constraint can be used in combination with all possible slider entries
FOA tutorial Bricks: Matching (attributes constr.) 1 1 2 1 Match all the elements, as expressed into the pattern path, which have the attribute id=‘1’ 2 2 Note: the attribute constraint can be used in combination with all the possible entries of the slider
FOA tutorial Bricks: Cont. Sel. (outside tag) 1 Set the Brick match If the content is not inside the matching tag, select “content outside” 2 Select the content tag from an XML file 3 The sel. process works like the match one, except that you can express pos. constr on all the tags present in the tree path 4 1 3 2 4
FOA tutorial Bricks: Cont. Sel. (inside attribute) 1 Set the Brick match If the content is inside one of the matching tag attributes, select “content inside match tag attribute” 2 3 Select the tag from the XML (it must be the same of the matching) 1 4 Tick the attribute in which there is the requested content 2 3 4
FOA tutorial Inspect Brick matching against XML 1 Click on the Content Matching Finder Icon 1 2 Using the “right” click on a matched element (in black) the corresponding brick name and group will be highlighted 2
FOA tutorial Paragraph and Emphasis Bricks 1 3 2 4 5 1 Brick name field 2 Matching button Note: the Emphasis Brick has the same GUI 3 Style selector 4 Outside Match tag content selector button 5 Match tag attribute content selector button
FOA tutorial Page Number Brick 2 3 1 1 Define the Page Number Brick like an Emphasis Brick 2 Edit the Content Sequence Properties Format the page numbering style Note: these properties are related only to the page numbering style. For other style info refer to the Inline class 3
FOA tutorial Image and Ext/Int Link Bricks e.g.: Image 1 2 e.g.: External Link e.g.: Internal Link 3 4 1 2 4 5 6 The same as Paragraph Brick 3 Attribute Content selection button: it allows you to select the content of an attribute of the XML matching tag which points at the image or at external link href or at internal id ref. 5 6 Note: the External and Internal Link Bricks have the same GUI
FOA tutorial Ordered List Brick 3 4 1 2 5 6 7 8 1 Match tag to the entire list 4 Item style (class=“block”) XML Generic Model Select content outside item element 2 Format of the numbering (eg 1, I) 5 3 Match tag to the list item element 6 List style (class=“list”)
FOA tutorial Unordered List Brick 3 4 1 2 5 6 7 8 1 Match tag to the entire list 4 Item style (class=“block”) Label type (it can be selected from an attribute field of the XML: WH2FO compatibility) XML Generic Model Select content outside item element 2 5 6 List style (class=“list”) 3 Match tag to the list item element
FOA tutorial Label & Body List Brick XML Generic Model 1 2 3 1 Match tag to the entire list 2 Match tag to the label list element 4 3 Label style (class=“block”) 5 4 Select content outside label element 6 5 Match tag to the body list element 6 Body style (class=“block”) 7 7 Select content outside body element Note: the Brick Content tab is the same of the Ord/Unordered List
FOA tutorial Item, Label & Body List Brick XML Generic Model 1 2 3 4 1 Match tag to the entire list 5 2 Match tag to the list item element 3 Item style (class=“block”) 4 Match tag to the label list element 6 5 Label style (class=“block”) 7 6 Match tag to the body list element Note: the Brick Content tab is the same of the Ord/Unordered List and Label and Body work like they do in Label&Body List 7 Body style (class=“block”)
FOA tutorial Simple Table 1 2 3 1 General table description 4 2 Columns management 3 Rows management 4 Cell management
FOA tutorial Simple Table: Columns 1 2 3 4 Note: the columns order (inside this list) is important because it will reflect the real table column widths. 1 Insert a column before the selected one 2 Insert a column after the selected one 3 Delete a column 4 Edit the column width
FOA tutorial Simple Table: Rows 1 2 3 4 1 Insert a row before the selected one 2 Insert a row after the selected one 3 Delete a row 4 Edit the row brick Note: the rows order (inside this list) is NOT important because it will be established by the matching rule and the XML content
FOA tutorial Simple Table: Cells 1 2 3 4 1 Insert a cell before the selected one 2 Insert a cell after the selected one 3 Delete a cell 4 Edit the cell brick Note: the cells order (inside this list) is NOT important because it will be established by the matching rule and the XML content
FOA tutorial Complex Table 1 2 3 1 General table description 2 Columns management 3 Style and content selection
FOA tutorial Complex Table: Body 1 Note: Before Editing and creating Body, Header and Footer give a name to the Complex Brick 2 3 Note: Table Body, Header and Footer are similar to the Simple Table Brick, without the column description. 1 Add Header Button 2 Modify Body Button 3 Add Footer Button
FOA tutorial Complex Table: Header/Footer 2 1 3 1 Select Add Header 2 Set all the Table Header parameters 3 After the update you can modify the newly created sub-Brick or delete it
FOA tutorial Global Settings: set-up and load 2 1 5 4 From Render menu select an external XSL-FO viewer to invoke 1 3 2 Write the command line or browse 3 Select the application You can load a config.foa file that contains all the global settings. 4 5 Windows users there is one on the settings dir (see installation)
FOA tutorial Variable Set Manager: Parameters 2 1 1 Create a new XSL-T parameter 2 Assign a name to the parameter 3 Modify the parameter name 4 Delete the parameter 3 4
FOA tutorial Variable Set Manager: Variables 1 Create a new XSL-T variable 2 Modify an existing XSL-T variable 3 Set the variable name 4 • Assign the variable value • select option uses the select construct to assign the value to the variable • content definition uses the content inside the tag option to assign the value to the variable 1 3 4 2
FOA tutorial Variables: How to use them (1) 1 2 1 Match the “static” content on the document model 2 Select the “variable” content from one of the document instance value sets
FOA tutorial Variables: How to use them (2) 3 3 Select the content path Choose one element in the path to make variable 4 4 5 Select if you want to replace it with a variable or just insert a variable before 5 6 6 Select the variable you want to insert or replace
FOA tutorial Variables: How to use them (3) 7 8 7 Select one of the defined variables Apply the changes. Now the content value is dependent on what is the value of the variable customerFile 8
FOA tutorial Generate XSL-FO: create makefile 2 4 3 5 1 Generate FO command will open the XSL-T Processing dialog that uses makefiles 1 2 Set the various parameters to execute the XSL-T processing 3 If the project has an external parameter set its value or file reference 4 Save the makefile (.mk) relative to the project IMPORTANT: remember to save the project before creating the FO file. Only saving the project you write/modify the XSL-T file 5 Execute the XSL-T processing
FOA tutorial Generate XSL-FO: open makefile 2 1 3 Generate FO command will open the XSL-T Processing dialog that uses makefiles 1 2 Load the makefile (.mk) relative to the project 3 Execute the XSL-T processing
FOA tutorial Rendering into PDF 2 2 1 3 Render Document command will open the PDF Rendering dialog that uses makefiles 1 2 Load the makefile (.mk) relative to the project IMPORTANT: the makefile contains both the information for the XSL-T processing and the Rendering. So to complete the setting you need to save it, on the same file for both operations
FOA tutorial Preview: Generation IMPORTANT: remember to save the project before generating the preview. Only saving the project you write/modify the XSL-T file 2 1 3 1 Load/Set the makefile and select “Generate Preview” 2 Press the run button to start the XSL-T process 3 Close the window 4 The Rendering for Pre-view will be automatically opened, press Run then Ok. 4 Note: the preview information are generate using a customized version of FOP (based on 0.20.5) that is inside the FOA distribution package
FOA tutorial Preview: Document 1 2 3 1 Menu bar for document browsing and zooming 2 Logic Tree: this tree represent the current page inside the sequence with all the regions and the brick composing them 3 XML rendered doc: This is the document preview, it’s based on an XML description of the rendered areas
FOA tutorial Preview: Document browsing 1 2 3 4 5 1 Browsing controls: first page, previous page, next page, last page. 2 Page jump field: get the requested page number and goes for it. 3 Fit to page: enlarge or reduce the document preview side to fit the entire page in the current window dimension. 4 Zoom control: specify the zooming factor (in and out) 5 Re-generate button: if you made some variations to the Bricks you can see the results
FOA tutorial Preview: Brick highlighting 1 Select a Brick from the Logic Tree: BrickName[class][instance] 2 The corresponding area will be highlighted inside the rendered document Note: changing the one Brick instance will affect all the other instances 1 2
FOA tutorial Preview: Brick variations 2 1 Select a Brick from the Logic Tree and select the Modify Brick option 2 FOA will open the corresponding Brick dialog and will allow you to modify it. 1