Download
1 / 51
660 likes | 783 Views
Ethereum Smart Contracts. Cyrus Jian Bonyadi and Shuai Xu. Outline. Introduction to Ethereum Ethereum Contextualization Proof of Stake and its uses Smart Contracts What does a Smart Contract look like? Smart Contract uses Lab Configure the network Create and run contracts on the chain.

E N D
Ethereum Smart Contracts Cyrus Jian Bonyadi and Shuai Xu
Outline • Introduction to Ethereum • Ethereum Contextualization • Proof of Stake and its uses • Smart Contracts • What does a Smart Contract look like? • Smart Contract uses • Lab • Configure the network • Create and run contracts on the chain
Intro to Ethereum Ethereum can be thought of as similar to bitcoin. https://pbs.twimg.com/profile_images/421692600446619648/dWAbC2wg.jpeg https://s.yimg.com/ny/api/res/1.2/79GZvpsBiB0w.4UMxQEijw--~A/YXBwaWQ9aGlnaGxhbmRlcjtzbT0xO3c9ODAw/http://media.zenfs.com/en-US/homerun/coin_rivet_596/45607ac1ecdfb82f720db97b79887702
Intro to Ethereum Ethereum can be thought of as similar to bitcoin. https://pbs.twimg.com/profile_images/421692600446619648/dWAbC2wg.jpeg https://miro.medium.com/max/1139/0*WyOt131FrOiIBGA_
Differences between Proof of Work and Stake https://hackernoon.com/hn-images/1*UTvlKIjMW7DK-ztV5VL2fQ.png
Types of Ethereum Private Ethereum has authorized nodes joining the network as opposed to arbitrary nodes. Private Ethereum currency is not equal to the cryptocurrency in public ethereum. Private Ethereum is more secure but cannot as easily trust the primitives of Proof of Stake as it has fewer nodes. Private vs public Ethereum
Uses of Ethereum Public • Cryptocurrency • Basis for public record • Others? Private • Organizational database • Personal smart contracts • Others?
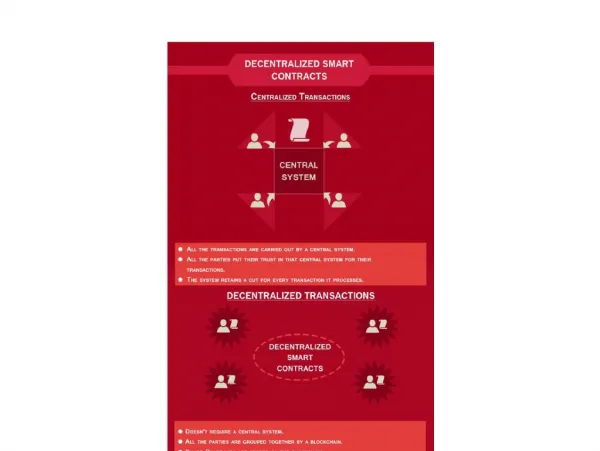
Smart Contracts Smart Contracts are the transactions committed to a blockchain network. They must be compiled and migrated into the network. Contracts are verified as they are uploaded into the network and are consistent across all machines to guarantee validity. https://static.coindesk.com/wp-content/uploads/2017/03/Screen-Shot-2017-03-28-at-5.43.08-PM.png
Smart Contract Uses • Printing Hello World • Sending money • Storing sensor data • Others? https://static.coindesk.com/wp-content/uploads/2017/03/Screen-Shot-2017-03-28-at-5.43.08-PM.png
Entering the VM Start up the VM. Notice the shell scripts on the Desktop. Open a terminal in the VM. cd to /home/demo/Desktop
Observe genesis.json This file contains the configuration of the network. The network builds with 3 addresses, each with a certain amount of money to begin. We set the difficulty to 1, though this is rather arbitrary as we modified the ethereum code. eip blocks are used when forks are needed. Chain id protects from replays, so we set it to something reasonable that changes, like the year.
Observe the commands in the scripts initChain - builds the chain into the directory. startChain - starts a single server instance of the chain. mineChain - starts a mining server instance of the chain. enterChain - attaches to the chain. rmChain - removes the directory to start fresh.
Start the chain In one terminal: ./initChain.sh ./startChain.sh Then, in another: ./enterChain.sh
Check the chain In the enterChain.sh terminal: web3.eth.accounts #should be the same as genesis.json web3.eth.getBalance(web3.eth.accounts[0]) #should be 30000 web3.eth.getBalance(web3.eth.accounts[1]) #should be 40000 web3.eth.getBalance(web3.eth.accounts[2]) #should be 50000 Web3.eth.coinbase #should be one of the accounts. Which one? Why? (1) Web3.eth.mining #should be false. Why? (2)
Start the miner Cancel both terminals (exit the enterChain.sh terminal, and ^C the server). Run ./mineChain.sh on the server chain. Re-enter the chain and check the balance of the mining chain: web3.eth.getBalance(web3.eth.coinbase) # How can we check the balance of a different account? (3)
Start editing a contract Close the miner down. cd to the “truffle/contracts” directory. Create “HelloWorld.sol”: nano HelloWorld.sol
HelloWorld.sol pragma solidity >=0.4.21 <0.6.0;contract HelloWorld {stringpublic message;function Hello() public{ message = "Hello World!"; }} “Ctrl + x “ Input “y” “Enter” to exit
Configure Truffle Migration To migrate our Smart Contract, we will have to add a file in the “migrations” directory in the “truffle” directory. In this directory we will add a file named “2_deploy_contracts.js” (Any other file name you want )with the following contents in it:
~/Desktop/truffle/migrations/2_deploy_contracts.js const HW = artifacts.require("HelloWorld");module.exports = function(deployer) { deployer.deploy(HW);};
Observe truffle-config.js in “truffle” directory module.exports = { rpc: { host:"localhost", port:8543 }, networks: { development: { host:"localhost", port:8543, network_id:"*", from:"0xfa2361236b5ac8079cb6cf250e5284922ed9ba9a", gas:20000000 } }};
Compiling and deploying smart contract personal.unlockAccount(web3.eth.coinbase) #no password $ truffle migrate Before migrating the contract, we must start the chain. Should we start a server or mine? Why? (4) $ truffle migrate $ truffle console
Truffle console $ var first_contract$ HelloWorld.deployed().then(function(instance) { first_contract = instance; })$ first_contract.Hello() $ first_contract.message.call()
Congratulations! Congratulations! You have created your first Ethereum Smart Contract and executed it. I hope this Ethereum Smart Contract tutorial was informative and helped you understand about how to execute an Ethereum Smart Contract.
Q&A • Which account is used as the mining account by default? Why? • What does the web3.eth.mining variable mean? • How can we check the balance of another account? • Do we need to mine to run smart contracts? Why? • Learn some basic Solidity grammar and write another contract to 1). Initialize a number variable when deploying(hint: How do you initialize a variable in object oriented language?) 2) Two functions to increase/decrease that variable 3) A function to return value of that variable.
Appendix I - Installation on Ubuntu 16.04 LTS Housekeeping sudo apt-get update sudo apt-get upgrade sudo apt-get install -y build-essential sudo apt-get install git cd ~ git clone https://github.com/ethereum/go-ethereum.git
Appendix I - Installation on Ubuntu 16.04 LTS Go 1.9.3 - Cd to home directory and download Go1.9.3 cd ~ wget https://dl.google.com/go/go1.9.3.linux-amd64.tar.gzYour download can be verified against the live Go website using the following sha256sum command: sha256sum go1.9.3.linux-amd64.tar.gz
Appendix I - Installation on Ubuntu 16.04 LTS Unpack Go, type the following command (using sudo)sudo tar -C /usr/local -xzf go1.9.3.linux-amd64.tar.gzTo ensure that the Go path is set for your user profile. Add the following line to the end of your ~/.profile file export PATH="$PATH:/usr/local/go/bin"
Appendix I - Installation on Ubuntu 16.04 LTS Reducing the mining difficulty of Ethereum - since we want the quickest mining time possiblecd ~ gedit go-ethereum/consensus/ethash/consensus.goAt around line 298 you will see a function called CalcDifficulty. The following image shows how this function sets the mining difficulty by calling one of 3 other functions (more specifically the Frontier, Homestead or Byzantium related difficulty adjustment).
Appendix I - Installation on Ubuntu 16.04 LTS If you remove everything inside this particular CalcDifficulty function and just add a single return statement, as pictured below, the mining difficulty will remain at its lowest possible difficulty level on an ongoing basis.
Appendix I - Installation on Ubuntu 16.04 LTS Building Go Ethereum cd ~ cd go-ethereum make geth
Appendix I - Installation on Ubuntu 16.04 LTS Network ID The network ID for the main Ethereum network is 1. If started in default mode, the code will automatically connect to the main Ethereum network. Alternatively, the network ID can be passed into the command line when starting Go Ethereum Obviously, in order to keep other nodes from connecting to your private Ethereum network it would be in your best interests to a) secure the network using a properly configured firewall and b) choose a unique network ID within your network. We will be using a network id of 15 today
Appendix I - Installation on Ubuntu 16.04 LTS Account In a moment we will be using a once off mechanism to fund our accounts. Before we use that mechanism we need to: a) create a data directory for Ethereum b) create our new accounts and c) save those account details for use on future steps.cd ~ mkdir gethDataDir geth account new --datadir ~/gethDataDir
Appendix I - Installation on Ubuntu 16.04 LTS Genesis block When running Ethereum for the first time, if the default settings are used, the blockchain will start at the “hard coded” genesis block (first block in the public main net blockchain). From this point onward the code will find peers and synchronize until the Ethereum instance which you are running is up to date. Being synchronized, or up to date, means that you are storing everything from the genesis block, right up, to the most recent block, locally. Ethereum’s blockchain is almost 45GB in size and so for our purpose of testing this is not desirable. You may recall that this is one of the reasons why we chose to run our own private network.
Appendix I - Installation on Ubuntu 16.04 LTS In order to run our own network, we are going to create our own genesis block. To do so, we create a file, such as below, and save it (into the recently created ~/gethDataDir) with the name genesis.json:
Appendix I - Installation on Ubuntu 16.04 LTS { "config": { "chainId": 15, "homesteadBlock": 0, "eip155Block": 0, "eip158Block": 0 }, "difficulty": "1", "gasLimit": "2100000", "alloc":{ "yourNewlyCreatedAccountAddressMustGoHere": { "balance": "300000" }, "yourNewlyCreatedAccountAddressMustGoHere": { "balance": "400000" }, "yourNewlyCreatedAccountAddressMustGoHere": { "balance": "500000" } } }
Appendix I - Installation on Ubuntu 16.04 LTS Note you must paste your newly created account addresses in the “alloc” section and then fund them in the “alloc/balance” section (as demonstrated above) Note how the “chainId” section is deliberately set to 15 (our private networkid)
Appendix I - Installation on Ubuntu 16.04 LTS Initializing the blockchain cd ~/gethDataDir geth --datadir ~/gethDataDir/ init genesis.jsonStarting Ethereumcd ~ geth --datadir ~/gethDataDir --networkid 15
Appendix I - Installation on Ubuntu 16.04 LTS The above command will start our Ethereum private network and, among other things, will provide an Inter-Process Communication (IPC) endpoint
Appendix I - Installation on Ubuntu 16.04 LTS Connecting to the IPC endpoint (starting and using the console)cd ~ geth attach ipc:gethDataDir/geth.ipc The following commands will: a) list the Ethereum accounts which we recently created b) show our account balances c) reveal our coinbase address (where mining rewards are sent) and d) show our mining status (true/false)
Appendix I - Installation on Ubuntu 16.04 LTS web3.eth.accountsweb3.eth.getBalance(web3.eth.accounts[0])web3.eth.getBalance(web3.eth.accounts[1])web3.eth.getBalance(web3.eth.accounts[2])web3.eth.coinbaseweb3.eth.mining
Appendix I - Installation on Ubuntu 16.04 LTS Mining the Ethereum private network As you can see from above, the Geth instance that we are running is not performing any mining. To mine the Ethereum private network you must: a) stop the original geth instance by pressing “ctrl + c” in the main window b) disconnect from IPC by typing exit in the console c) type the following commandscd ~ geth --mine --minerthreads=1 --datadir ~/gethDataDir --networkid 15
Appendix I - Installation on Ubuntu 16.04 LTS Please note the specific parameters which we provide such as datadir and networkid. These are to ensure the mining takes place using the correct accounts and network
Appendix I - Installation on Ubuntu 16.04 LTS As you can see from the output, we are now mining and sealing new blocks every few seconds If we open a new tab and connect to the console again, we can see that the coinbase account balance has increased significantly due to its successful mining operations. Note the two different ways in which we accessed the coinbase account’s balance. Firstly by obtaining and using the account’s address explicitly and secondly by nesting the two web3 commands together (passing the coinbase account address as an argument to the getBalance function).
Appendix II - Truffle Truffle is a Development Environment, Testing Framework and Asset pipeline for Ethereum Blokchains. To install Truffle, run the following command in your terminal:npm install -g truffle
Appendix II - Truffle $ mkdir truffle $ cd truffle $ truffle init
Appendix III - Solidity Compiler Solidity is a programming language used to write Smart Contracts. To run smart contracts on our system, we have to install Solidity Compiler. To install Solidity Compiler, run the following command in your terminal:sudo npm install -g solc


![Smart Contracts Market, by Contract Type (Smart Legal Contracts, Decentralized Autonomous Organizations [DAO] Contracts,](https://cdn5.slideserve.com/10228895/slide1-dt.jpg)