Download
1 / 56
630 likes | 864 Views
Winnipeg Blue Bombers 2010 Wide Receiver Manual. Table of Contents. Coaching Philosophy Position Philosophy Position Goals Stance & Start (Alignments) Reading Defenses Releases Stems Route Technique Catching The Football Blocking Warm Up Drills Fordham’s Offensive Overview.

E N D
Winnipeg Blue Bombers 2010 Wide Receiver Manual
Table of Contents Coaching Philosophy Position Philosophy Position Goals Stance & Start (Alignments) Reading Defenses Releases Stems Route Technique Catching The Football Blocking Warm Up Drills Fordham’s Offensive Overview
Position Philosophy Position Philosophy My Philosophy as a wide receiver coach is to define the fundamental skills essential to playing successful football. Our position play is predicated on working hard at helping the offense make big plays. Key components in blocking, catching the football, running precise routes and scoring touchdowns are important ingredients to a successful offense. Blocking: I believe this is the heart of wide receiver play. The will to learn and understand the assignment as well as, keeping a good stance is a great way to gain advantage over the defensive back. Being able to block at the wide receiver position is just as important as any offensive position. Many long runs, or short receptions that turn into long gains, are the result of a wide receiver’s willingness to block. Catching the Football: is not just about possessing great hand-eye coordination, it’s about being able to play the position with poise, under pressure and distraction. This is the true test of the position. Running routes: Running precise routes with intensity, hustle and recognizing coverage’s is the key to out-smarting the defensive back. Furthermore, wide-receiver must know the basic elements or route running: (locate corner, near side linebacker and safety) stance and start, releases, pad-level and get-off. The receiver runs hard for four quarters while the defensive back slows down, the receiver’s effort becomes relentless and he wins the battle. Scoring: is the hardest skill to teach. Scoring depends on how well the wide receiver incorporates all the dynamics from the practices, film study and actual game experiences. Ultimately, my offensive philosophy stems from sound fundamentals and hard work. With Self-discipline, determination, 100% effort and hustle, the direct result will prove positive towards the offense unit success.
Position Goals • Give 100% effort and hustle • Block on every play • Beat press coverage using good release techniques • Run precise routes • Catch every pass that is thrown in my direction • Ball Security (Limit Turnovers) • Make Big Plays (Run and Passing game) • Master the Offensive system • No dumb penalties • Help the team win East Division and Gray Cup Championship • To be the best WR Corp in CFL
Everyday Goals • Did we outwork the Defense (One on One’s, Skelly, Hook-up, Team)? • Did we communicate on every play (Huddle and Alignments) • Did we use our fundamental techniques in the run game, pass game and screen game? • Did we catch every ball thrown our way (not just for our individual stats but for our QB, O-LINE and ENTIRE team)? • Did we make BIG PLAYS and play with excitement and passion?
POSITION PROGRESSION “WHAT” TO DO AND “HOW” TO DO IT IS KEY TO SUCCESS K PROGRESSION CLASSROOM ALIGNMENT - HOW TO LINE UP! ASSIGNMENT – WHAT TO DO! SPLITS – ROUTE SPACING! FIELD STANCE – EFFICIENT! RELEASE – “HAVE A PLAN”! TOP OF ROUTE – WHAT THE ROUTE CALLS FOR! FINISH- DIFFERENCE BETWEEN GOOD & GREAT PLAYERS
WR Practice Schedule Periods Time Instructions Tempo Comments Warm up Drill Low Fundamentals Pre Practice Combo Drills ROA 10 Minutes Route Running High Concept of the Day High Individual Catching 10 Minutes Jugs /Tennis ball High 10 Minutes Hook Up Blocking Compete 1 on 1 10 Minutes WR’s vs. DB’s High Beat Press Screen Drill 10 Minutes Screen Vs. Cut Bags High Landmarks
Alignment WR’s Alignment • Horizontal (We will use the numbers (#’s) as • guides.) • Middle of the field alignment: • Max Split- Bottom of the #’S , never closer than 6 • yards from the sideline • Normal Split- Top of the #’S • Mini Split- Split the difference between the #’s • and the has • Nasty Split – Align 4-6 yards outside the OT/Y • Hash Rules To the field • Max Split – Bottom of the #’s • Mini Split – Align on the Hash • Hash Rules – Into the boundary • Max Split – No closer than 4-6 yards from the • sideline • Normal Split – Top of the #’s • Mini Split – Split the difference between the top • of the #’s and OT/TE • Nasty Split – 4-6 yards from the OT /TE • Hash Rules - To the Field • Max Split – Bottom of the #’s • Normal Split – Split the difference between the • #’s and the hash • Mini Split - Align on the hash • Nasty Split – 4-6 yards from the OT / TE • Note: WR alignment is based on the play type.
Motions and Shrifts • Why Motion? • Gives defense a different look • Match ups purpose (WR VS. LB) • Helps offense gain a extra man at • P.O.A • Help offense disguise base plays • Allows the Offense to out leverage • the defense • Helps WR release clean from LOS
Stance • Stance • 2 Point, outside foot back. Both knees bent, forward • Lean with weight on balls of feet. Shoulders over • Feet. Elbows slightly bent. (Sprinter’s stance from 2 • point.) Get a picture of the pre-snap coverage, but • you must see the snap of the football. ( Combat or • Relax Stance.) • Alignments • A. Vertical • 1. Outside WR (X)- On the line scrimmage. Helmet • must be within rear most part of the center. (Put • front foot even with front foot of the tackle.) • 2. Inside WR (Z)- Off the line scrimmage but critical • that you crowd the ball as much as possible. Prevent • wasted space, but don’t cover the TE. Your helmet • must clear rear most part of nearest down lineman, • not including center. (Put front foot even with back • foot of TE.)
Stance • Start • The start will be initiate by driving forward off the • back leg and, almost simultaneously, pushing into • the stride with the front leg. The first several steps • should drive the WR up and out of the stance. • WR must have enough weight distribution to the • back foot and enough knee flexion to drive it • forward: 60% - 40% distribution. • First Step: (Start) • No false steps – front or back foot. • No false movement – front knee bend. • Transfer all weight to front foot, push off front • foot, rip back foot through. • Great arm action ( 90 degree running form) • Stay low – flat back. • Shoulders must drive down as he explodes from • the LOS, hiding his numbers from the DB. • 7. Make Eye contact with defender
Reading Defenses • Coverage Identification • The majority of our route conversions are based on defender’s • techniques rather than on particular coverage's. It will benefit the • receiver, however, to be able to identify basic pass coverage's and • have some idea of how they work. They will help you to understand • the overall pattern concept, not just your individual assignment. • Two Basic Elements of identification: • Contour • As you set in your stance, glance at the overall “contour” or shape • of the coverage, accounting for depth and alignment, then narrow • your focus to the three defendants nearest you. This called • “READING THE TRIANGLE”. The configuration of these three • defenders will not only tell you what the coverage is, it will identify • each defender’s responsibility. • Technique • A second method is reading the technique and body posture of the • defender over you. Zone coverage defenders will normally be • looking in at the football. Their posture will be fairly upright, their • depth will be loose and alignment will be head up to outside. Man • coverage defenders will be aligned insides, looking directly at the • receiver. Depth will be tighter than usual and their stance will be • lower to the ground and more compact. • Note: All coverage identification must be confirmed after the snap!!!
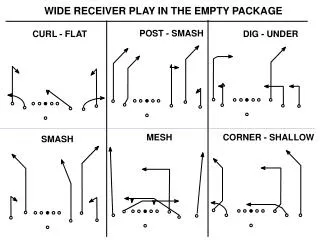
Reading Defenses C F F C OLB SS COVER 3 TRIANGLE A deep outside third defender and a deep middle third defender positioned in MOF. Curl to flat defender is close to the LOS. He may hold-up inside receiver or expand quickly to the outside
Reading Defenses C F F C OLB SS
Reading Defenses • Roofline • The Roofline is the outline of the coverage and will tell the Wide Receiver • the number of defenders deep. MOFO=Cover 2,4 and 6, MOFC=Cover 1,3. • Examples of Roofline Example of Cover 2 Roofline (MOFO) F D C C W M S R T N E Q C F C S M W D N R T E Q Q Q Q Q Q Q Q
. Releases • When releasing from the Line of Scrimmage the WR needs to a have a plan for • how he going to attack the defense. The WR plans depend on the technique used • by the corner. The WR must execute his plan using good technique. • Furthermore, the WR needs to change up his plan , so the corner does not catch • onto his release. • Basic Premise: • Release with your feet, finish with your hands. • Beat the defender off the ball with speed before he has a chance to react. • Move the defender. Make him move his feet, get him off balance, get him out of the way. Types of Releases: Speed Release - Use speed release whenever possible. It gets the receiver vertical immediately. Put the release side foot back. Find a spot 1 yard outside and 1 yard in back of the defender. Explode out of your stance taking your first step at that spot. Get low and skinny taking the target away from the defender. Rip the opposite arm and leg through getting vertical. The key is beating the off the ball with speed and staying low . This release is used when defender is playing a soft type of press or when there is space between the WR and defender. Stutter - A quick 3 step maneuver used to force defender to set his feet. Shorten your stride length on the leg opposite the direction you are releasing. This followed by two quick balance steps where your feet are about parallel and directly under the hips. Pop the near side foot and crossover, pulling the opposite leg through, accelerate (get up on your toes)! Single Move – A change of direction maneuver very similar to the stutter, but with a more deliberate first step at the shoulder opposite the side of escape ( also a “heavy” head and shoulder lean, get your chest over the front leg). Since this is a slightly slower escape you must work hard to pull the opposite leg through on the crossover. Double Move – Use when defender expects the single move. Step to the side of your desired release using quick feet and staying low. The defender expecting you to come back the other way. Foot Press and head stick at the defender then go.
. Releases Types of Releases: Swim -The swim release can be used as a change up release to the rip release WR needs to hammer the forearm of the defender to the side of the escape. Strike with a closed fist and a firm lower arm. Turn your chest to the defender and whip your far side arm over his shoulder. The far side arm should also be firm with a closed fist, striking the defender in the back. WR should cross over with the far inside leg as you swim. Its critical to get the leg at least even with the defenders hip. Use the far side arm to push yourself into the stem. Diamond – Step opposite the side your release for 3 steps in attempt to make the defender move in that direction. You must use quick feet and be ready to finish with your hands. Stay low and compact. The key is to sell the defender with your hips, toes, shoulders and eyes. Throw By– The throw by release is a release used vs. hard press technique inside. The WR is going to take a outside release pushing vertical and at the top of the he should plant off his outside foot. He is going to take his inside arm and grab the waist of the DB and pull himself through with his outside arm. This release is used on Curl and Dig routes. Whip – This is abbreviated version of the swim. The whip is used vs. a defender who is simply trying to get his hands on you, not necessarily trying to collision your release. Swat with arm to the side of escape and whip the far side arm over the extended arms of the defender. Pull through with the far side arm and get the defender’s hands low. Note: Accelerate up the field. Best -The best release is used by outside WR running vertical routes vs. squat or rolled up corners. The WR needs to attack the DB’s outside shoulder with low pad-level. If the DB gives the WR a hard shoulder outside denying him the outside, then the WR needs to plant his outside foot in the ground and slip back inside to his landmark. On the contrary, when the DB is giving the WR a soft shoulder outside the WR needs to attack the shoulder and stay outside working to his landmark full speed. Note: The best release will turn into a positive outside release if any WR aligned inside the outside WR runs a out or flat route.
. Stem Stemming allows the WR to attack the DB’s leverage. WR eyes should look through the DB, not at ground. Movements must be precise as they indicator of making a break. This area of the route is where expression becomes critical. The use of our eyes, head, shoulder fakes and change of speed are critical.
. Release Drills Partner Release Drills: Speed Release Single Release Drill Double Move Drill Best Release Semi Best Release Throw By Drill Diamond Release
. Route Technique Techniques used to Change Direction: Digs & Outs – We can use a “Speed Cut” Technique or a “Square Cut” Technique. Speed Cut – Stick your foot in the ground , point your toe and angle step, snap your head around and get FLAT as quick as possible. Remember On speed cut we want to change directions without losing speed or body Position. “DIG” “OUT” 12 Yards = Final Depth 15 Yards = Final Depth Be Flat Be Flat Foot in ground at 12 Yards Foot in ground at 9 Yards 1. Run a straight line to break point Stick Outside foot in the ground (Start foot press 3 yards from final depth 3. Point your toe and angle step and snap your head around 4. Flatten at the final depth of route. 1. Run a straight line to break point Stick Outside foot in the ground (Start foot press 3 yards from final depth 3. Point your toe and angle step and snap your head around 4. Flatten at the final depth of route. WR e WR
. Route Technique Techniques used to Change Direction: Hooks & Comebacks – We can use “Run” around the Cone Technique. Run around the cone– Stick your foot in the ground at the proper depth , sink your hips, point your toe and angle step, snap your head around the Cone. Stay low and compact and keep your arms moving. “Hook” “Comeback’ 14 Yards = Final Depth 14 Yards = Final Depth Foot in ground at 12 Yards Foot in ground at 12 Yards Run a straight line to break point Stick Outside foot in the ground at designated depth and sink hips. Point your toe and angle step and snap your head around. 4. Run around the cone staying low and compact and keep arms moving. Drive back to the thrown ball Run a straight line to break point Stick Inside foot in the ground at designated depth and sink hips. Point your toe and angle step and snap your head around. 4. Run around the cone staying low and compact and keep arms moving. Drive back to the thrown ball WR e WR
. Route Technique Techniques used to Change Direction: Posts & Corners – We use a Foot Press technique. Foot Press – Press your foot in the ground at the designated depth, step With your opposite foot at your reference point and accelerate. “POST” “CORNER” Foot Press at 12 yards Foot Press at 12 yards Run a straight line to break point Foot Press with outside foot at Designated depth. Step with inside foot pointing that toe at your reference point and accelerate. Be ready to adjust to flight of Thrown ball. Run a straight line to break point Foot Press with outside foot at Designated depth. Step with inside foot pointing that toe at your reference point and accelerate. Be ready to adjust to flight of Thrown ball. e WR WR
. Route Technique Techniques used to Change Direction: Square Cut- Run a straight line to final depth of the route. Stick Your foot in the ground, sink your hips, gather your feet, foot press And snap head in the desired direction and accelerate staying flat. “SQUARE DIG” Final Depth 12 Yards e WR 1. Run a straight line to the break point which is at the final depth of the route. 2. Stick your outside foot in the ground, sink your hips, gather Your feet, foot press with your outside foot, snap your head inside and accelerate staying flat. WR
. Route Drills Route Drills: Route on Air Route Enders Drill w/ Agile Lean Drill One on One
Release Drills Speed Release Diagram; D R
Release Drills Single Stick Release Diagram; D D R R
Catching the Football • Passing Catching Method • A. There isn’t one way to catch a football. The object is to catch • the ball, the method used is secondary to the result. • B. Some great receivers are arm and body receivers, especially • on Curls. This method is used to avoid fumbling and being hit. • C. it is generally best to catch a football in your hands, much like • a baseball. Pluck it – snatch it and reach for it with hands giving contact.
Catching the Football Thumb and Finger Placement D. When running with the flight of the ball, the thumbs are out. Other -wise, the thumbs are inside. When catching the football within the framework of the body, the thumbs are inside.
Catching the Football Low Passes E. On low passes, when the ball is inches off the ground, cradle the arms-elbows together and close to the body. Lower the body so that your chest or the numbers on your shirt are at the same level as the flight of the ball. Do not reach for this type of throw.
Catching the Football Balls Thrown Behind WR F. On balls thrown behind the WR -use the pivot reception. Turn the body completely. Do not reach back with one hand. G. Carry the arms high in regular sprinting position and reach at the last second. Running with arms extended results in loss of speed.
Catching the Football Hands • II. HANDS • A. Must have excellent hands, • that is the first pre-requisite. • B. Hands must be loose and • relaxed – fingers extended. • C. Cushion the ball at contact • - your hands should give with • the catch. • D. The hands should be like fly • paper – when the ball hits, it • sticks. Avoid the double catch. • concentrate and make the catch.
Catching the Football Eyes • III. Eyes • A. Must have complete concentration on the ball. • B. It is essential that the ball is locked and secured into • your hands. Always focus your catch into your hands until • you can read the writing or numbers on the ball. • C. There is a critical area, one yard in front of the hands with • arms extended. The Receiver who drops the ball generally takes • his eyes off the ball and begins to look for running room. Look • the ball into your hands. • D. Great Receivers possess excellent hand and eye coordination.
Catching the Football Determination • IV. Determination • A. A great WR has the attitude that he • and his Quarterback are the only two • people on the field and that he will • catch everything thrown in his • direction. • B. He never gives up but will make • the supreme and courageous effort • to make the catch. • C. He is always going full speed.
Catching the Football Knowledge of System . • V. Knowledge • A. Must possess a complete picture of the total passing game. • B. Full knowledge of total coverage. • C. Full knowledge of the tendencies and abilities of the individuals within the coverage. • D. He must have the talent to master the art of move making so he can defeat the individual in man to man coverage and at the same time, be able to make any adjustment necessary in the event he is working against zone defense.
Catching the Football Concentration • VI. Concentration • A. Concentration on the ball and not • on the opponent’s movement. • B. Concentration on the coverage so • that any adjustment of the route can • be made. • C. Utter disregard of possible contact.
Catching the Football Body Control • VII. Body Control • A. Must be able to shift gears by • running full speed, then stop and jump. • B. Be able to go full speed and change • change direction – breaking at sharp • angles rather than running circles. • This is a requirement for good move • making .
Catching the Football Running After the Catch • IX. Run after the Catch • A. To have the talent of a RB is a rare • talent. • B. Make the first down before you • think of touchdown – have in mind • the necessary distance for the first • down. • Big Play • A. All WR are expected to come up • with a big play – impossible catch, • the key block that springs the runner • for the distance. • B. They are expected to produce the • extra effort that results in a • touchdown.
Catching the Football Timing • VIII. Timing • A. Timing consist of timing your own • route in relationship with the QB’s • drop. • B. Knowledge and feel for the timing • and rhythm of the pass will prevent • Quarterback sacks. • C. Keep in mind that all passes have • some degree of rhythm. Passes thrown • on rhythm are generally completed.
Catching the Football Big Play • Big Play • A. All Receivers are expected to come up with a big play – impossible catch, the key block that springs the runner for the distance. • B. They are expected to produce the extra effort that results in a touchdown.
Catching the Football Ball Security 1. Hold the ball high and tight. 2. 5 pressure points. 3. Fingers 4. Palm 5. Forearm 6. Bicep 7. Rib Cage 8. Two Hands on the football when expecting contact. 9. No switching hands in traffic 10. Keep the football in outside arm.
Catching the Football Stiff Arm Ball-carriers run towards defenders who are attempting to tackle them. By positioning the ball securely in one arm, the ball-carrier can fully extend his other arm, locking his elbow, and outstretching his palm. Then, the ball-carrier pushes directly outwards with the palm of his hand onto the chest or shoulder of the would-be tackler. The fend is a pushing action, rather than a striking action. A stiff-arm fend may cause the tackler to fall to the ground, taking him out of the play. Even if the tackler keeps his feet, it becomes impossible for him to complete a tackle, as he cannot come close enough to wrap his arms around the ball-carrier.
Catching the Football Expecting Contact Two Hands on the football when expecting contact.
Catching the Football Success = Celebration Two Hands on the football when expecting contact.
Catching Drills • Confidence Drills: • Snake • High and Behind • Low and Behind • Wrong Shoulder( Baseball Drill) • Collision Drills: • Blaster • Half Suicides( 2 Catches and Contact) • Collision Drill Vs. Strong Safety or OLB • Distraction Drills: • Drape • Defender Pass by (one WR and DB line) • Pole ( Drill can also be done with stand up dummy) • Windows Drill (Colts and Curl drill) • Note: Emphasize catches from every angle. • Concentration Drills: • Jugs Machine Drills • Tennis Machine Drills • Numbers and Letters • Around the Clock • Out Bounds Drills • Sideline Drills • Gauntlet • Jump Ball Drills
Blocking • The Complete receiver understands the importance of • perimeter blocking and downfield blocking. WR blocking on plays ensure that the offense will have success in the screen, run and pass game. 1. Body Position 2. Finish all blocks • WHY DO WE BLOCK? We must work hard for our teammates if we expect them to work hard for us when we get the ball. Blocking is not about ability but rather heart and commitment . Blocking is a mind set, be physical at all times, take pride in beating up your opponent. Blocking is 90% mental, 10% technique.
Blocking • The first thing our WR’s must understand blocking is just as important as catching touchdowns. In order to achieve successful blocking the WR must understand the • Following: • WR must understand blocking rules (inside • and outside runs) • Explode off the ball selling vertical route • Breakdown 3 to 2 half yards in front of the • defender • Body Position – upon contact • Weight on balls of the feet • Feet slightly wider than armpit width---buzzing feet (foot fire) • Knees bent • Butt down • Arch in back • Head up, chin back • Slight bend in elbows • Shuffle and mirror the defender movements • Helmet below defender chin • Heels of hands on breastplate – Hands higher then eyes • Hands open, Thumps up • Keep feet moving (Drive defender) @ the point of attack 1 2
Blocking Drills • Drills • Partner Fit Up: • Purpose: Each WR fits up on his partner to get a great feel for final • body Position. • Contact: Violent Punch • 3 points of contact – hands and eyes form a triangle that creates a • hard blocking surface. Snap chin back as you roll your hips and • make contact. Emphasize the hands inside (turn the shield upside • down) • Accelerate feet and widen base on contact. Must really concentrate • on not stopping the feet as you punch. • 4 Point Punch: violent punch , roll hips. Snap chin back • 2 Point Punch: feet moving, violent punch, roll hips, snap chin back, • accelerate feet and widen base. • Procedure: • 2 Groups of WR facing each other, 1 yard apart. The WR’s facing • sideline is the WR group and WR’s with their back to the sideline will • be DB’s • On coaches commend the WR will strike the defender.
Blocking Drill Menu Blocking Progression: Fit Up Drill Half Way Drill Mirror Drill Cut –Off Drill Hook -up Cut – Block Drill
Blocking Drills Fit Up Drill Diagram; R R R D D D