Download
1 / 32
320 likes | 323 Views
Step by Step Guide to FFA Online Membership 2008. Table of Contents Helpful Hints - slide 3 Membership Homepage– slide 4 PeopleSoft LIVE login – slide 5 Use: Staff and Partners to update advisor info & renew magazine subscriptions – slide 7 Add new staff or partner – slide 10

E N D
Table of Contents Helpful Hints - slide 3 Membership Homepage– slide 4 PeopleSoft LIVE login – slide 5 Use: Staff and Partners to update advisor info & renew magazine subscriptions – slide 7 Add new staff or partner – slide 10 Membership System>Use>Staff and Partners Chapter and School Information – slide 11 Membership System>Use>Chapter Information Membership System>Use> School Information Renew previous members at the Rapid Renewal Page – slide 12 Membership System>Use>Rapid Renewal Page Add new members at the Student Rapid Addition Screen – slide 15 Membership System>Use>Student Rapid Addition Screen Process: Approve roster and forward notice to state at Chapter Roster Approval – slide 18 Membership System>Process>Chapter Roster Approval Reports: Retrieve Billing Roster from Email, at time of approval – slide 20 Send a printed copy of billing roster along with check to your STATE office for processing – Page 21 Additional Process: Print Chapter Roster from menu, at any time – slide 22 Membership System>Reports>Chapter Roster Changes to Student Record after Approving Roster – slide 31 Membership System>Use>Student Rapid Entry Birthdate, address, expiring duplicated or unneeded records – slide 32 Membership System>Use>Student Rapid Entry Screen
Helpful hints for working in PeopleSoft • Effective dating—For existing records click on the + button first to effective date (this adds another line with the current date) the record and then make the new changes. SAVE. • If there is a down arrow by a field, click on it to choose from the specific drop down list. • If there is a magnifying glass icon, click on it to see a predetermined list to pick from. • NOTE: To move from page to page in PeopleSoft use the RETURN button at the bottom of the page or click on the menu listing needed on the left side of the screen. DO NOT use the back arrow at the top, left of the page! Using the back arrow will knock you out of the PeopleSoft system. • Follow your state association’s instructions regarding sending payment and roster information to your STATE office. Normally your state will want a copy of the billing roster (instructions to follow) and payment. • DO NOT send payment to the National FFA. • Once your roster has been nationally approved you will begin receiving your magazines starting with the next available issue. Magazine addresses are pulled from the database approximately seven weeks before you receive the magazine in the mail. • The second line on the address label of the New Horizon’s magazine lists that student’s 9 digit FFA ID number • If you forget a student in your initial submission, you can submit additional students individually or in groups. You will enter them the same way as original roster and print an additional billing roster using the new batch number. Submit this billing to your STATE office like you would a supplemental roster. • On left menu, disregard Submit Roster for Processing. This step is no longer required. • Do not use Report Manager
Membership Homepage http://access.ffa.org Type or copy the address above into your Internet address bar. This is a good page to save to your Favorites. Select PeopleSoft Live - Online Membership (not Excel) to enter PeopleSoft to complete roster or look up information. Use PeopleSoft Testing - Training Purposes Only Online Membership to PRACTICE for training purposes. *Please note the link to Membership Support. This link directs to numerous help documents for the FFA Membership Online & Excel programs.
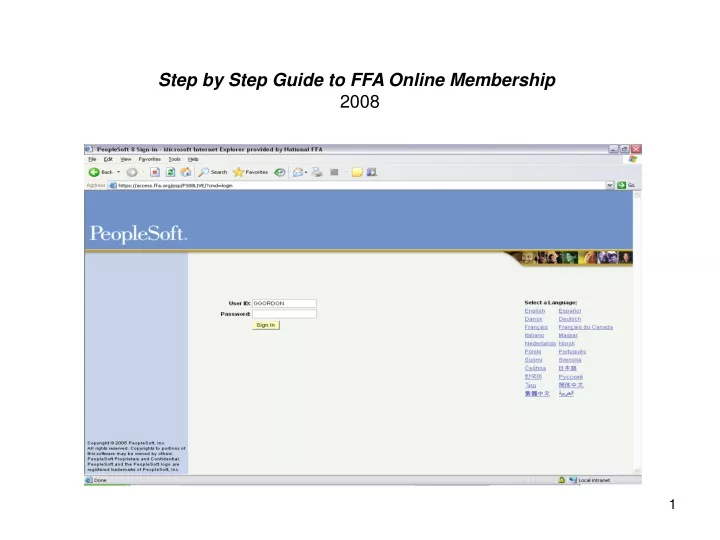
PeopleSoft LIVE login page After selecting PeopleSoft Live - Online Membership , this is the log in screen. User ID is chapter number (state abbreviation needs to be capitalized, for example IN2000). Type in password exactly as provided by your state FFA association (password is case sensitive, caps lock key needs to be off). If possible, copy and paste your password if you have it electronically. Click on the yellow Sign In box.
Using the left menu, click on Membership System. Do not use folder icons on the middle of the screen. 3 main sections will drop down: Use, Process and Reports.
Use: Staff and Partners; mailing list and adult New Horizons subscriptions [Notice this and most of the following screen prints are green; taken from the test environment. The LIVE environment has a blue box menu] Click Use and then click on Staff and Partners to enter your magazine subscriptions and advisor information. Your chapter number should show up automatically under FFA Chapter ID, if not, just type in your chapter number. Click on Search or your staff record may appear. A listing of all your Staff and Partners will show at the bottom of the page. Click one or a single record will appear on the screen.
Under Employee Type, click on drop down arrow for list. Do not use “State.” Anyone needing FFA mailings and resource materials needs to have ADVISOR in the FFA Title box. To change Address Information, under the blue bar, on the right side, click on the + button first to effective date the record (this adds another line with the current date). Update the information, scroll down and click on the SAVE button at the bottom, left of the page. Select the Personal tab at the top of your screen.
To make any changes on Personal tab page, first click on the + to effective date the record. Choose the correct FFA Membership Type (you can look up the options by clicking on the magnifying glass icon): K – New Horizons magazine subscription (generates a $7.00 billing and will appear on your chapter’s approval list for later processing). This membership type will be included in all FFA mailings. N – Adult Non-Member (This is recommended for any Advisor or person, who is still actively involved with your chapter, but is not getting a magazine, and will be included in National FFA mailings) X – Expired Record (no longer involved with the chapter/school, no longer added to mailings). NOTE: There is no way to delete a record in PeopleSoft, just make sure the record is expired if they are no longer involved with FFA. Click SAVE at bottom, left of the screen when complete.
To add new Staff or Partner Go back to the left menu Under Use, Click on Staff and Partner Click on the Add A New Value tab or link. Next page click ADD Use your state abbreviation and 4 zeros for the State ID (for example: IN0000) if this is not already auto-filled for you. Tab through and enter all the requested information as described on the previous pages. New records populate with the current date and membership type of N for mailing list. Do not select the + and effective date. Save
Chapter and School Information Click on Chapter Information on the left menu. Click SEARCH. Verify the data on these pages is current. [This information is used for State & National Grants and chapter mailings.] Click on the + to effective date the record before making any changes under the blue bar. SAVE. Go back to left menu and repeat/verify School Information.
Renew previous members – Rapid Renewal Page From left menu click on Use then click on Rapid Renewal Page. Click on “View All or View 100” on the blue bar to see the larger membership list. The total number of records will appear on the blue bar, far right. Don’t forget to use the far right arrow, >, to see end of the list. Under the blue bar, click on any underlined header to sort the list. Expiration is suggested. To bring to the top of the list, last year’s members, click on Expiration until the previous year’s 8-31 date appears at the top. The system will sort the members by expiration date and then alphabetically by last name. Under the first column, “R” for renewal, click on the box to the left of each member who has paid. This makes a check mark. Skip over any students not in your chapter this year, do not attempt to delete, they are already expired; 8-31. Students that are already renewed for the current school year will have the checked box grayed out. NOTE: If there are duplicate names, renew the line with the most current Expiration date. Working from left to right, update the applicable information on that member’s line (FFA degrees, grade, etc.) You may see a “Y” for Yes, under the “Bad Addr” column if the current address is undeliverable; magazine will not be mailed. By clicking on the blue Update Details link at the end of the line, you may update that bad address and complete further information.
The Detail page will show you additional data on the student. If the address needs to be changed or updated, under the address box, click on the + first to effective date the record. The resulting screen will look the same; just the effective date will have changed to the current date. Highlight the information you want to change in the address and type over it. Click the yellow SAVE button at the top. To return to the previous screen, click on the blue Return to Rapid Renewal Page link at the top of the page. If you return to the previous screen without saving the changes you made, they will not take effect!
Once you have check marked all your renewing students, verified their information, and are completely done with this session click on SAVE at the top before leaving the page. Do not save after each green check mark. If any changes are made on these screens and not SAVED, the changes will be lost when you go to another menu option. After saving, you will see a message telling how many members were successfully renewed. Watch for this message at the top of your screen.
Student Rapid Addition Screen – For adding new members only From the left menu, under Use, click on Student Rapid Addition Screen to add your new students. Click on the yellow ADD button.
This template appears for each new member. Tab thru the fields. Required fields are noted with an asterisk. If your state is using the State Req’d fields, you will be informed. Do Not Use This Method Of Entry For Renewal Of Previous Members! This option assigns a new member number to each added entry. Save at the bottom, left when done. Watch for the new 9 digit ID number to populate at the top. This ID number is a confirmation of the save. See duplicate warning message, next page. If you want to enter additional students, click on the ADD button, bottom right and repeat the process. When completely done updating all information (student members, staff & partner, school and chapter) you are ready for chapter roster approval.
Duplicate Warning Message NOTE: A warning screen will appear when attempting to save the record if a last name is similar or identical to one already in the database, for your chapter. Click on YES if you want to continue to add the member you’re working on or NO if you want to cancel the duplicate entry you made. YES will save the record, ID number will appear. NO will take you back to the template to add another student.
Process: Chapter [Advisor] Roster Approval – Submitting to state When the main roster members are renewed or added advisor/chapter roster approval is next. Remember: each time this is done a separate billing/batch is generated. Wait until you have the majority of your members entered before you approve your roster. From the left menu, click on Process and then Chapter Roster Approval.
The members renewed and/or added will display on the screen. Put list in alphabetical order by clicking on the Last Name header under the blue bar. Verify the names are correct for your chapter with no duplications. Number of members is listed on the right side of the blue bar. Approve each member individually by checking the box at the beginning of each row, under Select for Batch, or approve the entire chapter at once by clicking on the “Select All Students” button. If there is a duplicate name DO NOT CHECK MARK the duplicate member record, leave it blank or uncheck it. If a duplicate name is checked and approved billing will occur for that member. (See the end of these instructions for how to expire the duplicate record. If you don’t expire the record it will remain in your chapter.)
After check marking the current members, click SAVE button at the bottom, left of the screen. Watch for “Processing” and then “Saved” to appear in the upper, right corner of the screen. A dialog box will appear with this message: “Roster successfully submitted to your state. Write down batch number ________. Enter ONE email address above/top right. Select button, Print new roster [this batch only.] Click OK. [If you do not have an email account, follow Additional Processes>Print From Left Menu, later in these instructions. When prompted to save again, before leaving page, click cancel.] To continue with preferred email roster, Select button, Print new roster [this batch only.] Next dialog box to appear: “Batch/billing roster sent to your email. Log out of PeopleSoft, when prompted to Save again, select cancel. Open email account to find roster” Click OK. The system prompts to save again; the email address. Do not save, click cancel.
This will send a billing roster of the members just approved (this batch only) to the email address you provided. It will not send any other earlier submissions of roster. On left menu, disregard Submit Roster for Processing—this step not needed. Do not go to Report Manager. Go to the email account you entered above to retrieve roster. You will receive a message from PeopleSoft/National FFA. Click on the pdf attachment to open your roster, save, print and view totals/dollar amounts due. Print a copy for your bookkeeper to attach payment and mail both to your STATE office. If you don’t have Acrobat or if you leave the above screen without printing a roster, go to the left menu to generate and print roster.
Additional Processes Reports: Printing a roster from left menu Anytime information is needed From the left menu click Membership System>Reports>Chapter Roster
Click on “Add a New Value” if it’s your first time to run a roster from this screen.
Click SAVE on this page. You will only have to do this process the first time you run a chapter roster. This run control ID/process is saved for future use. If chapter number is not automatically entered, enter it in the FFA Chapter ID box. Enter the batch number that you wrote down when you advisor approved your roster if you want to print a billing roster for a specific group of students.If you are not running a specific billing roster, leave the batch number box blank. Leaving the batch number blank will produce a report of all the active members in the chapter to date, including supplemental rosters. It will not generate a roster with billing information. Click RUN top/right.
This page should auto-fill with Type: Web Format: PDF Click OK
You have returned correctly to the first page. At the top, right click on Process Monitor
Click REFRESH, top/right until under Run Status says “Success.” Click on that line’s Details link, middle/right of page.
Click the View Log/Trace link. [If the View/Log Trace link, bottom/right is not underlined, go back to the previous page (by clicking OK on this page), click “Refresh” a few more times, click on success details link again and return to check this page until the blue link appears.]
Open the file by clicking on the FFA3005…PDF link, middle/left of page. This will initialize Adobe Acrobat and the pdf file will appear. The roster is now ready to view, print and save. On the roster, the batch status code will show the status of your roster as it processes through to National. Codes for Status: AA – Advisor/Chapter Approved, SA- State Approved, and NA- National Approved [NA-magazine subscription will start with the next available issue] Notice the batch number column. A zero indicates students who still need chapter roster approval, [Membership System>Process>Chapter Roster Approval.] If you need to run a batch/billing roster, copy a batch number from this pdf, go back and run the roster again, pasting in the batch number.
Additional Processes: Changes to student record after approving roster Birthdate, address, expiring duplicated or unneeded records If you should need to make changes to a student record that is already approved, click on Use, then Student Rapid Entry Screen. Enter the student’s name or ID number in the search screen to get to their member record.
To change the birth date, highlight the date, change it and SAVE at the bottom of the page. • To change an address, click on the + sign in the address box. The current date will appear. Make the necessary changes and click SAVE. • To expire a duplicate or unneeded record, [If the batch status is NA for nationally approved, DO NOT expire, DO NOT CHANGE MEMBERSHIP TYPE, contact your state office.] • click on the + button in the membership box. This will change the date to current. Change the Membership Type to “X”. • Click SAVE at the bottom of the screen. • You DO NOT have to Chapter Roster Approve these changes. • Please note: You cannot change a record on the same date that you entered it. The effective date • needs to be a different day in order for the record to save. A future date may be used. • Contact your state office with MEMBERSHIP TYPE, NAME or SPELLING changes.