Download
1 / 6
60 likes | 235 Views
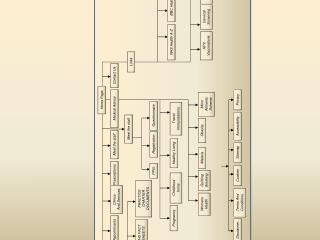
Client Appointments Setup. Use this process to configure the appointments that will be assigned as new applications are entered into the system. Note – even if your Corps is not assigning appointments, there should

E N D
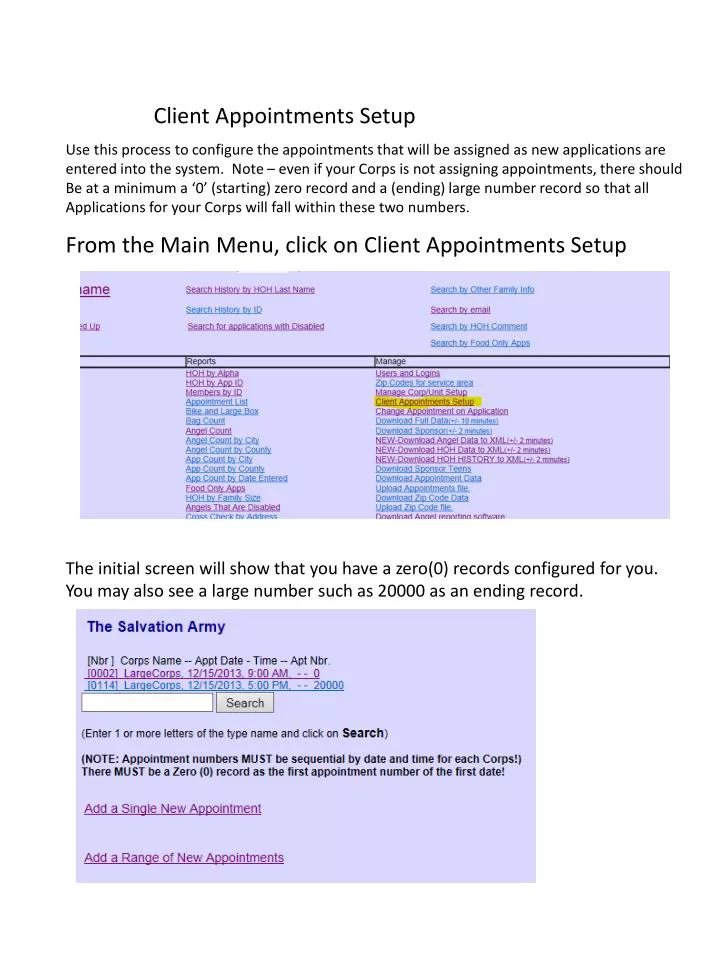
Client Appointments Setup Use this process to configure the appointments that will be assigned as new applications are entered into the system. Note – even if your Corps is not assigning appointments, there should Be at a minimum a ‘0’ (starting) zero record and a (ending) large number record so that all Applications for your Corps will fall within these two numbers. From the Main Menu, click on Client Appointments Setup The initial screen will show that you have a zero(0) records configured for you. You may also see a large number such as 20000 as an ending record.
The first thing to do is to decide the dates and times, as well as how many families you will be seeing at each time. Will your appointments continue thru lunch time or do you want to schedule a break for the morning and afternoon session. Will your appointments span more than one day? Step 1. Click on the 0 record and update the date and time to match your planed first date and time for appointments. For example, if your first day of appointments is Monday, December 16th 2013 at 9:00 AM, then change the Zero record to reflect this and click on Next to save and return to the list. Step 2. Click on the 20000 record and delete it. You will add one back later after configuring the appointment times.
Click on the link to Add a Range of New Appointments and fill in the options. Using the plan for appointments, fill in the details for your Corps. In this example, the plan will be: Starting at 9:00 AM on 12/16, with 25 appointments every 30 minutes and a 1 hour break between noon and 1:00 PM – the last appointment to be given is 4:30 PM. Fill in the date (no slashes, just 121613) Select the start time of 9:30 because the Zero record is already at 9:00 Select the End Time of 11:30 so that you can take a break for lunch at noon The increment time is 30 minutes The Starting number for this batch is 26 because the first 25 will be in the 9:00 slot You want 25 per block. Click on Generate New Appointments.
This returns you to the list screen showing the Appointments that have been configured. Click on Add a Range… to add the after noon batch Notice that at the bottom of the screen, it tells you that the Highest Appt. Nbr. is 126. Use this to calculate the next starting number: (126 + 25 = 151) Fill in the selections for the afternoon section. 121613 and 1:00 to 4:30 30 Minutes, Starting number is 151 and 25 per each block.
When you return to the list screen, it shows appointments from 0 at 9:00 thru 126 at 11:30 and then the afternoon batch is 151 at 1:00 thru 326 at 4:30 Click on Add a Single New Appointment to add back in the 20000 record Fill in the date and time (in 24 hour time – 5:00 PM is 1700. Add a very large number like 20000 so that the assignment routine never falls outside of the range, and then the printer time of 5:00 PM
Now your configuration is complete. If you wanted to assign appointments across multiple days, then you would continue assigning batches of appointment blocks until completed. Then add a single large number at the end of the last day.