Download

1 / 140
1.41k likes | 1.58k Views
Basic Concepts. Variables. Declaration : [ < attributelist > ] [ accessmodifier ] [[ Shared ] [ Shadows ] | [ Static ]] [ ReadOnly ] Dim [ WithEvents ] variablelist

E N D
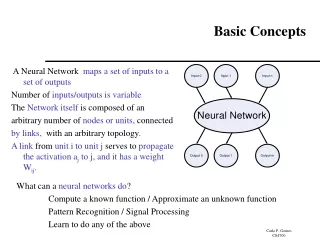
Variables • Declaration : [ <attributelist> ] [ accessmodifier ] [[ Shared ] [ Shadows ] | [ Static ]] [ ReadOnly ] Dim [ WithEvents ] variablelist • attributelist : Specifies the attributes to be applied to a declared programming element. Multiple attributes are separated by commas. • accessmodifier : Can be one of the following: • Public • Protected • Friend • Private • Static : Specifies that one or more declared local variables are to remain in existence and retain their latest values after termination of the procedure in which they are declared. • ReadOnly : Specifies that a variable or property can be read but not written. • WithEvents : Specifies that one or more declared member variables refer to an instance of a class that can raise events.
Examples • Dim numberOfStudents As Integer • Dim summary As String = "Summary of results" • Dim days() As Integer • Dim lastTime, nextTime, allTimes() As Date • Dim finished As Boolean • Dim monitorBox As System.Windows.Forms.Form • Dim a, b, c As Single, x, y As Double, i As Integer ' a, b, and c are all Single; x and y are both Double • Dim bottomLabel As New System.Windows.Forms.Label
Constants • Declaring : [<attributelist>] [{ Public | Protected | Friend | Protected Friend | Private }] [Shadows] constant-name [As type] = initexpr • Examples : Const conPi = 3.14159265358979 Public Const conMaxPlanets As Integer = 9 Const conReleaseDate = #1/1/1995# Public Const conVersion = "07.10.A" Const conCodeName = "Enigma“ Const conPi2 = conPi * 2
If..else • Syntax: If (Condition) Then Statements executed if condition is true Else Statements executed if condition is false End If • Example: If A > 10 Then A = A + 1 Else B = B + A End If
If..ElseIf • Example: Dim number, digits As Integer Dim myString As String number = 53 If number < 10 Then digits = 1 ElseIf number < 100 Then digits = 2 Else digits = 3 End If If digits = 1 Then myString = "One“ Else myString = "More than one“ End if
Select..Case • Syntax: Select Case var Case 1 stmt1 // executed if var = 1 Case 2 stmt2 // executed if var = 2 Case Else stmt3 // executed if var is other than 1 and 2 End Select
Continued… • Example: Dim number As Integer = 8 Select Case number Case 1 To 5 System.Console.WriteLine("Between 1 and 5") ' The following is the only Case clause that evaluates to True. Case 6, 7, 8 System.Console.WriteLine("Between 6 and 8") Case 9 To 10 System.Console.WriteLine("Equal to 9 or 10") Case Else System.Console.WriteLine("Not between 1 and 10") End Select
Looping Structure Overview • Visual Basic loop structures allow you to run one or more lines of code repetitively. You can repeat the statements in a loop structure until a condition is True, until a condition is False, a specified number of times, or once for each element in a collection.
Do Loop • Repeats a block of statements while a Boolean condition is True or until the condition becomes True. • Example: Dim counter As Integer = 0 Do counter += 1 If counter = 10 Then check = False End If Loop Until check = False
Do While • The Do...While statement allow you to repeat a block of code while a certain condition is True, or until a certain condition is True. • For example, suppose you had a program to add a series of numbers, but you never wanted the sum of the numbers to be more than 100. You could use the Do...While statement to perform the addition as follows: Dim sum As Integer = 0 Do While sum < 100 sum = sum + 10 Loop
Do While Variations • First: Do While(a<>0) Console.Writeline(a) a = a – 1 Loop • Second: Do Console.Writeline(a) a = a – 1 Loop While(a<>0)
For Next • For/Next loops enable you to evaluate a sequence of statements multiple times. This is unlike the If and Select statements where the program passes through each statement at most once during the formula's evaluation. • For/Next loops are best when you know the number of times that the statements needs to be evaluated in advance.
For Next Example For i As Integer = 1 To 10 For j As Integer = 1 To 10 For k As Integer = 1 To 10 ' Insert statements to operate with current values of i, j, and k. Next k Next j Next i
For Each • The For Each statement construction is similar to the For...Next loop, but it runs the statement block for each element in a collection, instead of a specified number of times. • A For Each...Next loop uses an element variable that represents a different element of the collection during each repetition of the loop.
For Each Example Dim lab As Label For Each lab In thisForm.Controls ComboBox1.Items.Add(lab.Text) Next
Overview • File handling is largely based on the System.IO namespace, which encloses a class library that supports string, character, and file manipulation. • These classes include properties, methods, and events for creating, copying, moving, and deleting files. • The most commonly used classes are FileStream, BinaryReader, BinaryWriter, StreamReader,and Streamwriter class.
Reading File • To read a line from a file with a text reader Dim fileReader As System.IO.StreamReader fileReader = _ My.Computer.FileSystem.OpenTextFileReader("C:\\testfile.txt") Dim stringReader As String stringReader = fileReader.ReadLine() MsgBox("The first line of the file is " & stringReader)
Writing File Sub Main() Dim s As String s = Console.ReadLine Dim file As System.IO.StreamWriter file = My.Computer.FileSystem.OpenTextFileWriter("c:\test.txt", True) file.WriteLine(s) file.Close() End Sub
Dialog Boxes Overview • Dialog boxes are used to interact with the user and retrieve information. • In simple terms, a dialog box is a form with its FormBorderStyle enumeration property set to FixedDialog. • You can construct your own custom dialog boxes by using the Windows Forms Designer in Visual Studio. Add controls such as Label, Textbox, and Button to customize dialog boxes to your specific needs. • The .NET Framework also includes predefined dialog boxes, such as File Open and message boxes, which you can adapt for your own applications .
Color Dialog Box • The Windows Forms ColorDialog component is a pre-configured dialog box that allows the user to select a color from a palette and to add custom colors to that palette. It is the same dialog box that you see in other Windows-based applications to select colors. • The color selected in the dialog box is returned in the Color property. • If the AllowFullOpen property is set to false, the "Define Custom Colors" button is disabled and the user is restricted to the predefined colors in the palette. • If the SolidColorOnly property is set to true, the user cannot select dithered colors. To display the dialog box, you must call its ShowDialog method.
Creating Color Dialogs Private Sub Button1_Click(ByVal) sender as System.Object,_ ByVal e As System.EventArgs) Handles Button1.Click If ColorDialog1.ShowDialog( ) <> DialogResult.Cancel Then Label1.Text = “Here’s my new color !” Label1.BackColor = ColorDialg1.Color End If End Sub
Font Dialog Box • The Windows Forms FontDialog component is a pre-configured dialog box, which is the standard Windows Font dialog box used to expose the fonts that are currently installed on the system. Use it within your Windows-based application as a simple solution for font selection in lieu of configuring your own dialog box. • By default, the dialog box shows list boxes for Font, Font style, and Size; check boxes for effects like Strikeout and Underline; a drop-down list for Script; and a sample of how the font will appear. (Script refers to different character scripts that are available for a given font, for example, Hebrew or Japanese.) To display the font dialog box, call the ShowDialog method.
Creating Font Dialogs Private Sub Button1_Click(ByVal) sender as System.Object,_ ByVal e As System.EventArgs) Handles Button1.Click If FontDialog1.ShowDialog( ) <> DialogResult.Cancel Then RichTextBox1.Font = FontDialog1.Font RichTextBox1.ForeColor = FontDialog1.Color End If End Sub
Save File Dialog Box • The Windows Forms SaveFileDialog component is a pre-configured dialog box. It is the same as the standard Save File dialog box used by Windows. It inherits from the CommonDialog class. • Use it as a simple solution for enabling users to save files instead of configuring your own dialog box. By relying on standard Windows dialog boxes, the basic functionality of applications you create is immediately familiar to users.
Creating Save File Dialogs Private Sub Button1_Click(ByVal) sender as System.Object,_ ByVal e As System.EventArgs) Handles Button1.Click If SaveFileDialog1.ShowDialog( ) <> DialogResult.Cancel Then MsgBox(“You chose ” & SaveFileDialog1.FileName) End If End Sub
Open File Dialog Box • The Windows Forms OpenFileDialog component is a pre-configured dialog box. It is the same Open File dialog box exposed by the Windows operating system. It inherits from the CommonDialog class. • Use the ShowDialog method to display the dialog at run time. You can enable users to multi-select files to be opened with the Multiselect property. Additionally, you can use the ShowReadOnly property to determine if a read-only check box appears in the dialog box. The ReadOnlyChecked property indicates whether the read-only check box is selected. Finally, the Filter property sets the current file name filter string, which determines the choices that appear in the "Files of type" box in the dialog box.
Creating Open File Dialogs Private Sub Button1_Click(ByVal) sender as System.Object,_ ByVal e As System.EventArgs) Handles Button1.Click If OpenFileDialog1.ShowDialog( ) <> DialogResult.Cancel Then PictureBox1.Image = _ Image.FromFile(OpenFileDialog1.FileName) End If End Sub
Exception Handling Overview • Visual Basic supports structured exception (error) handling, which allows the program to detect and possibly recover from errors during execution. • Visual Basic uses an enhanced version of the Try...Catch...Finally syntax already supported by other languages such as C++.
Structured Exception Handling • Structured exception handling combines a modern control structure (similar to Select Case or While) with exceptions, protected blocks of code, and filters. • Structured exception handling, which is the recommended method of error handling in Visual Basic, makes it easy to create and maintain programs with robust, comprehensive error handlers.
Unstructured Exception Handling • Unstructured exception handling using On Error can degrade application performance and result in code that is difficult to debug and maintain.
Try-catch • Place the sections of code that might throw exceptions in a try block and place code that handles exceptions in a catch block. • The catch block is a series of statements beginning with the keyword catch, followed by an exception type and an action to be taken.
Try-catch Example Dim Top As Double = 5 Dim Bottom As Double = 0 Dim Result As Integer Try Result = CType(Top / Bottom, Integer) Catch Exc As System.OverflowException MsgBox("Attempt to divide by zero resulted in overflow") End Try
Try with multiple catch Try ' Add code for your I/O task here. Catch dirNotFound As System.IO.DirectoryNotFoundException Throw dirNotFound Catch fileNotFound As System.IO.FileNotFoundException Throw fileNotFound Catch pathTooLong As System.IO.PathTooLongException Throw pathTooLong Catch ioEx As System.IO.IOException Throw ioEx Catch security As System.Security.SecurityException Throw security Catch ex As Exception Throw ex End Try
Try-catch Finally • A Finally statement can be used within a Try block to ensure allocated resources are clean. The code in a Finally block runs after the exception-handling code, but before control returns to the calling procedure. The code in a Finally block will run even if your code throws an exception, and even if you add an explicit Exit Function (or Exit Sub) statement within a Catch block
Continued… • Example: Public Sub TryExample() Dim x As Double = 5 ' Declare variables. Dim y As Integer = 0 Try ' Set up structured error handling. x /= y ' Cause a "Divide by Zero" error. Catch ex As Exception When y = 0 ' Catch the error. MsgBox(ex.ToString) ' Show friendly error message. Finally Beep() ' This line is executed no matter what. End Try End Sub
On Error Resume Next • On Error Resume Next causes execution to continue with the statement immediately following the statement that caused the run-time error, or with the statement immediately following the most recent call out of the procedure containing the On Error Resume Next statement. • This statement allows execution to continue despite a run-time error. • You can place the error-handling routine where the error would occur rather than transferring control to another location within the procedure. An On Error Resume Next statement becomes inactive when another procedure is called, so you should execute an On Error Resume Next statement in each called routine if you want inline error handling within that routine.
Example Sub ResumeStatementDemo() On Error GoTo ErrorHandler ' Enable error-handling routine. Dim x As Integer = 32 Dim y As Integer = 0 Dim z As Integer z = x / y ' Creates a divide by zero error Exit Sub ' Exit Sub to avoid error handler. ErrorHandler: ' Error-handling routine. Select Case Err.Number ' Evaluate error number. Case 6 ' "Divide by zero" error.’ y = 1 ' Sets the value of y to 1 and tries the calculation again. Case Else ' Handle other situations here.... End Select Resume ' Resume execution at same line that caused the error. End Sub
On Error Goto • GoToline • Enables the error-handling routine that starts at the line specified in the required line argument. The line argument is any line label or line number. If a run-time error occurs, control branches to the specified line, making the error handler active. The specified line must be in the same procedure as the On Error statement, or a compile-time error will occur. • GoTo 0 • Disables enabled error handler in the current procedure and resets it to Nothing. • GoTo -1 • Disables enabled exception in the current procedure and resets it to Nothing.
Example Public Sub OnErrorDemo() On Error GoTo ErrorHandler ' Enable error-handling routine. Dim x As Integer = 32 Dim y As Integer = 0 Dim z As Integer z = x / y ' Creates a divide by zero error On Error GoTo 0 ' Turn off error trapping. On Error Resume Next ' Defer error trapping. z = x / y ' Creates a divide by zero error again If Err.Number = 6 Then ' Tell user what happened. Then clear the Err object. Dim Msg As String Msg = "There was an error attempting to divide by zero!" MsgBox(Msg, , "Divide by zero error") Err.Clear() ' Clear Err object fields. End If Exit Sub ' Exit to avoid handler.
Continued… ErrorHandler: ' Error-handling routine. Select Case Err.Number ' Evaluate error number. Case 6 ' Divide by zero error MsgBox("You attempted to divide by zero!") ' Insert code to handle this error Case Else ' Insert code to handle other situations here... End Select Resume Next ' Resume execution at same line that caused the error. End Sub
Types of Exceptions • In Visual Basic, errors (also called exceptions) fall into one of three categories: syntax errors, run-time errors, and logic errors. • Syntax Errors: Syntax errors are those that appear while you write code. Visual Basic checks your code as you type it in the Code Editor window and alerts you if you make a mistake, such as misspelling a word or using a language element improperly. Syntax errors are the most common type of errors. You can fix them easily in the coding environment as soon as they occur.
Continued… • Run-time Errors: Run-time errors are those that appear only after you compile and run your code. These involve code that may appear to be correct in that it has no syntax errors, but that will not execute. For example, you might correctly write a line of code to open a file. But if the file is corrupted, the application cannot carry out the Open function, and it stops running. You can fix most run-time errors by rewriting the faulty code, and then recompiling and rerunning it.
Continued… • Logic Errors: Logic errors are those that appear once the application is in use. They are most often unwanted or unexpected results in response to user actions. For example, a mistyped key or other outside influence might cause your application to stop working within expected parameters, or altogether. Logic errors are generally the hardest type to fix, since it is not always clear where they originate.
Others • Standard Exception : Represents errors that occur during application execution. • Application Exception Class : The exception that is thrown when a non-fatal application error occurs. • System Exception Class : Defines the base class for predefined exceptions in the System namespace.