Download
1 / 33
330 likes | 434 Views
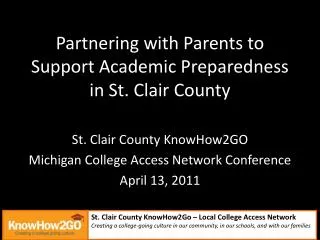
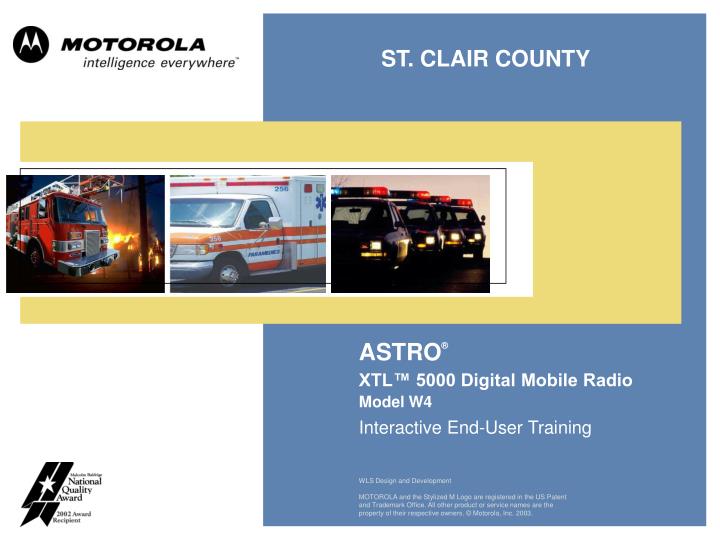
ST. CLAIR COUNTY. Index. XTL™ 5000 Digital Mobile Radio Model W4. Introduction. ►. 9. ◄. :. ►. 3. Push-to-Talk (PTT Button). Programmable Buttons. ▲ DIR. Dir. Mon. Emer. Del. Scan. Resp. Sel. ▲ PRI. ▲ N PRI. Your Radio. Pwr On/Off Volume Knob. Fleet Map. Home

E N D
XTL™ 5000 Digital Mobile Radio Model W4 Introduction ► 9 ◄ : ► 3
Push-to-Talk (PTT Button) Programmable Buttons ▲ DIR Dir Mon Emer Del Scan Resp Sel ▲ PRI ▲ N PRI Your Radio Pwr On/Off Volume Knob Fleet Map Home H/L (horn/lights) Dim Direct Indicator Mode Knob Priority/ Non-Priority Indicators Radio Overview The Control Head below is an example showing possible button programming options. Status Alert Tones X
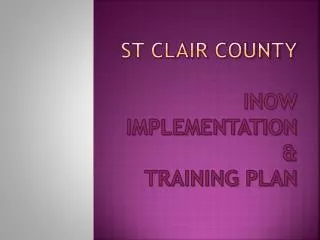
▲ DIR Display Basic Operating Procedures ▲ PRI ▲ PRI ▲ N PRI ▲ N PRI X T L 5 0 0 0 W4 Control Head Display: The W4 control head contains an 1-line/8 character alphanumeric display. This model does not have a keypad.
Fleet Map – Radio Templates See the Radio Template for your specific entity
XTL ™ 5000 Digital Mobile Radio Model W4 Basic Radio Features ► 9 ◄ : ► 9
Volume Knob Radio On or Off Basic Radio Features ▲ PRI ▲ N PRI CNTY CALL ▲ DIR • Turn Radio On: • To turn the radio on rotate the Volume knob clockwise. • When the ASTRO XTL 5000 Digital Mobile Radio is turned on the display shows XTL 5000. • The radio then performs a self check. Notes: If FL ##/## appears in the display, the radio will not function until the condition has been corrected. If ER ##/## appears some non-critical data has been changed. If this display appears, the display goes blank, or if the unit appears to be locked up, refer to the “Troubleshooting” section. Turn Radio Off: Rotate the Volume knob counterclockwise.
Dim Display Brightness General Radio Features CNTY CALL
Home HOME Mode/Talkgroup/Channel Select CNTY CALL NOTE: HOME is your Primary Dispatch Talkgroup/Channel Press . This selects the HOME mode/talkgroup/channel contained within the HOME zone from any other zone and mode/talkgroup/channel in the radio. Home
Home Mode/Talkgroup/Channel Select or ChangeCurrent Zone Basic Operating Features CNTY CALL Selecting or Changing a Mode/Talkgroup/Channel in the Current Zone: A mode/channel/talkgroup can be either a conventional transmit/receive frequency pair or a trunking talkgroup. A mode/channel/talkgroup must be assigned a specific zone location. Turn the Mode Selector Knob until the desired mode/talkgroup/channel is displayed. ▲ ▼ Note: If you select a zone that is out of range, you will hear a low-pitched tone. Select a different zone.
Home Mode/Talkgroup/Channel Select or Change Not in Current Zone Basic Operating Features CNTY CALL Home ▲ ▼
Transmit Basic Radio Features CNTY CALL continued
YELLOW • BUSY LED: • Flashing • Conventional talkgroup busy (Private Line) RED • XMIT LED: • Solid • PTT is pressed, radio is transmitting • Flashing • Radio is trying to access the system. LED Status Basic Radio Features ▲ PRI ▲ N PRI CNTY CALL ▲ DIR
▲ PRI ▲ N PRI ▲ DIR ▲ Volume Knob Volume Set General Radio Features V O L 1 0
XTL™ 5000 Digital Mobile Radio Model W4 General Radio Features ► 9 ◄ : ► 18
Emergency(1 of 3) General Radio Features E M E R G N C Y To initiate an emergency from your radio:
Emergency Call (Initiate)(2 of 3) General Radio Features E M E R G N C Y To send an emergency call: Press the Emergency button. Your radio reverts to emergency status and has priority access to the EMRGNCY 1 talkgroup. *an audible alert is heard and displayed at every dispatch console in CENCOM The radio operates in the normal manner while in emergency call status, except you are no longer on your selected talkgroup. You talk on the preprogrammed emergency talkgroup - EMRGNCY 1 - that is monitored by dispatch. The emergency alarm is sent on this same talkgroup. A tone sounds and the display alternates EMERGNCY with the current zone/talkgroup/channel. The current zone/talkgroup is displayed alternately with EMERGENCY, the LED lights red. NOTE: If you are selected to a conventional channel, you may not be able to send an emergency call. When you press the orange button, your radio will emit a prohibit tone indicating that the emergency function is not available on the selected channel. Emer continued
Emergency Alarm and Call (Initiate)(3 of 3) General Radio Features E M E R G N C Y To Exit/Clear an Emergency: NEVER CLEAR AN EMERGENCY WITHOUT BEING INSTRUCTED TO DO SO BY DISPATCH. *See St. Clair County SOP for proper emergency procedure To Exit/Clear an Emergency: Press and hold the Emergency button for a few seconds until you hear a dull tone. The radio display will no longer display EMERGNCY, AND Your radio will revert to your selected talkgroup. Emer
Home List View General Radio Features CNTY CALL To View a List: • Press and hold until the display shows the first list member. • Use the Mode knob to locate the talkgroup(s)/channels in the scan list. • Press to return to the HOME display. Scan Home
Scan On & Off General Radio Features ▲ PRI ▲ N PRI CNTY CALL ▲ DIR • Notes: • A lit N PRI (non-priority) indicator means that the active mode is a non-priority member of the scan list (for all scan types). • A solidly lit PRI (priority) indicator means that the active mode is the priority 2 member of the scan list (Trunking Priority Monitor and Conventional scan types only). • A blinking PRI indicator means that the active mode is the priority 1 member of the scan list (Trunking Priority Monitor and Conventional scan types only). To Turn Scan On & Off: Press momentarily to start Scanning. The Scan indicator ( ) lights and a list of talkgroups/modes is scanned for activity. When a scanned talkgroup/mode becomes active, the display shows the active talkgroup/mode name, the appropriate priority indicator lights, and the radio unmutes. Press momentarily to stop Scannning. Scan ▲ PRI Scan NOTE: If you are selected to a trunked talkgroup when you turn scan on, you will be using Priority Monitor Scan. Priority one = Selected Talkgroup Priority two = Primary Dispatch Talkgroup * You cannot nuisance delete a priority member. All remaining members are non-priority. NOTE: If you are selected to a conventional channel when you turn scan on you will be using Talkgroup Scan. All scan members have equal priority and will not interrupt each other.
Home Scan List ProgrammingAdd Talkgroup to Scan List General Radio Features ▲ PRI ▲ N PRI CNTY CALL To Add a Talkgroup/Channel to the Scan List: • Scroll through the available priority choices, and press to select one. • The new talkgroup/channel becomes a member of the scan list which was assigned to the selected talkgroup/channel when scan list programming was entered. Sel • Press and hold until the scan indicator ( ) blinks and a good-key chirp is heard. • Using the Mode knob, locate the talkgroup/channel to be added. • Press to add the talkgroup. ▲ PRI Scan Note: If a scan list is full, you will hear a bad-key chirp each time you press , and the desired talkgroup/channel will not be assigned to the list. Note: If the desired talkgroup/channel resides in a different zone, press the (Zn up) or (Zn dn) button to change zones, then use the mode changer to find the desired talkgroup/channel. Sel ▲ ▼ • Press either or to exit scan list programming and return to normal scan operation. Scan Home Sel
Scan List ProgrammingDelete Talkgroup from Scan List (1 of 2) General Radio Features ▲ PRI ▲ N PRI CNTY CALL To Delete a Talkgroup from the Scan List: • Press to scroll through the available priority choices until the priority choice disappears. • OR • Press the button. • When no priority choice is displayed, this indicates that the talkgroup/channel is no longer a member of the scan list that was assigned to the selected talkgroup/channel. Sel • Press and hold until the scan indicator ( ) blinks and a good-key chirp is heard. • Using the Mode knob, locate the talkgroup/channel to be deleted. Scan ▲ PRI Del Note: If the desired talkgroup/channel resides in a different zone, press the (Zn up) or (Zn dn) button to change zones, then use the mode changer to find the desired talkgroup/channel. ▼ ▲ continued
Home Scan List ProgrammingDelete Talkgroup from Scan List (2 of 2) General Radio Features ▲ N PRI N O L I S T ▲ DIR • Press or to exit scan list programming and return to normal scan operation. Scan Home Note: If you delete all members of a scan list, and scan is subsequently turned on, you will hear a continuous lowpitched tone, and the display will change to NO LIST. You cannot delete the designated transmit mode/talkgroup/channel, the selected mode/talkgroup/channel, or the fixed scan list members. The selected mode/talkgroup/channel, by default, is always scanned when scan is turned on, regardless of whether or not it is explicitly programmed as a scan list member.
Home ▲ PRI ▲ N PRI ▲ DIR ▲ Scan Non-TalkbackTransmitting While Scan is On General Radio Features CNTY CALL Your Radio is Programmed for Non-Talkback Scan: Press the microphone PTT button at any time to transmit on the selected mode/talkgroup/channel.
XTL™ 5000 Digital Mobile Radio Model W4 Trunked Radio Features ► 9 ◄ : ► 28
Call Alert Page (Receive) Trunked Radio Features P A G E R C V If you are not available when a caller sends you a Call Alert page, the display shows PAGE RCV and the caller’s ID. If the page also triggers an external alarm, the display shows PAGE RCV and four tones repeat every five seconds. • To respond to a Call Alert page do one of the • following: • Press . • The display shows the unit ID of the caller. Resp IMPORTANT Standard Operating Procedure Return to your primary dispatch (HOME) and Respond to Dispatch.
Home • To answer a private conversation call: • Press within 20 seconds of receiving the call. • The display shows the ID number of the calling unit. • To respond to the call, press the PTT button to talk; release it to listen. • Press to end call. Resp Home Private Call – Respond Trunked Radio Features C A L L R C V When your radio receives a Private Call, you hear two repeating high-pitched tones, and the display alternates between the home display and CALL RCVD.
XTL™ 5000 Digital Mobile Radio Model W4 Conventional Radio Features ► 9 ◄ : ► 31
▲ DIR Direct Talkaround (Mobile Radio to Mobile Radio) Conventional Features SC I-CALL NOTE: Applies only to SC I-CALL and SC I-TAC 1-4. Make sure the receiving unit has the same channel configuration selected. You will not receive normal trunked, talkgroup/channel calls while in direct mode. Dir Dir
Monitoring Conventional Mode Activity Conventional Features M O N O N This feature allows you to monitor channel traffic on conventional channels by defeating the coded squelch. Mon The display shows MON ON, indicating that the radio is monitoring.