Download
1 / 33
420 likes | 1.47k Views
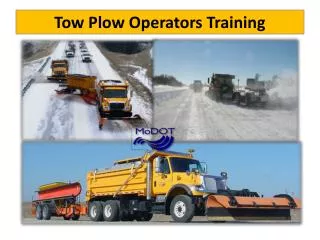
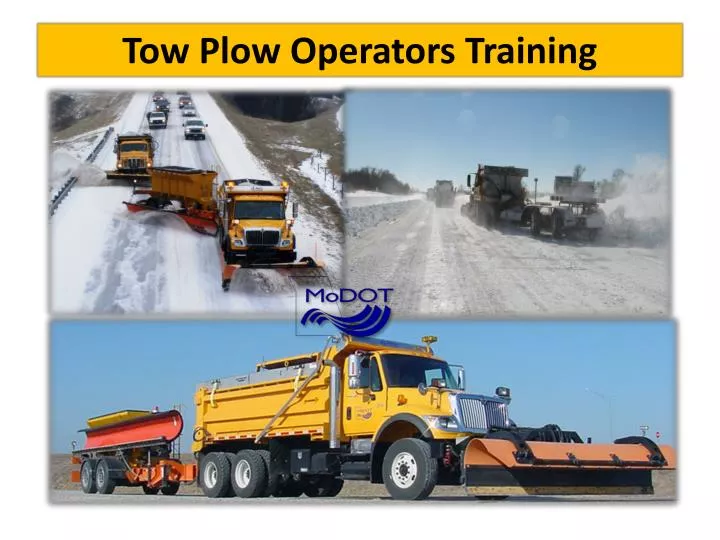
Tow Plow Operators Training. Tow Plow. Trailer snow plow designed to be towed with a truck and standard plow configuration 25’ clearing path with a 12’ front plow Improve services by: Providing faster results Reducing cost for equipment, fuel and labor. Contact Time.

E N D
Tow Plow • Trailer snow plow designed to be towed with a truck and standard plow configuration • 25’ clearing path with a 12’ front plow • Improve services by: • Providing faster results • Reducing cost for equipment, fuel and labor
Contact Time • 12 total contact hours (required) • 8 hours • Classroom, hands-on and closed driving course • 4 hours • Dry-run (pre-winter) • Experienced operator will drive to demonstrate proper procedures • New operator will drive and be evaluated by experienced operator • Checklist to be completed • During storm check ride (optional) • No set amount of contact time • As required by supervisor • Experienced operator will drive to demonstrate proper procedures • New operator will drive and be evaluated by experienced operator • Release to operate the Tow Plow on decision of experienced operator • Checklist to be completed during check ride
Course Objectives • Identify Tow Plow key components • Identify all safety hazards, terms and labels • Perform a pre and post-trip inspection • Describe preventative maintenance • Identify and become familiar with all in-cab operator controls • Demonstrate on a closed course the safe and proper Tow Plow operating procedures
Training • This training will focus on standard configuration • There are many different configurations based on district specific orders • Tow Plows may be outfitted with on or more of the following: • 1000 gallon liquid chemical tank • 8 cubic yard spreader • Become familiar with your Tow Plow • Train with equipment to be used • Train in area that the operator “typically” will be assigned to
Safety • Become familiar with all operating characteristics prior to operation during a winter event • Be aware of your surroundings • Must be able to see the Tow Plow • Clean windows • Clean mirrors • In-cab adjustable mirrors • Supplemental night lighting
Safety and Warning Labels • Become familiar with all safety warnings and labels • Replace labels when: • Damaged • Not legible • In addition, become familiar with additional equipment on the Tow Plow including: • Spreader • Liquid chemical tank(s)
Lockout / Tagout • All employees shall follow MoDOT’s lockout/tagout procedures prior to performing any work on the Tow Plow • Control of hazardous energy shall be complied with under Section 2.7 The Control of Hazardous Energy (Lockout / Tagout) • Follow manufacturer’s procedures • Tow Plow • Accessory equipment installed on the Tow Plow
Inspections • Follow the manufacturer’s guidelines for the inspection and maintenance schedules • Hydraulic fluid level on tow vehicle • Inspect tires for damage, proper inflation and that all lug nuts are in place and have not become loose • “STAY BACK 100 FEET” sign installed on rear of Tow Plow • All safety and warning labels are in place and legible
Inspections Continued • Visually inspect all hydraulic hoses and connectors for wear, damage, and leaks • Check all cables, chains, and sheaves for excessive wear and damage • Visually inspect all plow and wing units • Inspect cutting edge and shoes for excessive wear • Do not allow cutting edge to wear down into the mounting angle on the mold board
Inspections Continued • Inspect mounting arms for excessive rust, damage, cracks in welds or bent and broken sections • Inspect mounting holes on the arms and lugs for excessive wear • Mounting holes greater than 3/16” clearance are to be repaired • Dump air from the brake storage tanks on tow vehicle and the Tow Plow to remove excessive moisture and ensure that the system air pressure returns and does not leak • Add air brake drier to brake system to prevent air brake freezing during extremely cold weather
Lubrication • Grease all required components • All plow harness sheave nipples • All hydraulic pump drive shaft nipples • Front and rear tower sheaves and swivel blocks • Wing extension arm nipples • Front and rear tower guide tracks • All front harness pivot points • Check for loose or missing fasteners (nuts, bolts, cotter pins, lock rings, etc.) • Follow lubrication procedures for the Tow Plow and accessory equipment, such as spreaders • Refer to the owner’s manual for specific intervals
Hydraulic Set-up • Check hydraulic set-up prior to use • System pressure should be 2300 psi • Set hydraulic trims/flow for steering and mold board operation • Ensure that Tow Plow response is: • Consistent • Smooth • Not too slow (may reduce reaction time for obstacles) • Not too fast (could cause handling issues and damage) • Include operator to ensure response is adequate to the operators preference and needs
Installation • Standard Configuration • Connection of hydraulics and liquid chemicals for spreaders and liquid tanks may vary • Refer to your experienced Tow Plow operator or District General Services for additional requirements • Attach Tow Plow to tow vehicle pintle hitch • Pintle receiver locked • Raise landing gear into full up position and handle stored in tow position • Air brake lines/glad hands connected (no leaks) • Connect Tow Plow safety chains • Connect plow lift hydraulic circuit • Connect steering hydraulic circuit • 7 wire trailer plug installed and all Tow Plow lights operational • 6 wire plug installed and all operator lights are operational • Inspect all lighting for damage and proper operation
Operational Preparation • Ensure brakes are released and not frozen • Gently pull against the Tow Plow with brakes released to ensure brakes are not frozen • Remove mold board lock pins • Stand behind mold board • Start at center pins working out • Installing mold board lock pins • Install for transport or when deployment is not required for extended duration • Stand behind mold board • Start with outside pins and work to center
Operational Check • Perform operational check prior to leaving maintenance facility • Steering (deployment and retraction) • Steering wheels move freely through full stroke of activating cylinder while moving forward • Mold board (up and down) • Determine that the mold board moves freely from full up to full down
Deployment / Retraction • Visually check to ensure that the Tow Plow is clear of traffic • USE YOUR MIRRORS • Do not deploy or retract while stopped to prevent damage to the Tow Plow’s tires • Full deployment is not required to operate • Deploy to any desired position • Always deploy to a position that will clear all obstacles • Deployment (steering) and mold board functions (up and down) can be performed at the same time if desired
Low Visibility • Always retract the Tow Plow in low visibility conditions • Always have plenty of sight distance • Give yourself time to react and retract the Tow Plow for: • Stalled/stopped vehicles • Pedestrians • Roadway hazards • Obstacles • Guard rails, bridge ends and signs • When in doubt, pull in the Tow Plow
Steering • Use Tow Plow deployment to “steer” while negotiating tight turns • Left turns with right hand Tow Plows • Right turns with left hand Tow Plows • Avoid turns that require you to stop and back up • If retracted to tow position during turns, raise the mold board • Can be left in deployed position with mold board down and adjusted for obstacles to clear larger intersections
Pre-trip Inspection • Before each use: • Make sure that all nuts and bolts are in place and properly tightened • Make sure that all other fasteners are in place and are performing their specified function • Make sure all safety signs are in place, clean, and legible • Replace any damaged parts or excessively worn parts • Inspect for damage to any part of the plow mold board or push frame • Examples include broken or worn bolts or pins, cracked welds, bent sections, and/or excessive rusting • Inspect for damage to trip mechanisms, such as broken springs, cracked welds, and worn or broken bolts • Check all hoses for cuts, cracks, and leaks • Dump air from air brake reservoir to remove any moisture
Plowing Operations • Always try to position the Tow Plow in lanes that keep the plow farthest away from obstacles, such as guardrails, signs, etc. • Position the Tow Plow based on type of operation and configuration of the plows • Single operation • Plow two lanes as best as possible • Plow center turn lanes • Gang operation • Have enough plows to cover shoulder to shoulder • Utilize single plow trucks for clearing shoulders and ramps • Have single plow run shoulders next to guard rails
Gang Plowing • Try to position the crown of the road between the tow vehicle and the Tow Plow • For clearing first priority (high volume) routes, operational speeds should be within the following: • Safe for conditions present • Safe for traffic volume and conditions • Reduce spacing appropriately for limited visibility • Paced so that multiple gang trucks do not become separated • Spaced so that traffic may not pass between the gang plows
Starting Operations with a Gang • Communication is key • Ensure all operators know the procedures to be used • Ensure that all operators know their position in the gang • Enter traffic at speeds that are safe and allow the gang to stay together
Plowing Operations • Plowing heavy snow loads may require adjusting plow / truck position • Snow loads may suddenly decrease and allow the plow to skew back to it original position, such as clearing snow under bridges and overpasses • Tow may strike guardrail and other roadside devices when it returns to its normal position after the heavy snow load is released • Plowing aggregate shoulders • Raise mold board 2” to 4” above ground
Emergency Stopping • Maintain a safe distance from traffic in front of you • The Tow Plow is equipped with ABS braking system • Brake as you normally would • The procedure for stopping a trailer skid is: • Recognize the trailer skid by seeing it in your mirrors • Check mirrors anytime you brake hard to make sure the trailer is staying where it should be • Once the trailer swings out of your lane it is hard to prevent a jackknife • Stop using the brakes to get traction back • Do not use the hand brake (this will cause the trailer to continue to skid) • Once the wheels start to grip the road again, the trailer will start to straighten out and follow the tow vehicle • If the Tow Plow is deployed during a skid, leave in the deployed position
Lighting • There are two groups of lighting on the Tow Plow: • Work/warning • Operational (DOT) • Tow Plow lighting is connected to the truck via two separate trailer plugs: • 7 wire large plug for DOT vehicle lights • 6 wire plug for work and warning lights
Laser Guidance • Lasers can be used to determine Tow Plow position in relation to roadside obstacles • Can be helpful to determine Tow Plow position when fully extended • Mounted to the truck • Only represents full Tow Plow extension
Tow Plow Inspection • Used to assist operator in Tow Plow inspections • Use to pre-trip • Can be used for pre-storm inspections
Dry-Run Check List • Performed pre-season • Dry-Run • Allows operator to become familiar with the Tow Plow • Identify hazards • Identify turnaround points • Discuss and plan plowing procedures
Closed Driving Maneuvers • Provides several plowing scenarios including but not limited to • Ramps • Stalled vehicles • Barriers • Curves • Include additional maneuvers as needed