Download
1 / 55
560 likes | 691 Views
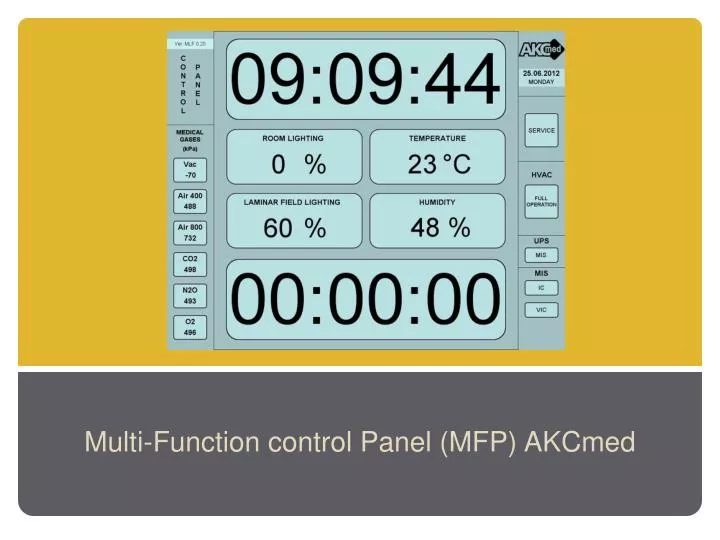
Multi-Function control Panel (MFP) AKCmed. Control panel MENU selection ( click on the selected MENU option). main menu. service menu. parameters setting. BACK to menu selection. m ain menu. BACK to menu selection. main menu. main MENU is shown on control panel screen

E N D
Control panel MENU selection ( click on the selected MENU option) • main menu • service menu • parameters setting
BACK • to menu selection main menu
BACK • to menu selection main menu • main MENU is shown on control panel screen • unable intuitive setting of selected functions needed for trouble free operation of the operating room • after accidental touch will screen return to main MENU after 3 seconds • color shown on screen reflects error messages and problems • NOTE: IF NOTHING IS SHOWN – SYSTEM IS STABLE AND WITHOUT ERRORS
BACK • to menu selection main menu ( click on the selected button) • clock • stopwatch • OT lighting • ventilation mode full/reduced operation • laminar flow unit lighting • medical gases control • OT temperature setting • UPS and ZIS control • SERVICE • humidity monitoring • in the OT
BACK • to menu selection clock BACK to main menu
BACK • to menu selection OT lighting BACK to main menu • after touching the lighted button will new screen appear • by touching on arrow you can adjust lighting intensity • after required intensity is set system switch back to main menu
BACK • to menu selection OT lighting BACK to main menu
BACK • to menu selection OT lighting BACK to main menu
BACK • to menu selection laminar flow unit lighting BACK to main menu • after touch on lighted button will new screen appear • by clicking on the arrow you are able to adjust lighting intensity • system will return to main menu once the required lighting intensity is set (same as accidental touch)
BACK • to menu selection laminar flow unit lighting BACK to main menu
BACK • to menu selection laminar flow unit lighting BACK to main menu
BACK • to menu selection temperature setting in the OT BACK to main menu • after touch on lighted button new screen will appear • by touching on arrow you are able to adjust temperature in the operating theatre (required increase/decrease of the temperature in degrees) • after required temperature is set – system will return to main menu • during the temperature setting period is value of the temperature figure white • ( delay is caused by ventilation construction and it is not possible to make it faster)
BACK • to menu selection temperature setting in the OT BACK to main menu
BACK • to menu selection temperaturesetting in the OT BACK to main menu
BACK • to menu selection humidity monitoring in the OT BACK to main menu • humidity is only displayed and is not possible to be set (ventilation function)
BACK • to menu selection humidity monitoring in the OT BACK to main menu
BACK • to menu selection stopwatch BACK to main menu • after touch on stopwatch button will system switch to stopwatch menu • three buttons are used – START, STOP, RESET • during the stopwatch function is button lighted in yellow color • to delete the value by using RESET button you will be to do so only after you stop the stopwatch
BACK • to menu selection stopwatch BACK to main menu
BACK • to menu selection stopwatch BACK to main menu
BACK • to menu selection stopwatch BACK to main menu
BACK • to menu selection ventilation mode switching BACK to main menu • ventilation is able to be switched between full and reduced mode operation • reduced mode is shown in orange color • after touching the button for switching the ventilation mode will appear window with question, if user like to continue to switch to change the ventilation mode – must confirm its decision (protection against accidental touch) • in case, that selection is not confirmed within 3 seconds will system return to original situation
BACK • to menu selection ventilation mode switching BACK to main menu
BACK • to menu selection ventilation mode switching BACK to main menu
BACK • to menu selection ventilation mode switching BACK to main menu
BACK • to menu selection medical gases control BACK to main menu • control panel is monitoring pressure of all medical gases (types of used medical gases are set in control panel parameter setting) • if any gas is in under pressure or overpressure alarm will be activated • alarm will create sound and also will be shown on appropriate button of exact gas by red color • in case of alarm is also shown alarm report with advice, how should personnel proceed (this is individually set) • after alarm is confirmed as received (by touching to button with alarm report) will sound alarm go off, but button will stay in red color • error message is possible to re-call back anytime after touching on red button of appropriate gas (sound alarm will not operate)
BACK • to menu selection medical gases control BACK to main menu
BACK • to menu selection medical gases control BACK to main menu
BACK • to menu selection medical gases control BACK to main menu
BACK • to menu selection UPS a MIS control BACK to main menu • control panel is monitoring medical isolated system status • in case of error ( UPS, IC, VIC) alarm will be activated • alarm will create sound as well as is shown in color (yellow, red – depends on type of error) – appropriate MIS button is in color • in case of alarm isalsodisplayed alarm report withadvice, howshouldpersonnelproceed (individualsetting) • after alarm is confirmed (by touching on button with error message) sound alarm will go off but appropriate button of MIS is in red color • alarm report can be re-called back anytime by touching red button MIS (without sound alarm)
BACK • to menu selection UPS a MIS control BACK to main menu
BACK • to menu selection UPS a MIS control BACK to main menu
BACK • to menu selection UPS and MIS control BACK to main menu
BACK • to menu selection service BACK to main menu • by using service button you can access to SERVICE MENU
BACK • to menu selection service BACK to main menu
BACK • to menu selection service menu BACK to main menu
BACK • to menu selection service menu BACK to main menu • service menu can be accessed by touching on SERVICE button • if someone touch accidently button SERVICE the system will return back to main menu after 3 seconds • if we are in service menu we can return back after touching button BACK • in this menu is possible to test IC and VIC, set time and date, shown alarm history and to find status of some control panel parts • by touching button PARAMETERS SETTING you can access to another menu
BACK • to menu selection service menu BACK to main menu • IC and VIC circuits • date and time adjustment • alarm history • other error reports • PARAMETER SETTINGS
BACK • tu menu selection IC and VIC testing • BACK • service menu • IC and VIC testing buttons able to do regular control of isolated status • after touching button you can hear sound signal during the testing period • if test will be successful, there will be button lighted in green color, if test was not successfully completed, the button will be lighted in red color • result of the test is also stored in so called history alarm section
BACK • to menu selection IC and VIC testing • BACK • service menu
BACK • to menu selection IC and VIC testing • BACK • service menu
BACK • to menu selection IC and VIC testing • BACK • service menu
BACK • to menu selection alarm history display • BACK • service menu • by pressing button – ALARM HISTORYwhole alarm history and testingofmedicalisolatedsystemswillbedisplayed • in menu youcanmove by usingarrows in left part ofthescreen • by pressingbutton BACK youwill return to service menu
BACK • to menu selection alarm history display • BACK • service menu
BACK • to menu selection History alarm display • BACK • service menu
BACK • to menu selection date and time settings • BACK • service menu • aftertouch on thebutton „Date and timesettings“ wecan set up requiredvalues • thanks to button BACK wecan return to service menu
BACK • to menu selection date and time settings • BACK • service menu
BACK • to menu selection other error reports • BACK • service menu • buttons show if all functions are in order (green color) • in case of error are buttons in red color, it is necessary to call service after problem is found • red color buttons are not showing critical errors, but errors which you are unable to find by other way
BACK • to menu selection other error report • BACK • service menu
BACK • to menu selection parameters setting • BACK • service menu • by using button PARAMETERS SETTING we can access to other menu, which is selected for setting of individual parameters of the control panel