Download
1 / 58
600 likes | 788 Views
ETID Electronic Turn-in Document. SITE USER GUIDE. ETID is now accessed through the BSM portal link: . https :// pep1.bsm.dla.mil/irj. SELECT “I Accept”. SELECT “Disposition Services”. SELECT “ETID”. Site Home.

E N D
ETIDElectronic Turn-in Document SITE USER GUIDE
ETID is now accessed through the BSM portal link: https://pep1.bsm.dla.mil/irj
Site Home This is the ETID Site Home Page. To complete your profile transferred from the AMPS process, select “Update My Profile”. You will use this option to make any changes to your profile in the future.
Site users can leave as “No” When users log in for the first time, you will need to complete your profile. Note the “*” fields are mandatory. Site users share the same profile screen as customers. To add a Site Location as a Site User, type in the Site DoDAAC and select “Add”. You may also edit or delete DoDAACs. Click “Save” when finished. As you tab through fields, this button may pop up. Hold your mouse over the button for explanation
Site Home Select “Log In As Site”.
Select ETID Type and Site Location, The screen will refresh and show a summary listing of all customers who have pending ETIDs. This summary allows you to view your workload.
By clicking on a users email, all their pending ETIDs will display in the listing below. You can further sort this listings by clicking on any of the column headings.
You may also use the Search Filter feature to display ETID listings based on several filter settings. Once filters are selected, click “Search”. You can further sort your listings by clicking on any of the column headings.
Updated Status Codes and Filters There are new and different status codes in ETID. Customers can now cancel approved ETIDs. ETIDs rejected after receipt will also show as cancelled. Demil Code has also been added as a filter and in listings.
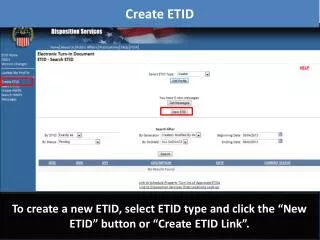
At the bottom of the ETID –Search ETID for Review Screen, are the actions that can be taken along with the links to research property to assist in reviews.
To View or Review an ETID From the “Search ETID for Review” screen there are 3 possible ways to review ETIDs. You may click on an underlined DTID number to view/review an ETID.
Top of the view screen includes Point of Contact info and Item Description. Action buttons and now at the top and bottom.
Supporting Documentation The bottom portion of the view screen includes any supporting documentation attached, and selected certifications. ETID now has the capability to attach supporting documentation to an ETID.
To view supporting documents, select “View Uploaded Documents”.
Click on image to view respective documents. After closing windows, select “Back”.
To view selected certifications, click on the furnished hyperlink.
After viewing a certification, select “Close Window” to go back to the ETID.
Please provide 4 copies of DD 1348-1A at turn in. To accept this ETID, select “Accept ETID”. You can now also enter a comment when you approve an ETID.
Note the message stating your accepted ETID was sent to DSS.
Note at bottom of screen, ETID Status has changed to “Approved”.
Hazardous info not complete, please add the correct certificates Select Reject Reason category, enter narrative, select “Reject ETID”.
Note the message “Your rejection request has been processed”, and…..
Note at the bottom of the screen that the ETID Status has changed to “Rejected”, and the reject reason(s) are shown.
SX1293 The site to receive this ETID should be SX1293 Choose your site from the “Look Up”, type in the DODAAC of the site to which the ETID is being redirected (note: DODAACs are case sensitive), enter the reason for the redirect, and select “Send To New Site”.
Note the message “ Your redirect has been processed”, and…….
…at the bottom of the screen the ETID Status has changed to “Pending/Redirected”. The redirect reason is also given.
To Review Multiple ETIDs ETIDs can also be reviewed by checking the “Select for Action” box next to the ETID (or ETIDs), and selecting “Review Selected ETIDs”.
A count of all ETIDs selected for review will appear at the top. As actions are taken, the next selected ETID will advance. You may also use the arrows to advance or go back without taking any actions.
Approving ETIDs off the ETID –Search For Review ETIDs can also be approved without viewing or reviewing by checking the “Select for Action” box next to the ETID (or ETIDs), and selecting “Approve Selected ETIDs”. Use only when a review is not necessary.
After selecting to approve several ETIDs, you will get a confirmation message. Select “Accept ETID”. Note list of multiple DTIDs being Accepted at once.
After you select print, you can choose what you want to print. You can still print labels, DD 1348-1A, Certifications, and a Shipping Manifest. Customers and Sites can now print a DLIS 1867 Hard Drive Label.
The 1348-1A in ETID now has 3 bar codes Rejected ETIDs now have a watermark.
Scrap Screen shows Scrap Group, Standardized LSN, Scrap Weight, Reimbursement Information and Noun Description.
Scrap review screen has same Accept, Reject and Redirect options. A QRP certification is also available in ETID.
Sites can view and authorize for turn in Hazardous Waste Profile Sheets separately from an ETID. In the Hazardous Waste Module, Click on “View Hazardous Waste Profile List”.
Hazardous Waste Profile Sheets (HWPS) will have 4 status codes. A HWPS in Pending Status is awaiting Site review. A HWPS can be submitted with or without an accompanying ETID for Site Review. A HWPS in “New” status has not been submitted for Site review yet.
A HWPS must first be “Authorized” before an ETID can be approved. A message will be provided at the top. Supporting Documentation Section will inform you of the type of Support Documentation provided.
To authorize a customer to use a Hazardous Waste Profile Sheet (HWPS), click on the “Authorized for Receipt” button.
Special Services Requests in ETID get “Submitted” by the customer and do not require a Site review.
Special Services Requests in ETID get “Submitted” by the customer and do not require a Site review. However, they can be viewed.