Download
1 / 11
110 likes | 333 Views
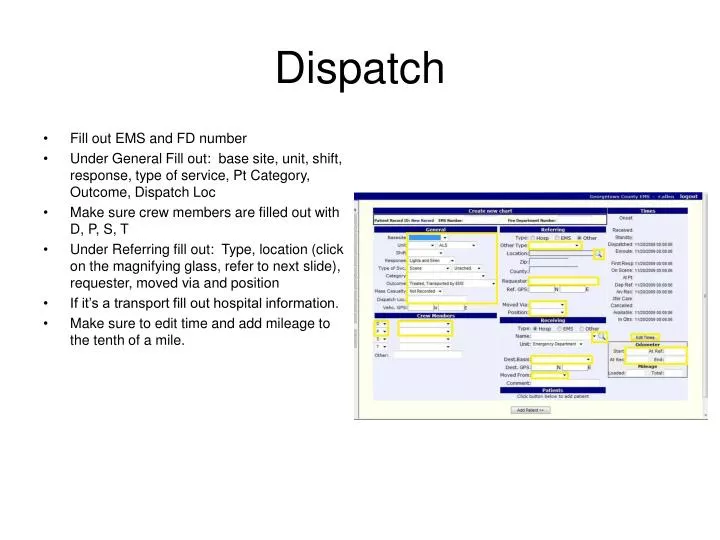
Dispatch. Fill out EMS and FD number Under General Fill out: base site, unit, shift, response, type of service, Pt Category, Outcome, Dispatch Loc Make sure crew members are filled out with D, P, S, T

E N D
Dispatch • Fill out EMS and FD number • Under General Fill out: base site, unit, shift, response, type of service, Pt Category, Outcome, Dispatch Loc • Make sure crew members are filled out with D, P, S, T • Under Referring fill out: Type, location (click on the magnifying glass, refer to next slide), requester, moved via and position • If it’s a transport fill out hospital information. • Make sure to edit time and add mileage to the tenth of a mile.
Location • If it is a common location use the drop down menu. If the location is in there select it and all the information will fill in for you. • If it is not a common do the following: Name is only used if it is a business (a good way to tell if name should be used is if someone could be dispatched to the location using only the name box. Ie Wal-Mart, choppee middle school) • Fill out address line(s) include PO Boxes and street address if applicable. • Use either the drop down box to pick city state zip or click on the writing tablet to write it in. • Click on Save Address
Patient • If we have treated this patient before they will be a common patient select them and verify the information • If we have not treated them before at a minimum fill out the highlighted areas. If you enter DOB it will automatically give you the patient age. • Make sure to verify billing information. • Make sure to either add PMHX or click on the none button. Do the same for allergies
Page 2 • Impression/Diagnosis: Make sure to fill out at least one of these boxes. • Fill out chief complaint: you can type in exactly what patient states is the problem • If warranted fill out the duration of complaint along with if an ALS assessment was done. Please remember that we do ALS assessments for suspected illness not rule out • Fill out History of Present illness. This needs to give an accurate description of why we are transporting patient. If there is no clear cut please add in verbiage to the extent of patient requesting tx for exam by doctor or facility requesting tx of patent for (reason) • Fill out scene description • FILL OUT CUSTOM BASED FEE. This will be BLS emergent, ALS emergent, ALS2 or ALS/BLS and the number of patients • Fill out patient belongings and factor affecting care as applicable
Page 3 • Default LOC and orientation are alert and oriented. Please change as needed. Do the same with pupils and motor sensory. • Initial GCS is on this page. The Airway on t his page is for when you first assessed, not what treatment was given. If the patient is on a vent or CPAP add it on this page.
Page 4 • Respiratory effort is defaulted as normal, along with breath sounds being clear. • The O2, via, performed by and outcome on this page are for what you observe during initial assessment, not treatment provided by our service. If we place the patient on O2 it will be documented on page 8. • Pulses are defaulted as strong radial. Please change as necessary.
Page 5 • This is where a secondary assessment is completed. If the patient is normal or there are only a few injuries or findings and you did a complete secondary survey click on the default button on the bottom (reference next page) • If the patient has many issues click on the body area and select the proper documentation. Please remember to mark a primary finding.
Page 5 cont • This is what the screen and assessment looks like if you click on the default button. If you need to change something you can still click on the affected body area and make changes. Please remember to remove the “normal” assessment if applicable.
Page 7 • This is for IV’s and medication given Prior to Assessment, as it states. This is not where we document IV’s and meds given by EMS personnel. • This page may be removed in the near future.
Page 8 • This is where we document ALL treatment and some findings. Before you can put in anything you need to fill out the time box • If you are just entering vital you can enter them in the proper place and place any comments you feel necessary in the comments box. • If you did an IV, med O2 or any other treatment pick an action and click on the SAVE/Add Line button. Fill out the information as requested and click on the save button (no picture) • Continue this for all treatments or findings. • If you need to just add comments to the chart just place the time in the time box and type your comments.
Page 9 • Click on Supplies used and fill out all used supplies. (We do not select blood tube). If a supply is not listed please contact BC Allen for the addition. • Fill out the reason for Transport • You need at least one signature, two preferred • Lock the chart when you are completed. • If you need to flag the chart at any time you can click the add a QA flag. • Make sure to fax any paperwork associated with this chart to 545-3278. Please place face sheet on top with CAD and preliminary chart. • If paper waiver forms used fax them individually.