Download
1 / 13
130 likes | 204 Views
Admin Interface Screen Shots. Iron Wind Metals Shopping Cart Project. Administrator User.

E N D
Admin Interface Screen Shots Iron Wind Metals Shopping Cart Project
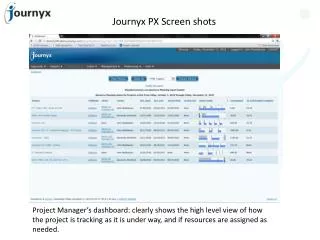
Administrator User The Admin Catalog page, which displays all of the main Categories. Also the options are given to add new category or new product. Also there are options to edit, delete, and move a selected category. To access Sub-Categories or Products, the Admin would click on the folder icon. This will display Sub-Categories or Products.
Administrator User The box to the left is the Battletech category in edit mode. This allows the admin to edit the name, image or hide categories from groups. The above box is displayed when the new category button is clicked. The Admin will enter the name, but do not need to include an image. The hide categories from group options, if selected would hide the new category from another customer group.
Administrator User The image on the left is the first part of the add new product page. The key areas that need to be filled out is Product Name, Product Price, and if the product is in Distribution set the minimum order quantity. The Select groups to hide this product from, is used when the product needs to be hidden from a certain group but still viewable by others.
Administrator User This is the second part of the new product page. The fields that need to be entered are Product name, quantity, model, image, and weight. After the information is entered, the Admin clicks on preview button, which brings up a preview entry. If it is good, then the Admin hits insert and it is saved into the database.
Administrator User This is the Specials by Category page, that is used to set the discounts for Distributor and Retail Stores Customer Groups. The Admin would select which category, the customer group, and then the discount need. It will apply the discount to all products in that category for that customer group.
Administrator User The image to the left is of the Quick Updates, which is an add-on that allows the Admin to make changes to products all at the same time. This way it reduces the time it takes to changes multiple products.
Administrator User The above image is from the customer groups page, which is were the Admin can edit, insert or delete customer groups. By default, all new users are considered in the Direct Customer group. The Admin will have to change the customer group for each user if they are a Retail Store, Contract Casting, or Distributor customer. Depending on what customer group a user is in, will determine what kind of discount on products and categories they can see.
Administrator User The above image is on the customer page, it displays all of the customers information about them. When an Admin selects a user, on the right four options are given, edit, delete, orders, or email.
Administrator User To the left, is an image of the edit customer page. The Admin can edit certain options for each customer and assign the correct customer group.
Administrator User To the left is the view all orders for the selected customer. It will display some key information about the order but when it is selected, the Admin can edit, delete, view PDF Invoice, or packing slip. To the right is the message the system will display if the Admin has selected to delete the order. If they want to delete the order, the Admin can chose to restock product that was within the selected order.
Administrator User The above image is of the Admin page that displays all orders, not just orders placed by a certain customer.
Administrator User The image to the left is of when an order is viewed. It will display all of the selected products and other information about the order. The Admin can also add comments about the order and change the status Processed or Delivered. When the status is updated, the Admin can either notify the customer of changes or not.