Download
1 / 5
50 likes | 178 Views
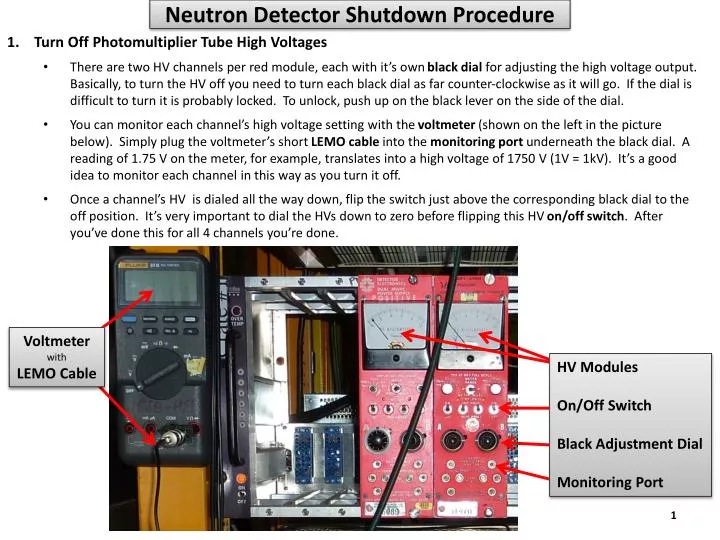
Turn Off Photomultiplier Tube High Voltages

E N D
Turn Off Photomultiplier Tube High Voltages • There are two HV channels per red module, each with it’s own black dial for adjusting the high voltage output. Basically, to turn the HV off you need to turn each black dial as far counter-clockwise as it will go. If the dial is difficult to turn it is probably locked. To unlock, push up on the black lever on the side of the dial. • You can monitor each channel’s high voltage setting with the voltmeter (shown on the left in the picture below). Simply plug the voltmeter’s short LEMO cable into the monitoring port underneath the black dial. A reading of 1.75 V on the meter, for example, translates into a high voltage of 1750 V (1V = 1kV). It’s a good idea to monitor each channel in this way as you turn it off. • Once a channel’s HV is dialed all the way down, flip the switch just above the corresponding black dial to the off position. It’s very important to dial the HVs down to zero before flipping this HV on/off switch. After you’ve done this for all 4 channels you’re done. Neutron Detector Shutdown Procedure Voltmeter with LEMO Cable HV Modules On/Off Switch Black Adjustment Dial Monitoring Port
Turn Off The Electronics Crates • There are two NIM electronics crates that should be switched off after the high voltage has been turned off. Make sure the high voltage is off before proceeding! (see step 1 above). • Simply switch the two on/off switches to their off positions. NIM Crate On/Off Switches
Shutdown Data Acquisition Computers • There are two Dell data acquisition computers that should be properly shutdown. This can be down either remotely or locally. For this set of instructions we’ll assume that it will be down locally in the mine. • Before an electrical shutdown either Joel Sander or Ray Bunker will have made sure that data taking has been turned off, and will probably have already turned the computers off. These instructions are for the unlikely event that the computers have not been turned off. If you’re unsure or it looks like some programs are still running, please contact one of our cells: • Ray Bunker 805-280-1076 • Joel Sander 805-403-0564 • Both computers are accessed with a single keyboard, monitor and mouse (as pictured to the right). They both run Windows XP… there’s nothing unusual about turning them on/off. You may need the username and password to gain access: • Username hep • Password hep|_|se|- • the vertical lines (or pipes) are not letters. Typical location on a keyboard is just above the enter key, grouped with the backslash key. • First log into (if necessary) whichever computer is currently hooked up to the keyboard and monitor. Use the menu bar at the bottom of the screen to shutdown the computer. Now switch to the other computer by double-tapping the scroll-lock key located near the top-right corner of the keyboard. This will switch keyboard, monitor and mouse control over to the other computer. Log into and shutdown the 2nd computer. • It should be fairly obvious from the computers’ front panel lights and the from the noise they make whether or not they have powered down. • Also, turn off the UPS battery backup to prevent it from beeping during the power outage, and consequently wearing out its battery. The front of the module has two switches. The larger one on the right is the on/off switch. UPS Battery Backup Dell Data Acquisition Computers
Turn Off UPS Battery Backups • There are two additional UPS battery backups that should be turned off so that they don’t beep during the power outage, and needlessly wear down their batteries. • The other two modules are located between the two yellow electronics racks as shown in the picture below. Again, there are two switches on the front of each module. The on/off switch is the larger one on the right. • These two UPS modules provide power glitch protection for the two NIM crates you shutdown in step 2. It’s very important that the high voltage be turned off (step 1) prior to turning off the NIM crates and their UPS modules! UPS Battery Backups
Neutron Detector PowerOn Procedure • Turning things back on is basically a reversal of the above 4 shutdown steps: • Turn on all 3 UPS backup modules. • Turn on the 2 Dell data acquisition computers. Simply push the power switch on the front side of each computer. You don’t have to log in or start anything… we’ll do that remotely. • Switch on the two electronics crates. • Before turning on the high voltage make sure the 4 black dials are turned all the way counter-clockwise (the zero voltage/off position). Also, locate the sheet that indicates the neutron and muon high voltage settings for each channel. We will inform you ahead of time which set of voltages to use… normally it will be the neutron high voltages. • Then, one channel at a time: • Plug the voltmeter into the HV monitoring port • Flip the HV on/off switch to the on position • Slowly turn the black dial clockwise until the voltmeter indicates the correct value. It can be difficult to get the exact value… try to get it as close as possible. • Lock the black dial by pushing the slider on its side down. This action can change the final voltage setting… so be careful. The dial can still be tweaked with a little more force when it’s in the locked position. This may be necessary to get the voltage close to the desired setting. And that’s all there is to it… Thank you!