Download

1 / 40
400 likes | 479 Views
Picking & Planning a Project… Test & Debug Basics. From Classes EE182 & EE183 Prof. Tamara Schmitz “Dr. T” and Ty. Outline. Six-Pack of Bad Assumptions about Senior Projects Sample Engineering Division of Labor Defining a Project (Importance of Test) Helpful Hints Debugging Strategies

E N D
Picking & Planning a Project…Test & Debug Basics From Classes EE182 & EE183 Prof. Tamara Schmitz “Dr. T” and Ty
Outline • Six-Pack of Bad Assumptions about Senior Projects • Sample Engineering Division of Labor • Defining a Project • (Importance of Test) • Helpful Hints • Debugging Strategies • Project Ideas
Six-Pack of Bad Assumptions 1. The Project will be defined for me. This is NOT a homework assignment or class project This is YOUR SENIOR PROJECT. Instead of solving someone else’s problem, you have the challenge of… • discovering a problem • defining it for yourself • breaking it into manageable (and testable) chunks • designing/building/testing these chunks • integrating them into a product • improving/refining/packaging • quantifying success • presenting your work EE198A EE198B
Six-Pack of Bad Assumptions 2. The Project will be neat/clean/easy. On the contrary, your project will most likely be messy. You will have to try multiple configurations to successfully build a circuit. There is a large gap between theory and practice. Will it work just because you designed it? How good is your design? How realistic are your models if you simulate? How good are your components? (% tolerance) How good is your assembly?
Six-Pack of Bad Assumptions 3. Friends make the best project partners. Hanging out and working together are very different. Choose partners for their: Talent or Special Skills (RF, software) Communication ability Complementary skills Dedication Ability to commit time Other things important to you…
Six-Pack of Bad Assumptions 4. More group members means less work for me. This isNOT a LINEAR relationship. 2 people 50%YOU + 50%ME OR 3 people 33%YOU + 33%ME + 33%OTHER It’s more like 2 people 75%YOU + 75%MEOR 3 people 65%YOU + 65%ME + 65%OTHER (& that’s only if everyone contributes equally… rare.)
Six-Pack of Bad Assumptions 5. “I’m about to graduate with an EE degree, so whatever I design and build will just work.” The nature of a project is more than design; It is also implementation! This is not something you have a lot of practice or experience with. You absolutely MUST plan for time to learn, time to make mistakes, time to bang your head on the wall. Making a project work means you have taken EVERY important issue into account. So… save lots of time to debug and improve your project. Set deadlines early. Don’t let them slip. If they slip, make up the work to get back on schedule.
Six-Pack of Bad Assumptions 6. My group will break up work into analog, digital, and software parts. This only breaks up the design work! There isSO MUCH MOREto completing a project. Allow me to offer an alternate plan, based on the structure in the IC industry…
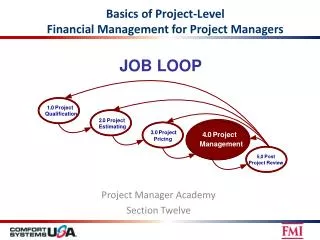
Design Applications Test Product Marketing Engineering Division of Labor
Design Applications Test Product Marketing Engineering Division of Labor Design deals with theory. They run simulations and improve models. They innovate. They built what has never been built before.
Design Applications Test Product Marketing Engineering Division of Labor Applications demonstrate the usefulness of a design. They evaluate the competition, find 2nd sources for parts, help customers debug problems, write articles and develop improvements for projects.
Design Applications Test Product Marketing Engineering Division of Labor Test engineers are in charge of evaluation of the design, fab, and assembly process. Their strongest skills are in debugging—hardware, software, interfaces, equipment limitations. (more later)
Design Applications Test Product Marketing Engineering Division of Labor Sales and Marketing engineers interface between a company & its customers. They build relationships, make presentations and make the sale. They return feedback from the customers to the rest of the team. $$$ $$ $ $ $
Design Applications Test Product Marketing Engineering Division of Labor Product engineers are devoted to a particular project. They make sure everyone else is doing their job efficiently and on-time, to ensure the company will make money. They analyze yields, synthesize large amounts of data and coordinate subcontractors.
Engineering Division of Labor How could this apply to your project? (Assuming group of 3, students A, B, and C) Design (Entire Group—A,B,C) Test Product (Hands-on, Methodical-A) Applications (Project Lead-B) (Make sure it works like the customer wants-C) Marketing
Design Engineering Division of Labor (Entire Group—A,B,C) Applications Marketing Test Product (Hands-on, Methodical-A) (Make sure it works like the customer wants-C) (Project Lead-B) Organize meetings. Enforce deadlines. Enable group members. Evaluate alternate solutions. (cheaper/faster/better?) Take personal responsibility for success of project. Investigate competition. Order parts. Find 2nd sources. Point person for assembly. Make back-up plans. Develop improvements. Consider packaging (customer interface). Makes sure design can be verified and operation quantified. Understands multiple interfaces (analog/digital, software/hardware) Detail-oriented. Calm demeanor.
Finding & Defining a Project Where do we start???
Finding & Defining a Project • The internet • Professors have interesting (weird?) ideas • Ask friends what they need or would like to have • Ask your mom • Ask a 5 year old • Use IEEE resources • Brainstorm • Call tech support at a company where you want to work and ask for an idea • Identify EE impact on various professions (firefighter, teacher, vet, gardener, brick layer…)
Narrowing down the List • Sit down with your group • Let each member pick 3 favorites and 3 non-favs • Compare notes and agree on 3 ideas to focus on • Before approaching an advisor, construct a block diagram of each of the 3 project ideas. • What will each project involve? • What are the trade-offs in your design? • What competition exists for your product? • Check on the availability of parts • If unsure about operation, build functional prototypes to verify ideas
Setting your Plan of Action • Find an Advisor • Be prepared • Share business plan and backup plans • Clarify requirements and expectations • Get Going • I encourage my students to have • part of their design built by the end • of EE198A to show viability of design. • Trouble hides in strange places. • You need to dive in to find it and handle • one issue at a time.
Design with Test in Mind • How are you going to prove that your project works? (What if only parts of it work?) • Include measurement access points • Document testing and share with advisor • As you build pieces to test, keep working sections in a safe place. • Build a copy if you want to improve/mess with the design. If you ruin it, you’ll still have the original. (Helps in debugging to have a comparison.)
Stages of Prototyping • Simulation • Quality of modeling (ideal?) • Breadboard • Frequency limitations • 1pF between adj. holes • Protoboard (soldered breadboard) • Printed Circuit Board (PCB) • ~ $50 to $500
Test Each Block in theBlock Diagram • Test circuits early • Test sections one at a time • Test sections in pairs (watch for loading) • Test complete design • Don’t wait until Presentation Week • to start testing! Get a simple prototype • as quickly as possible.
Helpful Hints Bypass Capacitors on every chip near power supply pin on power supply (even if using batteries) across motor terminals use ~ 1mF or more Label wires/Use color codes Breadboards can have hidden shorts Chips burn out (buy extras) Surface-mount parts are difficult to work with (packages: DIP, SMD, BGA, axial, 0805) Use sockets when possible
More Helpful Hints Batteries have issues series resistance maximum current deliverable (much less than the bench power supply) voltage decreases with use Use Voltage Regulators (ex: LM7805) AC power is not DC voltage Single-supply vs. Dual-supply ICs Ground planes
Helpful Places for Parts Halted Specialty Corporation (www.halted.com) garage-sale of electronic parts 10% discount with student ID helpful staff (Dr. T’s favorite EE place!) Anchor Electronics smaller selection, better organized than Halted Fry’s – be careful of returns/opened boxes Digikey – parts supplier (www.digikey.com) Mouser – parts supplier (www.mouser.com) Local IC Companies – free samples (order EARLY)
Debugging a Circuit • Check connections with • continuity on DMM • Turn on power • Check DC bias levels • Apply simple test signal (like 1kHz sine wave) • Check signal with scope through signal path • If there is a problem, test one stage at a time • driving problem? (prev stage not strong enough) • loading problem? (need a buffer) • Use ONE hand–is something really hot? • too much current • lower current or add a fan
Debugging a Circuit • Remember the basics: • Series or Parallel connections • Thevenin and Norton equivalents • Are you measuring a voltage or a current? • Op Amps can only be stable with negative feedback. • Don’t expect voltages beyond the power supply. • Use logarithmic and/or not linear steps
Debugging a Circuit The first step to finding a problem is to locate it. Verify as many blocks as possible. Probing signal nodes and looking for a change help you find sensitive places. Example: add capacitance to one node at a time and watch for the frequency of some unwanted ringing to change. (FYI: Finger is a convenient capacitance.)
Debugging? What doesn’t work? Software Tester/Equipment Be Systematic Be Patient Check and Recheck Is there Power? What is the Bias? Follow the Signal… DUT or component Board and Connections
Simple Debug Steps Summary • Verify power and grounds • Verify inputs and outputs against data sheet norms • Verify mechanical components (wires) • Check for physical shorts and opens • Use ohm meter • Visual inspections • Check for missing or wrong components • Check for heat, smoke & fire
A Few Project Ideas Two Favorites from Last Year Windspeed Monitor for Bridges Sum of Classes Mechanical Issues Multiple Transmitters Digital/Analog/RF “Elevator Description” Digital Picture Frame FPGA 10-layer PCB Auto-correction for small files Built-in MP3 player, too
A Few Project Ideas From Me • Test Equipment using USB on laptop • Interview doctors, librarians, umpires… what would they like? • Designs to help 3rd world communities
The End Good Luck!!!