Download
1 / 19
190 likes | 251 Views
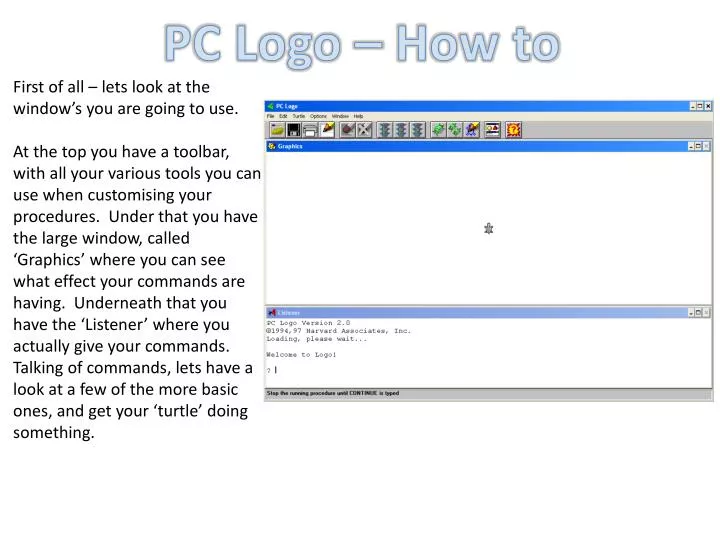
PC Logo – How to. First of all – lets look at the window’s you are going to use.

E N D
PC Logo – How to First of all – lets look at the window’s you are going to use. At the top you have a toolbar, with all your various tools you can use when customising your procedures. Under that you have the large window, called ‘Graphics’ where you can see what effect your commands are having. Underneath that you have the ‘Listener’ where you actually give your commands. Talking of commands, lets have a look at a few of the more basic ones, and get your ‘turtle’ doing something.
Commands The very first, most used commands you will need are incredibly simple. FD ‘X’ commands your turtle to go forwards by value ‘X’ RT ‘X’ commands your turtle to turn to the right by ‘X’ degrees. Lets do something simple, how about a square. Type fd 50 and then rt 90 four times. Your listener should look like this after you have finished.
Commands As you can see, this method, while hard to get wrong, takes quite a lot of typing to get any sort of shape, imagine trying to draw a circle like this. There is a far easier way to do this however. Type CS to clear your screen, so we can start on something slightly more advanced. Now, lets make a circle. Unless you want your hands to fall off though, we are going to have to find a slightly faster way to do this. Lets make a procedure.
Procedures Now, lets decide what to call your procedure. We’re going to draw a circle, so lets call our procedure ‘circle’. Type edit circle This should open up a new window, like this. It should be titled Circle, and start with TO CIRCLE. Now, lets make it do something shall we. We want it to draw a circle, without having to do lots of typing. The answer to this is the Repeat command.
Repeat As the name suggests, the repeat command repeats whatever you tell it to. What we are going to do is tell it to draw a circle. So, type: repeat360[fd1rt1] This tells the procedure to repeat 360 times the commands fd 1 then rt 1. So the repeat command can be summed up like this: repeatX[Y] Which means repeat command ‘Y’, ‘X’ times. Press F2 to leave the editor. You should see ‘circle defined’ in your listener.
Our Procedure Now, lets test our procedure. Type circle into your listener, and press enter. You should see this. To vary the size of your circle, change how much the turtle moved in the FD command in your procedure. However, that takes time, and you aren’t sure of what it will look like until you have done it. Lets speed this up shall we. Lets use variables.
Variables A variable is something we can change in the procedure, without having to edit it every time. Lets call our variable ‘X’. So, open your procedure with edit circle, and lets change it around a bit. Where it says, TO CIRCLE, change it so it says TOCIRCLE:X. This means that when you type circle, you must also give a value of X. Now, change your procedure, so is says repeat360[fd:Xrt1] Now you can vary how far the turtle moves every repeat. Press F2, and try typing circle 2. You should see this.
Variables Now, with variables, a whole new world of possibilities has opened up for us. If we put our minds to it we could make any shape we could ever imagine. You can have as many variables as you like in a procedure, for example you could have a procedure called SHAPE :X :Y :Z Or any other combination. Now lets make a procedure that will make a shape with a number of sides :X and a side length :Y As you may know, the exterior angle of a shape is 360/No. of sides. So our procedure would look something like this. First, lets call it POLYGON. 90⁰ 120⁰ 360 4 360 3 30⁰ 360 12
POLYGON Now, type edit POLYGON into your listener. We need the top to say TOPOLYGON:X:Y Then, type repeat:X [fd:Y rt360/:X] This lets us set the number of sides, and the length of each side. Lets give it a go shall we? Lets start with a square, of side length 50, and of course with 4 sides. You should get this, if not, go back and check for any typo's in your procedure. Now, one more thing before we get onto some really hard stuff.
Circles (again) With all the circles we’ve drawn, we have set the circumference, not the radius. Lets see if we can try and make a procedure where we set the radius, of the circle, and the program works out the rest. So first, we’re going to need a variable, :X, and the value of pi. Logo takes this value to 3.14, which is close enough for our means. Lets call our procedure CircleR – meaning it is a circle where you set the radius. So, type ‘edit circler’ in your listener, and type this: Give the procedure a variable :X Tell it to repeat 360 times: forward 2*π*:X then right turn by 1. Remember, to multiply use * not x. Circumference D R Circumference = π*R*2 π*D
Circles So, with all that done, does your procedure look like this: TOCIRCLER:X REPEAT360[FD((PI * 2 * :X)/360)RT1] END If so – well done, you have made a procedure where the value :X is the radius, and the circumference is done by Logo. Try is out, and you should get this, set :X to 50. This is useful for making a drawing significantly more precise. Now, lets move onto something even better – spirals!
Spirals We’ve made all sorts of shapes, but they all have one thing in common; they start and end at the same place. What about a shape that starts at one place, and ends in another, like a spiral. Lets start with something basic, like a square spiral. This involves quite a jump in procedure complexity – so make sure you type everything correctly first time! Lets call it Sqspiral – square spiral. Type edit sqspiral into your listener, and give it 2 variables, X and Y. First, we’re going to need to stop our spiral growing out of control, so type IF :X > 200 [stop] Then just tell it to go forwards by X and right by Y. Then – and this is the important bit, type sqspiral :X + 1 :Y This is the bit that makes it expand into a spiral. Go to next slide for the finished procedure. You will notice that here the procedure ‘calls itself’, otherwise you would have to type it every time :X changed! How tiring!
SQspiral Does your procedure look like this: TOSQSPIRAL:X :Y IF:X>200[STOP] FD:X RT:Y SQSPIRAL :X+1:Y END If so, well done, and lets give it a go. Press F2 to save it, and then type sqspiral 0 90 into your listener. Does it look like this? With this procedure you can make a spiral with any number of sides, with right angles, or with triangles, or anything you can imagine, within some limits. This procedure will not produce a circular spiral, so that’s what we’re going to do next.
Circular Spiral Now, lets start on our circular spiral. We need to give it a name first. Lets call is Cspiral. To get it to work, we need to work a few things out first. We need to work out, for example, the distance between two layers of the spiral, and make this distance constant throughout the spiral. This instantly means that we are going to have an :X + ‘Y’ part in there somewhere. Now we need to find an appropriate value for ‘Y’. To work this out we need another constant, ‘Z’. So, if ‘Z’ is the distance between two layers, say 0.1, and ‘Y’ is what we do to :X, then we need to increase :X by 0.1 every 360⁰ of rotation. The answer is now clear. ‘Y’ = 0.1/360. So now we know what our procedure is going to look like. Try and put it together, and see if it works. Remember all the limiters to stop it expanding out of control! Go to the next slide to see my solution to this problem.
Cspiral Does your procedure look something like this? Note: The only reason we have a variable is so that we can change it within the procedure itself. TOCSPIRAL:X FD:XRT1 IF:X> 2 [STOP] CSPIRAL:X+(0.10/360) END And, does the spiral it produces look something like this? (set :X as 0.1) If not, give it another go, or just copy out the procedure I used.
An Animation That was fun – but it is still quite limited. Lets move onto something a bit more fun. Lets make an animation. This will require a few steps, but we’ll get there! First, I am going to explain why I have designed it like I have, and then I’ll set you to putting it all together for yourself. The animation I have made is very simple, but requires 4 different procedures to work. This is because when I was putting it together I did it step by step, to make sure that everything worked. This has the added bonus of slowing the animation down enough that it doesn’t hurt your eyes when you play it. You can amalgamate all the procedures into one if you so wish, but I don’t think you will like the result, and it gives you quite a headache after a while. So, lets begin!
Our Animation Our first procedure we’re going to make is called TA. Its very simple, and it goes: RT 30 FD 50 REPEAT 2 [RT 120 FD 50] Then we have TA2, which goes: TA REPEAT 2 [FD 50 LT 120] FD 50 You will notice that this procedure draws on a previous procedure. Now for TA3, and it goes: TA2 PE TA2 PD PE means pen erase – which causes the pen to erase any lines it touches. PD is pen draw, the default mode. And now, for the final one, called ANI. ANI goes: REPEAT 100000 [TA4 RT 1] Give it a go, put them all together, then sit back and watch. It is very basic, but all my attempts to make a more advanced animation have been met with failure. Perhaps you will have more luck? One more thing. This animation will never stop, and if you leave it too long, it crashes your computer. To stop it, press this icon (the one on the right)
If all Goes to Plan If all goes to plan, you should see this on your screen (click to start and stop when viewing as slide show.)
I hope this slide show has helped you, as much as it helped me when I was making it!