Download
1 / 60
610 likes | 732 Views
GUI Programming: Basic Concepts. A GUI component is a class that implements the IComponent interface. Which allow sharing components between applications. a control , such as a button or label, is a component with a graphical part

E N D
GUI Programming: Basic Concepts • A GUI component is a class that implements the IComponent interface. Which allow sharing components between applications. • a control, such as a button or label, is a component with a graphical part • Some components, which we call containers, can contain other components • some examples are Form, GroupBox and Panel • Components can generate events to which event handler can respond to.
GUIComponents/Controls • Components and Controls are organized into an inheritance class hierarchy so that they can easily share characteristics • Each component/control defines some • properties • methods • Events • The easiest way to add components and controls to a program is to use VS .NET ToolBox • Controls dragged from the Toolbox onto the surface of the form with the aid of the Designer. • We first look at the form itself then look at most common controls
Forms The System.Windows.Forms namespace contains classes for creating Windows-based applications. // create a form do Form1 form = new Form1(); form.Show(); // Show form modelessly shows the new form modelessly and returns immediately without creating any relationship between the currently active form and the new form. This means that the existing form can be closed, leaving the new form behind. Or show form modally form.ShowDialog(); On the other hand, shows the form modally and does not return control until the new created form has been closed.
Form Size and Location • The initial location for the form is governed by the StartPosition property, which can have one of several values from the FormStartPosition enumeration: enum FormStartPosition { CenterParent, CenterScreen, Manual, WindowsDefaultBounds, WindowsDefaultLocation, // default } –WindowsDefaultLocation. The form's starting position will be determined by Windows. –WindowsDefaultBounds. Windows will be asked to determine a default size as well as location. –CenterScreen. The form will be centered on the desktop –CenterParent. The form will be centered over the owner (or the currently active form, if there's no owner) when ShowDialog is used. If Show is used, the behavior is that of WindowsDefaultLocation. –Manual. Allows you to set the initial location and the size of the form.
Form Size and Location The size and location of the form are exposed via the Size and Location properties, of type Size and Point, respectively. – this.Location = new Point(1, 1); this.ClientSize = new System.Drawing.Size(292, 266); this.Location = new System.Drawing.Point(2, 4); this.MaximumSize = new System.Drawing.Size(400, 400); this.MinimumSize = new System.Drawing.Size(10, 34);
Form Appearance • FormBorderStyle sets whether the form has a border, whether it can be resized. •ControlBox is a Boolean determining whether or not the icon on the upper left of the form as well as the close button on the upper right are shown. • The MaximizeBox and MinimizeBox properties determine whether the maximize and minimize buttons are shown on the form's caption. • The HelpButton property shows the question mark button next to the close button in the upper right, but only if ControlBox is set to true and MaximizeBox and MinimizeBox are both set to false. • The Icon property determines the image used as the icon for the form.
Form Appearance The SizeGripStyle property allows values from the SizeGripStyle enumeration: Auto, Hide, or Show. A size grip appears on the lower-right corner of a window that indicates that it can be resized. •ShowInTaskbar is a Boolean governing whether the form's Text property should appear in a button on the taskbar. Form Tarnparancy: Controlled by the Opacity property with its defaults to 1.0, or 100% opaque. this.Opacity = 0.5;// 50% Background image: Can set the Form background to some iamge. And many more properties
Form Lifetime • When Form.Show or Form.ShowDialog is called, you can be notified that this has happened when the code handles the Load event. void InitializeComponent() { ... this.Load += new System.EventHandler(this.Form1_Load); ... } void Form1_Load(object sender, System.EventArgs e) { MessageBox.Show("Welcome to Form1!"); } There are many other events.
Form Menus The major things you'll want to focus on are: • The Checked and CheckOnClick properties (which mark an item as chosen) • The Enabled and Visible properties (which determine whether the item can be chosen or whether it will be shown) • The ShortcutKeys property (which allows you to assign a keyboard shortcut to a menu item, such as Ctrl+S for Save) • The Text property, which is what's shown to the user • The Image property which will assign the image that will be displayed on the menu.
Form Menus •Although you are limited to a single main menu showing on a form at a time, you can switch menus at run time to your heart's content by setting the Form.MainMenuStrip property. private void button1_Click(object sender, EventArgs e) { this.Controls.Add(this.menuStrip1); this.Controls.Remove(this.menuStrip2); } • Menus and menu items are both containers. The MainMenu class has a MenuItems collection that contains zero or more MenuItem objects. This makes up the list of items across the top of the menu, such as File, Edit, and Help. Each of these MenuItem objects in turn has its own MenuItems collection, which contains the next level of items—for example, File | Save, File | Recent Files, File | Exit.
Event, Event Handler and Delegate • There are 100’s of possible events and application can respond to: Events, e.g., • a window becomes visible • a graphical button is clicked • a keyboard key is pressed • the mouse is moved • a mouse button is clicked • the mouse is dragged • a timer expires The application may choose to handle or ignore the event • Event handler • a method that processes an event and performs tasks • In a control, there is one delegate for each event it can generate • a delegate of an event is an object which references (a list of ) methods, i.e., event handlers but which method will be called is not known until run time
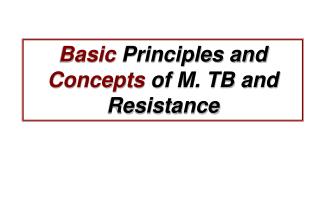
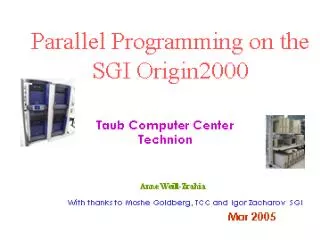
calls Handler 1 for event E calls Object A raises event E Delegate for event E Handler 2 for event E Handler 3 for event E Event-Handling Model Fig. 12.5 Event-handling model using delegate.
Controls - Standard Controls • can be broken into the following categories: – Action controls. Controls such as Button and Toolbar exist to allow the user to click on them to cause something to happen. – Value controls. Controls such as Label and PictureBox show the user a value, such as text or a picture, but don't allow the user to change the value. Other value controls, such as TextBox or DateTimePicker, allow the user to change the value being displayed. – List controls. Controls such as ListBox and ComboBox show the user a list of data.
The most common controls Buttons: Tell applications to take some actions Labels: put titles descriptions for controls TextBox: Write any text (free writing ) RichTextBox: Text editing control, can handle formatting features PictureBox: is used to display an image CheckBox: Ask yes or no RadioButton: Multiple choice (one selection is allowed) ListBox : Select or or more choices from a list (less area) ComboBox: Combination of a textbox and listbox (select or type) GroupBox: Frame for group of controls MenuStrip allowing adding menu to applications ToolStrip: allow adding toolbar to applications StatusStrip: Send messages to users, progress bar
Some Common Control Properties • Text property • Specifies the text that appears on a control • TabIndex property • Order in which controls are given focus • Automatically set by Visual Studio .NET • Enable property • Indicate a control’s accessibility • Visibility control • Hide control from user • Or use method Hide
Labels, TextBoxes, Buttons, and PictureBoxesLayout Management Labels: Provide text instruction Defined with class Label • derived from class Control
TextBoxes • Provide an area for text input: You can specify that a textbox is a password textbox
Buttons • Control to trigger a specific action • Derived from ButtonBase
PictureBox • Displays an image • Read image from file:Image.FromFile() method (need to add System.IO name space)
Layout Management • Size structure • Allow for specifying size range • MinimumSize and MaximumSize property • Location structure • Specifies upper-left corner of the control, relative to container • Anchor and dock • Anchor • Anchored control stays at a specific location (relative to parent) • constant distance from specified location • unanchored control moves relative to the position • Dock • allows control to spread itself along and entire side
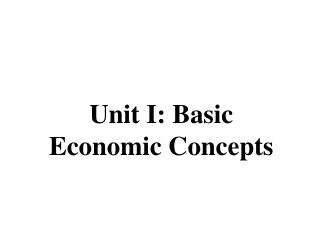
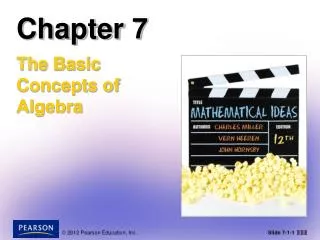
The Effect of Anchoring Before resize After resize Constant distance to left and top sides Fig. 12.11 Anchoring demonstration.
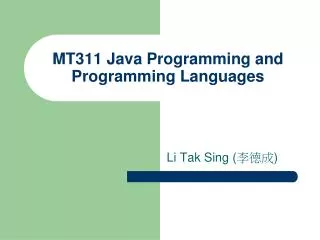
Set Anchor Darkened bar indicates to which wall control is anchored Click down-arrow in Anchor property to display anchoring window Fig. 12.12 Manipulating the Anchor property of a control.
Control Layout: Dock Control expands along top portion of the form Fig. 12.13 Docking demonstration.
GroupBoxes • A GroupBox can display a caption • Text property determines its caption
Panels • A Panel can have a scrollbar • View additional controls inside the Panel
GroupBoxes and Panels panel Controls inside panel panel scrollbars Fig. 12.21 Creating a Panel with scrollbars.
Standard Dialogs • A component is like a control in that you can drag it from the Toolbox onto a design surface and set its properties using the Property Browser. • All the standard dialogs are components, they can be created in two ways: manually or by using the Designer. For example, creating and showing an instance of the ColorDialog component manually looks like this: void colorDialogButton_Click(object sender, EventArgs e) { ColorDialog dlg = new ColorDialog(); dlg.Color = Color.Red; DialogResult res = dlg.ShowDialog(); if( res == DialogResult.OK ) { MessageBox.Show("You picked " + dlg.Color.ToString()); } }
Standard Dialogs • If you drag a ColorDialog component from the Toolbox, you can show it without explicitly writing the creation code, because the Designer will generate it for you in the InitializeComponent function: void InitializeComponent() { ... this.colorDialog1 = new ColorDialog(); ... } void colorDialogButton_Click(object sender, EventArgs e) { colorDialog1.Color = Color.Red; DialogResult res = colorDialog1.ShowDialog(); if( res == DialogResult.OK ) { MessageBox.Show("You picked " + colorDialog1.Color.ToString()); } }
Standard Dialogs • The following standard dialogs come with WinForms: –ColorDialog allows the user to pick a color exposed by the Color property of type System.Drawing.Color. –FontDialog allows the user to choose a font and its properties, such as bold, italics, and so on. The user-configured font object of type System.Drawing.Font is available from the Font property of the component. –OpenFileDialog and SaveFileDialog allow the user to pick a file to open or save, as appropriate for the dialog. The chosen file name is available from the FileName property of type string.
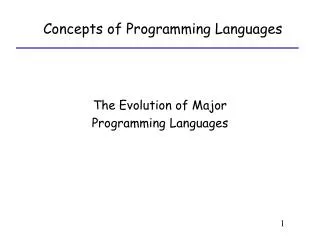
(0, 0) x-axis +x +y (x, y) y-axis Basic Concepts of Graphics: Where to Paint? • A graphics context is a drawing surface, the drawing area of a form or a panel • A Graphics object manages a graphics context; thus drawing actions are always like:Graphics g;…// get gg.DrawAction()… Graphics coordinate system. Units are measured in pixels.
When to Paint? • There are two cases: • when a control becomes visible/resized etc, it will receive a Paint event from the run time system • Or if you call Invalidate, it will generate a Paint event as well • for example you want to redraw after you update in a timer handler
How to Handle the Paint Events • A form has a virtual event handler OnPaint() for the Paint event; thus one way is to override the virtual event handler OnPaint(), e.g., protected override void OnPaint( PaintEventArgs e ){Graphics g = e.Graphics; • Pen pen = new Pen( Color.Blue ); • g.DrawLine(pen, 0, 0, 150, 150); • } • Another possibility is to write your own event handler to handle the Paint event, e.g.,private void Form1_Paint(object sender, System.Windows.Forms.PaintEventArgs e) {Graphics g = e.Graphics; • Pen pen = new Pen( Color.Blue ); • g.DrawLine(pen, 0, 0, 150, 150); • }
Colors, Fonts, Pens, and Brushes • Colors • The easiest way to specify color is to use the system defined color, e.g.,Color.Blue, Color.White • Fonts • Create new fonts: new Font(…) • Pen • To draw shape outlines; create a pen:Pen pen = new Pen( Color.Blue ); • Brush • To draw solid shapes
(x, y) height width Example: Drawing Ellipse DrawEllipse( Pen p, int x, int y, int width, int height ); .
Multiple Document Interface (MDI) • MDI was invented as a way to contain a set of related windows in a single frame. • An MDI form has two pieces: a parent and a child. You designate the parent form by setting the IsMdiContainer property to true, and you designate the child form by setting the MdiParent property before showing the form // Create a new instance of the child form. Form childForm = new Form(); // Make it a child of this MDI form before showing it. childForm.MdiParent = this;
MDI • An MDI parent form has a collection of MDI children called MdiChildren. All the forms in the MDI will automatically added to this collection. • An MDI parent is expected to have two sets of special menu items: • one to arrange the children inside the parent frame • second one to list the active children and select among them.
MDI To implement the items that arrange the children inside the parent, the Form class provides the LayoutMdi method, which takes one of the four MdiLayout enumeration values: void windowCascadeMenuItem_Click(object sender, EventArgs e) { this.LayoutMdi(MdiLayout.Cascade); } void windowTileChildrenVertMenuItem_Click(object sender, EventArgs e) { this.LayoutMdi(MdiLayout.TileVertical); } void windowTileChildrenHorizMenuItem_Click(object sender, EventArgs e) { this.LayoutMdi(MdiLayout.TileHorizontal); } You can also create multiple forms in the same applications that can interact with each other by sending data between them see Forminteractions exmaple.
Exception Handling Motivation: A program may encounter many exceptional scenarios • e.g., input/output errors, arithmetic errors • A large portion of many programs is to deal with exceptional/error cases • It may be hard to deal with some error cases • Examples: if you are to write these methods, what can go wrong and how do you deal with it? int Int32.Parse( string input ); double SquareRoot( double num ); int Average( int sum, int count );
Exception • Exception is a programming language structure to signal an exceptional scenario • An exception, if not handled, will cause a program to terminate and produce an appropriate message • the message includes a call stack trace that indicates on which line the exception occurred • the call stack trace also shows the method call trail that leads to the execution of the offending line • See Zero.cs
Example public class TestException { // calls Public static void Main( ) { TestExeption t = new TestException( ); t.Func1( ); } // funct1 handles exception using try catch block public void Func1( ) { try { Func2( ); } catch { Console.WriteLine("Exception handling"); } // function two thows exception using the throw statement public void Func2( ) { throw new System.Exception( ); } } See exceptionhandling.cs
try,catch and finally • Objective • to separate normal program flow from exceptional error cases so that the normal flow is clear • Structure • to process an exception when it occurs, the code segment that may generate exceptions is executed within a tryblock • a try block is followed by one or morecatch clauses, which contain codes to process possible exceptions • each catch clause has an associated exception type • when an exception occurs, processing continues at the first catch clause that matches the exception type • there may be an optional finally block which contains codes that will always execute • no matter an exception happens or not • See example ExHandDividByZero.cs
Structure try { // normal program } catch (DivideByZero Exception e) { // deal with one type of exception } catch (Exception e) { // deal with another type of exception } finally { // do things regardless exceptions happen or not }
Catch Clause and Exception Objects • Catch clause • must be of class Exception or one that extends it directly or indirectly, e.g.,catch ( DivideByZeroException e ){ … } • Class Exception is base class of exceptions System.Object System.Exception System.ApplicationException … System.SystemException System.FormatException System.ArithmeticException System.DivideByZeroException System.NotFiniteNumberException System.OverflowException System.IndexOutOfRangeException …