Download
1 / 5
50 likes | 57 Views
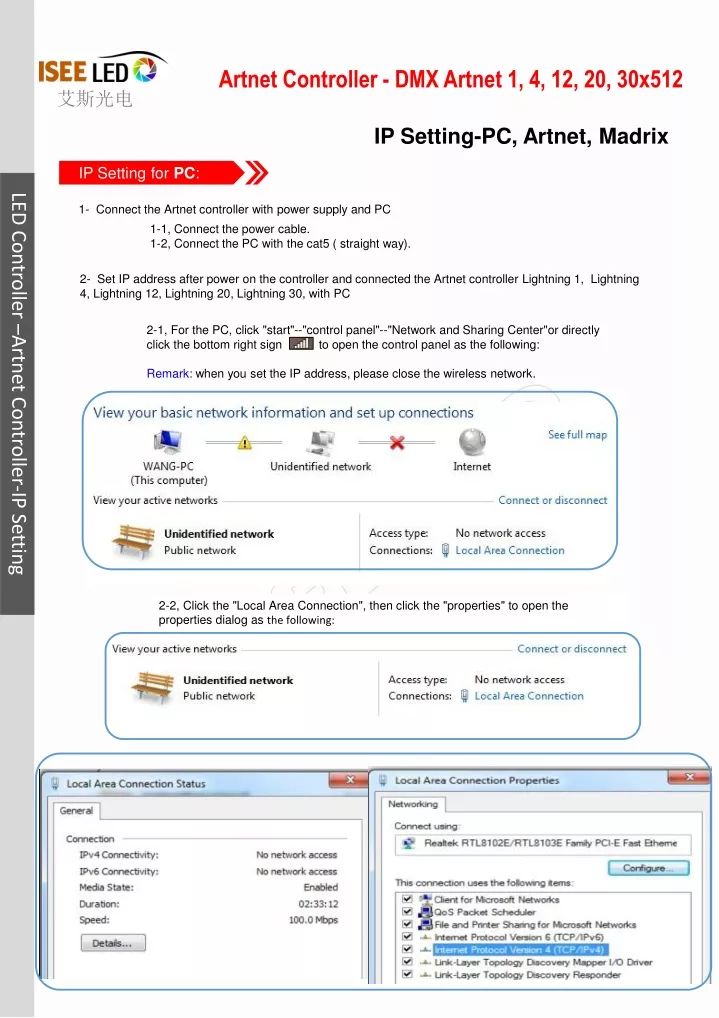
Artnet Controller - DMX Artnet 1, 4, 12, 20, 30x512. 艾斯光电. IP Setting-PC, Artnet, Madrix. LED Controller –Artnet Controller-IP Setting. IP Setting for PC :. 1- Connect the Artnet controller with power supply and PC. 1-1, Connect the power cable.

E N D
Artnet Controller - DMX Artnet 1, 4, 12, 20, 30x512 艾斯光电 IP Setting-PC, Artnet, Madrix LED Controller –Artnet Controller-IP Setting IP Setting for PC: 1- Connect the Artnet controller with power supply and PC 1-1, Connect the power cable. 1-2, Connect the PC with the cat5 ( straight way). 2- Set IP address after power on the controller and connected the Artnet controller Lightning 1, Lightning 4, Lightning 12, Lightning 20, Lightning 30, with PC 2-1, For the PC, click "start"--"control panel"--"Network and Sharing Center"or directly click the bottom right sign to open the control panel as the following: Remark: when you set the IP address, please close the wireless network. 2-2, Click the "Local Area Connection", then click the "properties" to open the properties dialog as the following:
2-3, Twice Click the "Internet Protocol Version 4(TCP/IPv4)" to open the properties dialog. As the following: LED Controller –Artnet Controller-IP Setting 2-4, In the Internet Protocol Version4(TCP/IPv4) dialog, choose "Use the following IP address", get Manual IP address Remark: Art-net Pro default address is 192.168.1.100, as is saying:enter the IP address between 192.168.1.0-99 and 192.168.1.101-255 2-5, Click the confirm button"OK" to back to the Local Area Connection Properties dialog Click the confirm button"OK"to back to Local Area Connection Status,finally click the "close" button.
LED Controller –Artnet Controller-IP Setting IP Setting for Artnet Controller: 3- Set the IP address for the artnet controller 3-1, Open the "IE browser", enter the IP address 192.168.1.100 3-2, Set the IP address in the webpage. After the IP address setting, click the "Change IP&Mask". As the following:, Model Definition Remark: 1, Art-net Pro default address is 192.168.1.100, as is saying: enter the IP address between 192.168.1.0-99 and 192.168.1.101-255 2, the MASK address should be same with the subnet mask. Eg: the controller and PC mask is 255.255.255.0 Madrix Connectting with Artnet Controller: 4- Setting on madrix software 4-1, select the button in turn of "Preferences"--"Device Manager" to enter the window of "Device Manager"
4-2, In the "Device Manager" window, click "Art-net". Click the button "Enable" (remark: if the Art-net could not start, the internet network settings should be checked; redefine the IP address) LED Controller –Artnet Controller-IP Setting Model Definition 4-3, Click the "Find Auto" button, automatically search Art-net communication node. As the following:(eg:2 set Artnet controller, 1/4/12/20/30 universes)
E-mail: info@iseeled.com Bld 12, Fuqiao Industrial Park,Fuyong, Bao'an, Shenzhen, CN Web: www.iseeled.com International hotline: 86-755-3697 8198 4-4, Click the button "Sync". Then the "Artnet Sync Options" window appears. In the window, click the button "Enable", "Pre Sync" and "Post Sync". finally select "OK" to finish the setting. LED Controller –Artnet Controller-IP Setting 4-5, In the "Device Manager" window, select "DMX Devices". select all the universes, click the button" Enable". Then click the button "Full Frames" finally click" Apply" button to finish the output parameter settings. Remark: Change the "Frame Time(ms)" within 25<F ≤1000 (F is "Frame Time(ms)",1000 is the software factor maximum number. Here the default no.is 30 and don't need to change.)