Download
1 / 23
230 likes | 416 Views
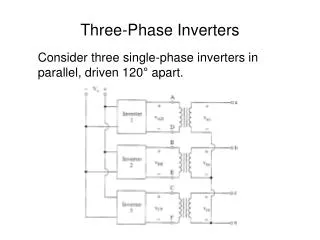
CONFIGURATION CHANGE Three Phase Inverters Ingecon Sun. Index. Introduction. Firmware Upgrade. Procedure for the configuration change. Introduction. New Standards forced new performances in the firmware. Firmware Upgrade for the AC, and next versions.

E N D
Index • Introduction. • Firmware Upgrade. • Procedure for the configuration change.
Introduction • New Standards forced new performances in the firmware. • Firmware Upgrade for the AC, and next versions. • Different procedures for changing the configuration. • Manual mode. • Automatic mode.
Firmware Upgrade • Firmware Upgrade:
Configuration Change • Effects on the AC firmware version. • It is necessary to introduce new parameters on the inverter to let the inverter work correctly. • The following blocks of the Pdata is necessary to change: • Block 1: From 0xFF0A to 0xFF0D. • Block 2: From 0xFF65 to 0xFF72. • Block 3: From 0xFF9A to 0xFF9E.
Configuration Change • Effects on the AD firmware version. • It is necessary to introduce new parameters on the inverter to let the inverter work correctly. • The following blocks of the Pdata is necessary to change: • Block 1: From 0xFF0A to 0xFF0D. • Block 2: From 0xFF61 to 0xFF72. • Block 3: From 0xFF74 to 0xFF85. • Block 4: From 0xFF9A to 0xFF9F.
Configuration Change • Necessarytoolstoperformtheconfigurationchange: • IngeconSun Manager. • Excel Table AAS0223ICB01. • Excel Table“Configuration Template” ConfigurationTemplate Table IngeconSun Manager AAS0223ICB01_K Table
Configuration Change • Different procedure to perform the Configuration Change. • Manual Mode. (Actually) • Automatic Mode. (Next)
Configuration Change • Manual Procedure: 1-. Folder structure. New Folder INGECONsettings We need to add as folders as plants we are using in the ingecon sun manager.
Configuration Change • Manual Procedure: 2 -. Download the actual configuration and do a back up copy. Reed the 160 Positions of the Mem from 0xFF00 to 0xFF9F Copy the 160 Memory Positions of the configuration.
Configuration Change • Manual Procedure: 2- . Download the actual configuration and do a back up copy. Paste the 160 memory positions on the excel. Copytherequired positions fromthe AAS0223ICB01 totheConfigurationTemplateTable.
Configuration Change • Manual Procedure: AAS0223ICB01 description. • Country and Standard: p.e. Spain Medium and High Voltage PO12.3. • Model: p.e. Power Max 125kW Memory Position and Meaning. Model, Country and Standard.
Configuration Change • Manual Procedure: 3-. Introduce the new parameters into the table Configuration Template excel , from AAS0223ICB01 Table. Pegar las 160 Posiciones de la configuración Copy the necessary parameters from the AAS0223ICB01 to the Configuration Template excel.
Configuration Change • Manual Procedure: 4-. Load the new parameters with the Ingecon Sun Manager. • Load the parameters using the tool Memory Monitor. • It is necesary to introduce the parameters one by one. Memory Position Value
Configuration Change • Manual Procedure: 5-. Check the loaded Configuration into the inverter. • Download again the configuration of the inverter. • Copy the configuration from the Ingecon Sun Manager into the Configuration Template Table. • Save the new configuration in the same folder that we had downloaded previusly. Final Configuration Desired Configuration Initial Configuration
Configuration Change • AutomaticProcedure: 1-. Folder structure. New Folder INGECONsettings We need to add as folders as plants we are using in the ingecon sun manager.
Configuration Change • Automatic Procedure: 2-. Download the configuration file. 3-. Save the file in the plant folder. Save to Folder Reed the configuration
Configuration Change • AutomaticProcedure: 3-. Savethefile in thecorrect folder. FileName: INVERTER_SERIAL_NUMBER_Date_Hour
Configuration Change • Automatic Procedure: 4-. Load the new inverter configuration. Each inverter have the proper file. Fileto load: AAS1012_General_
Configuration Change • AutomaticProcedure: 5-. Load the file into the Ingecon Sun Manager environment.
Configuration Change • AutomaticProcedure: 5-. Load the file into the Ingecon Sun Manager environment. Ingecon Sun Manager will load the new values into the parameters manager.
Configuration Change • AutomaticProcedure: 5-. Load the file into the Ingecon Sun Manager environment. Until we don’t press the send button we will not load the inverter with the new configuration.
Configuration Change • Automatic Procedure: 6-. Save the new configuration in a new file. Save the new configuration of the inverter in the proper folder.