Download
1 / 50
550 likes | 674 Views
Hearing Screening Guidelines for School Health. Hearing Screening. At the end of this presentation the participants will be able to: Explain the importance of hearing screening for the school-aged child

E N D
Hearing Screening At the end of this presentation the participants will be able to: • Explain the importance of hearing screening for the school-aged child • Identify individuals with possible hearing deficits at the earliest possible stage in order to refer for diagnosis and treatment, if required
Hearing Screening • Discuss age appropriate screening techniques and procedures • Identify the steps of the screening process
Hearing Loss • It is estimated 1/3 of children with minimal or unilateral hearing loss fail a grade
Legislation Affecting Hearing Screenings • All hospitals delivering babies must now assure a screening is performed
Why Do Screenings? Prevalence of hearing loss • Between 1 and 6 out of 1,000 newborns are born with hearing loss • Early identification and treatment can prevent or at least alleviate the consequences of many hearing problems • The incidence of hearing loss between 6 and 19 years of age is estimated to be 15%
Characteristics of Population Based Screening Program • Validity – ability to identify those who have the condition • Reliability – consistent screening results • Yield – number of persons identified • Cost – personnel and equipment
Types of Hearing Loss • Conductive—site of lesion is at the external or middle ear • Sensorineural—site of lesion is at the cochlea or auditory nerve • Mixed—combination of conductive and sensorineural
Conductive Hearing Loss (CHL) • Occurs when there is a decrease in sound transmission before the sound reaches the inner ear • Occurs because of a problem in the outer or middle ear • Usually (but not always), can be treated medically or repaired
Conductive Hearing Loss (CHL) Examples of issues causing CHL and possible treatments:
Sensorineural Hearing Loss (SNHL) • Usually occurs because of a problem in the inner ear • Usually (but not always), permanent and cannot be repaired to a normal state
Sensorineural Hearing Loss (SNHL) • Examples of issues causing SNHL and possible treatments:
Mixed Hearing Loss • Occurs when there is both a conductive component and a sensorineural component to the hearing loss
Normal Hearing • Occurs between -10 and 20 decibels (loudness of sound)
Degrees of Hearing Loss • Mild hearing loss = 20 to 40 dB • Moderate hearing loss = 40 to 70 dB • Severe hearing loss = 70 to 90 dB • Profound hearing loss = 90 dB or greater
Setting Up A Hearing Screening Program Basics: • Should be coordinated by the local school or community health nurse • Should be a part of the overall hearing conservation program
When to Screen NOT the first week of school Children entering school for the first time • Need time to adjust to school environment • BUT, don’t wait too long in case of hearing loss Don’t wait too long • Cold and flu season • Need time for follow-up
Screening Protocols Prescreening Education • Take the audiometer in the classroom to show students • Show students how they will have headphones placed over their ears in order to hear the sounds
Portable Audiometer • A portable audiometer is needed • Conduct a biological (or listening) check everyday that it is used • Calibrate the audiometer on a yearly basis (see list for sources of calibration services) • Use extreme caution when moving audiometer around from school to school – be gentle
Hearing Aids/Cochlear Implants Students with the following should not be screened: • Hearing aids • Cochlear implants • Documented hearing loss (by an audiologist/MD)
Environment for Screening Conduct pure tone screening in a room where the ambient noise is low enough to allow detection of selected stimuli.
Environment for Screening The American Speech-Language-Hearing Association recommends that to accomplish a 20 dB beep, ambient room noise should not be greater than: • 49.5 dB SPL at 1000 Hz • 54.5 dB SPL at 2000 Hz • 62 dB SPL at 4000 Hz (ASHA, 1985)
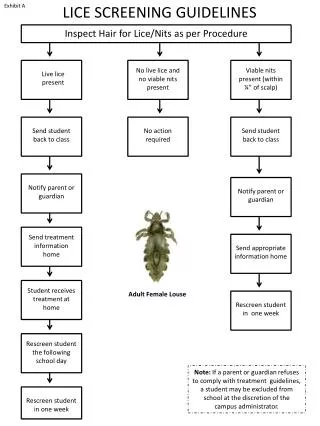
Protocol Summary • Pure tone screening • Rescreening (if did not pass 1st screen) • Referral • Follow-up • Annual summary
Audiometer Controls • Power (on/off) • Ear indicator (right/left) • Intensity selector (dB; e.g. 40 dB HL) • Frequency selector (Hz; e.g. 4000 Hz) • Signal selector (use continuous or pulsed tone only) • Presentation function (how do you present the tone)
Headphone Placement • Place the headphones on student (red on right ear; blue on left ear) • Hair behind ears • Remove large earrings • May want to remove glasses • Diaphragm of headphones over ear canal • Adjust head band for snug, even fit • Head band on top of head is preferred
How to Screen • Instruct student for the task (e.g. raise hand when they hear the beep) • Condition the student to the task (i.e. present a tone in one ear at one frequency ABOVE the screening level – example: 50 dB) • Once the student is conditioned – start the screening protocol
How To Screen • Administer an initial sweep screen, presenting tones at 1000, 2000 and 4000 Hz in each ear at 20 dB • Record as pass or fail at each level
Screening Protocol Right Ear 1000 Hz 20 dB 2000 Hz 20 dB 4000 Hz 20 dB Left Ear 4000 Hz 20 dB 2000 Hz 20 dB 1000 Hz 20 dB
Pass/Fail Criteria • Student must pass all frequencies in an ear for that ear to be classified as a “pass” • If a student does not pass ALL frequencies in each ear, he/she should be re-screened in 2-4 weeks
Recheck/Referral Criteria • If the child does not respond at the recommended screening level at any frequency in either ear, immediately remove the headphones, reinstruct the child, reposition and rescreen • If other screeners are available, you may want to have another screener perform the screening
Recheck/Referral Criteria • If the child continues to miss at any frequency in either ear, the child should be rescreened in 14-21 days • If the child fails the re-screening at this time he or she should be referred for further evaluation
Play Audiometry • Use with students who are: • difficult-to-test • developmentally delayed • non-English speaking • Use a play task (drop blocks in a bucket) • Teach the child the task at an elevated intensity level (e.g. 50 dB HL) • Make sure child can do the task on their own before you attempt screening at 20 dB HL
Screening Notes • Do not increase the dB levels to accommodate for noise in the environment • All failures should be rescreened to confirm the need for referral
Referral • Refer immediately if you observe physical abnormalities that are not documented in the student’s file • May immediately refer if child does not pass and there is serious concern regarding hearing or speech/language development
Referral Cont. • Refer to MD or Audiologist if fails rescreen • Refer to MD or Audiologist if child passes, but there is concern regarding hearing
Referral Process • Tracking referrals (have a system in place) • Teacher notification • Watch list
Follow-up • Send letter, referral form, financial assistance information and list of appropriate professionals to the parent/guardian (make sure school nurse contact info is on referral form) • If no response from parent/guardian in two weeks, follow-up with a phone call or personal contact
Follow-up Cont. • Review information received from examining professional • Rescreen after medical treatment if indicated • Collaborate with special education personnel if indicated
Don’ts • Don’t require students to raise right or left hand • Don’t get into a pattern with your presentation of the tone • Don’t give visual cues-position audiometer controls out of view
Don’ts • Don’t screen ear with known hearing loss • Don’t switch the headphones from one audiometer to another. This changes the calibration for your machine
Do’s • DO find a quiet room • DO screen at 20 dB HL • DO present tone for at least 3 seconds • DO use pulsed tones if possible
Amplification Hearing aids and FM systems • Be sure to have someone designated in the IEP to do daily listening checks, have batteries, change batteries and contact someone (parent, special education teacher) if a problem arises
For Additional Information on Hearing Screening Visit the Online Hearing Screening Manual at: http://health.mo.gov/living/families/schoolhealth/pdf/HearingScreeningGuidelines.pdf