Download
1 / 80
800 likes | 804 Views
Learn how to use commercially available equipment to transport IP over varying distances. Discover the possibilities and examples of what you can achieve with this capability.

E N D
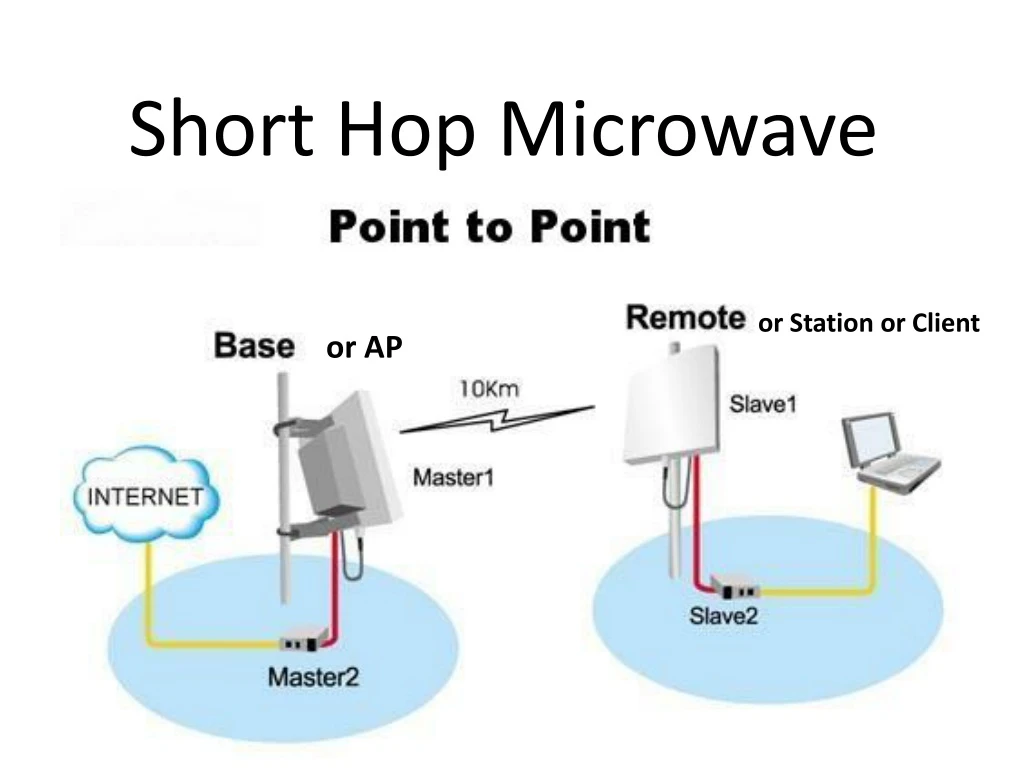
Short Hop Microwave or Station or Client or AP
What this class isn’t: • Home brew turn a satellite TV dish into a Ham system or some such. • A class on how to steal/share commercial internet service (that’s theft of service, a no-no) • What this class is: • How to use commercially available equipment to transport IP* over varying distances. • Some ideas and examples of what you can do with this capability.
Downloads N7KUW.COM/hop Copy of this presentation (pptx & pdf) Programming info & text files for Mikrotik N7KUW.COM/CommAcad My other classes Contact Info: Carl Leon N7KUW Carl@n7kuw.com
HamWAN Relay To This RoomWill detail at end of class • Wireless ssid: CA44 = An outside world / internet routable 44. series IP address from HamWAN CA192 =A 192.x.x.x LAN with NAT to 44. seriesHamWAN address Password: CommAcad2019
Very Basic Network 192.168.0.101 Cloud Desktop 192.168.0.1 Router Cable/DSL Modem 192.168.0.102 Printer 44.25.240.82 192.168.0.103 Laptop
Basic Network 192.168.0.101 Cloud Desktop 192.168.0.1 Router Modem 192.168.0.102 Printer 44.25.240.82 44.25.240.82 192.168.0.103 Laptop Microwave Link
Basic Network 192.168.0.101 Cloud Desktop 192.168.0.1 Router Modem 192.168.0.102 Printer 44.25.240.82 192.168.0.103 Security Camera Microwave Link
How complicated it can be… The microwave devices, whether they are Ubiquiti, Mikrotik, or any of a variety of other brands, almost without exception have a full, built in, router. In the examples I’m showing, we are not using that router – we are programming it to be a complete pass-through, or bridge. But you could use the router if you wanted to.
Basic Network 192.168.0.101 Cloud Desktop Microwave Link Modem 192.168.0.102 192.168.0.1 Printer 44.25.240.82 (Dish and router) 192.168.0.103 Laptop
Basic Network 192.168.0.101 Cloud Desktop 192.168.0.1 Router Modem 192.168.0.102 Printer 44.25.240.82 44.25.240.82 192.168.0.103 Laptop Microwave Link
IP Doesn’t have to be a “network” Remote Rig allows you to separate the control head of a radio from the RF part of the radio and remotely use the radio over IP. Typically that would mean over your LAN or over the internet, but I tested this and it worked just fine over a point-to-point microwave relay. So pretty much anything that uses IP, even if not part of a local or wide area network.
What is a Short Hop? • For our purposes, anywhere from perhaps 100 feet to 5 or 6 miles. No specific near or far limit. WHY? • Unable to run wire • Cost • Environment • Distance BUT • Must have Line Of Sight (LOS) for distances over a few hundred feet. (Real line of sight, you can actually SEE the other end of the link.)
Some Real World Examples • 1. Business Building to Building • 2. Relay HamWAN connection • 3. Field Day here at South Seattle College • 4. RAMROD • 5. New house, no internet (oops) • 6. Large farm property. • 7. Orcas Island Doe Bay system • 8. Today’s classroom demo
A business with offices in two nearby buildings was able to provide connectivity over microwave rather than spend large recurring amounts of money for leased fiber or copper connections between the locations. The one-time cost of installing and setting up the microwave link was offset by monthly savings in less than a year. The buildings were < 800’ apart.
An amateur operator wants a HamWAN connection at his house, but does not have line of sight to any of the HamWAN sites. Another ham nearby does have a good connection, and there is usable line of sight between the two, so a point-to-point link is set up between them to extend the HamWAN connection.
Seattle ACS, the Puget Sound Repeater Group, and the West Seattle Amateur Radio Club combine to put on Field Day each year in the large field outside, right here at South Seattle College. We use point-to-multipoint microwave links to provide internet connectivity (via HamWAN) to all of the operating tents and trailers here.
High Speed Internet at Cayuse Pass HamWAN was relayed from Crystal Mountain via Sunrise to Cayuse Pass. Sunrise was a standard HamWAN Client, then used a point-to-point relay to Cayuse. This was done in support of RAMROD.
Two on-line (Youtube) stories of people who bought houses only to discover they could not get high speed internet at the location, so they got service at another location where it was available and then set up short-hop microwave links between the locations. First link is about 1.5 mile. Second link is about 1.25 mile. I wouldn’t put the two dishes So close each other.
A large property (such as a farm or ranch) where you want to extend your internet service to various outbuildings that are too far for direct wire runs.
A BIG multi-point Ubiquiti network! Orcas Island
Relationship to HamWAN • Nothing really, other than we are using pretty much the same equipment (possibly by the same manufacturer), and the same technology, to distribute our high speed data. But that does point to one caution, we need to be sure we respectfully share the frequency spectrum, and not cause interference to each other (or others).
What Equipment is Needed? • Probably the most common brand you will find in online searches is Ubiquiti, which makes a large variety of good, relatively low cost, 2.4 GHz and 5 GHz equipment, as well as some other bands. Mikrotik, which is the equipment used by HamWAN, makes comparable equipment, at comparable cost, that works just as well, but is not as widely known. There are other brands also available. I have slightly more experience with Mikrotik (simply because of HamWAN), but have equipment of both brands here today to display and demonstrate. Ubiquiti is more user friendly to the novice, and you can often find more online help. • Oh, and full disclosure – I don’t work for either company, I don’t sell equipment, and I’m not getting paid by anyone to suggest or promote equipment. Everything I’m showing you here today is my own personally acquired equipment, or is a Seattle ACS resource.
How Much ? • Many variables, but at the low end, for a short link, you can buy the components for about $50 (each) up to about $250 (each). • High end systems can cost in the tens of thousands of dollars.
Part 15 vs Part 97 (Or, unlicensed versus amateur?) • Amateur (Part 97) (International or ROW* version) • Can be hard to find/purchase equipment • Cannot (legally) encrypt • No business/professional use • Has more frequencies available • Can use higher power • Unlicensed (Part 15) (US Only version) • Equipment more readily available • Power restrictions • Uses same frequencies as 2.4 & 5 GHz Wifi • Okay to encrypt, okay for business use. * Rest of World
Only Mikrotik for HamWAN • If you want equipment that can be used as a HamWAN client, then you MUST have Mikrotik, and you MUST have the international (not US) version. • HamWAN utilizes the nv2 protocol in the wireless setup (as opposed to 802.11), which is unique to Mikrotik. For that reason, ONLY Mikrotik equipment is compatible with HamWAN. • HamWAN utilizes Part 97 amateur frequencies for the sector-to-client links, requiring use of the non-US version of equipment. You typically must provide a copy of your amateur license to purchase the non-US version of this equipment, and be VERY specific when ordering it.
Specific Equipment • Ubiquiti LiteBeam AC • 16dBi 2x2 MIMO • Multi-Point AP • (US Version) • (Ubiquiti is NOT compatible with HamWAN, but is great for point-to-point) $130
Specific Equipment • Ubiquiti NBE-M5-16 • High Performance • Air-MAX Bridge • NanoBeam M5 • (US Version) • (Ubiquiti is NOT compatible with HamWAN, but is great for point-to-point) $73
Specific Equipment • MikrotikSXTsq Lite5 RBSXTsq5nD • International Version • Can be HamWAN client, or used in PtP, or used as client in PtMP. $45
Specific Equipment Mikrotik RB911G-5HPnD-QRT QRT-5 Wireless System International Version Can be HaWAN client, or used in PtP, or PtMP client or access point. $153
Specific Equipment • Mikrotik LHG 5 Light Head Grid 5GHz CPE 24.5 dBi grid antenna. • International Version • Can be HamWAN client, or used in PtP, or used as client in PtMP $73
Specific Equipment • Mikrotik DynaDish5 (RBDynaDishG-5HzcD) • International Version • Can be HamWAN client, or used in PtP, or as P2MP client • Longer Range $155
How Do We Make It Happen? 1. Verify line of sight signal path. • Google Earth Elevation Profile and headings • Compass • Binoculars • Chain saw 2. Determine best equipment for your needs. 3. Purchase equipment. 4. Unpack, set up, program and test equipment ALL AT THE SAME LOCATION! 5. Install local end in final configuration, then test remote end while still local. 6. Install remote end. Find, then peak signal. • 3 axis to align, horizontal, vertical, rotational. • Dither for best signal (go past peak to certain level, then go other way to same level, then go halfway back).
How Do We Make It Happen? • Fresnel Zone (@5.9GHz) 0.25 Mi, r = 7.5 feet (11 feet) 0.5 Mi, r = 10.6 feet (16 feet) 1 Mi, r = 15 feet (23 feet) 2 Mi, r = 21.2 feet (32 feet) 3 Mi, r = 25.9 feet (40 feet) 4 Mi, r = 29.9 feet (47 feet) 23 Mi, r= 72 feet (111 feet) (lower freq-larger radius – 2.4Ghz) • Side Lobes A 3D cylindrical ellipse
Google Earth • Accurately mark both ends of the path (SSC to Beacon is my example shot) • Note distance and bearing • 30.68 degrees (true), 3.36 miles • Do elevation profile • SSC 329 feet, Beacon 327 feet (ground level) • SSC on 3 story bldg, Beacon on 11 story bldg • (~ 40 ft = 369 ft) (~110 ft = 437 ft)
How Do We Make It Happen? • 1. Verify line of sight signal path. • Google Earth Elevation Profile and headings • Compass • Binoculars • Chain saw 2. Determine best equipment for your needs. Bigger & better is always better, but you may have to go smaller due to cost or space to install, or other factors. Get the best you can. 3. Purchase equipment. 4. Unpack, set up, program and test equipment ALL AT THE SAME LOCATION! 5. Install local end in final configuration, then test remote end while still local. 6. Install remote end. Find, then peak signal. • 3 axis to align, horizontal, vertical, rotational. • Dither for best signal (go past peak to certain level, then go other way to same level, then go halfway back).
How Do We Make It Happen? • 1. Verify line of sight signal path. • Google Earth Elevation Profile and headings • Compass • Binoculars • Chain saw 2. Determine best equipment for your needs. Overkill is okay if you can afford it. 3. Purchase equipment. MAKE SURE YOU GET INTERNATIONAL VERSION if for HamWAN Otherwise, it doesn’t matter, US version may be preferred. 4. Unpack, set up, program and test equipment ALL AT THE SAME LOCATION! 5. Install local end in final configuration, then test remote end while still local. 6. Install remote end. Find, then peak signal. • 3 axis to align, horizontal, vertical, rotational. • Dither for best signal (go past peak to certain level, then go other way to same level, then go halfway back).
Where to Order • Streakwave and/or Baltic Networks • Might cost a bit more, but well worth it to assure International version (for HamWAN use). • Amazon or eBay • But getting international (non-US) version can be challenging (if equipment will be used with HamWAN). For local P2P use, US version is fine. • Typically faster to obtain • Maybe less expensive
How Do We Make It Happen? • 1. Verify line of sight signal path. • Google Earth Elevation Profile and headings • Compass • Binoculars • Chain saw 2. Determine best equipment for your needs. Overkill is okay if you can afford it. 3. Purchase equipment. MAKE SURE YOU GET INTERNATIONAL VERSION if for HamWAN Otherwise, it doesn’t matter, US version is fine. 4. Unpack, set up, program and test equipment ALL AT THE SAME LOCATION! 5. Install local end in final configuration, then test remote end while still local. 6. Install remote end. Find, then peak signal. • 3 axis to align, horizontal, vertical, rotational. • Dither for best signal (go past peak to certain level, then go other way to same level, then go halfway back).