Download
1 / 29
300 likes | 336 Views
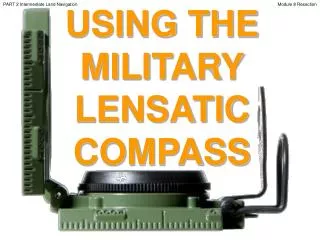
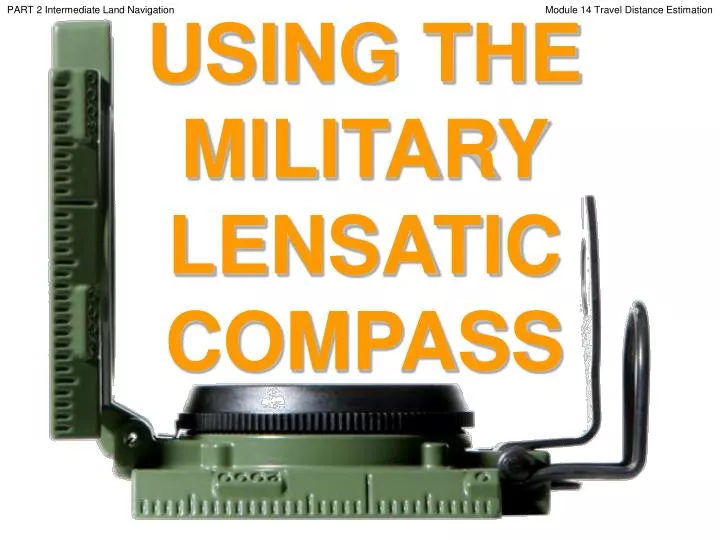
PART 2 Intermediate Land Navigation. USING THE MILITARY LENSATIC COMPASS. Module 14 Travel Distance Estimation. PART 2 Intermediate Land Navigation. Module 14 Travel Distance Estimation. WARNING.

E N D
PART 2 Intermediate Land Navigation USING THE MILITARY LENSATIC COMPASS Module 14 Travel Distance Estimation
PART 2 Intermediate Land Navigation Module 14 Travel Distance Estimation WARNING This presentation is intended as a quick summary, and not a comprehensive resource. If you want to learn Land Navigation in detail, either buy a book; or get someone, who has the knowledge and skills, to teach you in person.
PART 2 Intermediate Land Navigation Module 14 Travel Distance Estimation NOTE To get the ideas across presented on these slides, many figures, pictures, and calculations may not be to scale and may be exaggerated for clarity.
PART 2 Intermediate Land Navigation Module 14 Travel Distance Estimation Note: Prior to being issued any training *equipment, you will be required to sign a “statement of liability” agreeing to pay for anything you damage or lose. All items will be inspected and inventoried prior to your signature and at the end of the training day too. If you do not intend to sign this statement, then you may be denied training. *You may use your own equipment.
PART 2 Intermediate Land Navigation Module 14 Travel Distance Estimation Any Questions?
PART 2 Intermediate Land Navigation Module 14 Travel Distance Estimation LAND NAVIGATIONPRESENTATIONPART 2Module 14Travel Distance Estimation
PART 2 Intermediate Land Navigation Module 14 Travel Distance Estimation . . . and now on with the . . . PRESENTATION
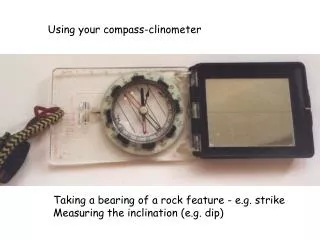
PART 2 Intermediate Land Navigation Module 14 Travel Distance Estimation LAND NAVIGATION WITH MAP ANDLENSATIC COMPASS
PART 2 Intermediate Land Navigation Module 14 Travel Distance Estimation LAND NAVIGATION • Why Learn Land Navigation? • Tracking present location • Determining Distance • Sense of direction • How to read a topographic map • Terrain and map association • Spatial skills • Planning safe, practical routes • And more Navigational skills • The best way to learnLAND NAVIGATION is to get "dirt time", that is, get out there with a map and compass! • Navigation is not about finding yourself after you are lost (although that’s what happens sometimes); it’s about keeping track of your position as you move away from a known point. As you move you have to remain cognizant of the terrain you are leaving, of the terrain you are passing, and of the terrain that is ahead. • Navigation in the wilderness means knowing your starting point, your destination, and your route to get there. • These skills will allow you to venture farther off the beaten path than you ever thought before. Training and practicing land navigation on foot provides the following everyday navigation (how not to get lost) benefits; (Where am I?) (How far is it and am I there yet ?) (Where do I want to go and where am I actually going ?) (Do I understand the map ?) (What hill or river am I looking at ?) (Can I mentally visualize the landscape in 3D ?) (Take a long safe route or a short risky route ?)
PART 2 Intermediate Land Navigation Module 14 Travel Distance Estimation • THIS PRESENTATION IS DIVIDED INTO FOUR PARTS • ________________________________________________________________________________________________________________________________________________________ • PART 1 Basic Land Navigation • The Lensatic Compass module 1 • The Topographic Map modules 2, 3, 4, • The Land and Map Association modules 5, 6 • PART 2 Intermediate Land Navigation • Making Sense of Direction module 7 • Tracking Present Location modules 8, 9, 10, 11 • Determining Travel Distance modules 12, 13, 14 • PART 3 Advance Land Navigation • Navigation Methods to Stay On Course module 15 • Additional Skills of Land Navigation module 16 • Planning to Navigate module 17 • PART 4 Expert Land Navigation • Navigation in different types of Terrain module 18 • Night Navigation module 19 • Sustainment module 20
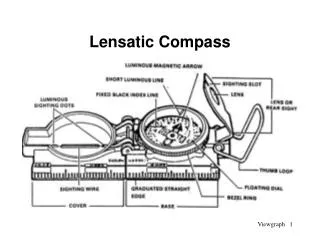
PART 2 Intermediate Land Navigation Module 14 Travel Distance Estimation THESE ARE THE TRAINING MODULES Module 1 Lensatic Compass – parts and features, and how to sight the compass by two different methods. Module 2 Topo Map Margin – what map margin data represents, map care, and how to properly fold a map. Module 3 Topo Map Scale – map sizes and how it affects amount of detail that will be shown. Module 4 Topo Map Symbols – you must understand them; to read and speak map language to others. Module 5 Terrain Relief – shows elevation, indicates terrain features and heights of natural features. Module 6 Map Information – what a protractor is for and how a map provides four kinds of information. Module 7 Sense of Direction – lateral drift, current bearing, obstacles, back azimuth, deliberate offset. Module 8 Resection – locate position with map only. Modified resection is with a map or compass. Module 9 Intersection & Triangulation – two methods to locate position by compass. Module 10 Map Speaks Compass Language - there is no need to orient the map to find your position. Module 11 Plotting Position Coordinates – exact positioning, used to communicate to others with a map. Module 12 Route Measure – mapping straight-line distance, curvature distance, and slope distance. Module 13 Pace Count – using ranger pacing beads and estimating hiking speed. Module 14 Travel Distance Estimation – estimating by 100 meter rule, rule-of-thumb, and by time. Module 15 Plan to Navigate – in a group or alone, equipment, safety, responsibilities, route selection. Module 16 Stay on Course – advance reference points and advance baselines. Module 17 Additional Land Navigation Skills – estimate daylight, conserve energy, blisters, weather insight. Module 18 Navigating Different Terrain – special environments, featureless terrain, visibility, dense foilage. Module 19 Night Navigation – night adaptation, protecting night vision, navigate with lensatic compass. Module 20 Sustainment – maintaining skills, training others, setting up a land navigation course.
PART 2 Intermediate Land Navigation Module 14 Travel Distance Estimation Any Questions?
PART 2 Intermediate Land Navigation Module 14 Travel Distance Estimation PART 2INTERMEDIATE LAND NAVIGATION MODULE 14 • Determine Travel Distance • Estimation by 100 Meter • Estimation by Rule-of-Thumb • Estimation by Time
PART 2 Intermediate Land Navigation Module 14 Travel Distance Estimation DETERMINING TRAVEL DISTANCEDESCRIPTION Determining travel distance is the most common error encountered while moving. There may be circumstances where you are unable to determine travel distance using your map. It is therefore essential to learn methods by which you can accurately measure, pace, or estimate distances on the ground. How far is that mountain? An ability to judge distances accurately is not a natural gift, but it is a skill worth developing. Judging distances accurately can help to identify features and avoid wrong assumptions that could lead to trouble; (“We should have reached camp by now… that’s got to be Eagle Mountain, I think?”) • There are several techniques to measure distance on a map. • STRAIGHT LINE DISTANCE – measuring from point A to point B on a map (horizontal distance). • CURVATURE DISTANCE – measuring a trail or other curved line on a map (horizontal distance). • SLOPE DISTANCE – measuring the planned route terrain slope on a map (vertical distance). • There are several techniques to determine distance on the ground. • SPEED – estimating your travel speed, how many miles per hour. • PACE COUNT – count the number of steps you have taken and translate to ground distance. • ESTIMATION – visualizing a set ground distance. • TIME – Make it a habit of keeping your map and compass handy and refer to them every hour or so to locate your position (more often in low visibility). Keep track of your starting time, rest breaks and hiking pace. This will also give you an idea of how far you have traveled over a period of time.
PART 2 Intermediate Land Navigation Module 14 Travel Distance Estimation DETERMINING TRAVEL DISTANCEDETERMINE DISTANCE BY ESTIMATION At times, because of land navigation situation, it may be necessary to estimate range. There are methods that may be used to estimate range or distance. Proficiency of Methods. The methods discussed are used only to estimate range. Proficiency in these methods requires constant practice. The best training technique is to require the navigator to pace the range after he has estimated the distance. In this way, the navigator discovers the actual range for himself, which makes a greater impression than if he is simply told the correct range. 100-Meter Unit-of-Measure Method. The navigator visualizes a distance of 100 meters on the ground. Rule-of-Thumb-Measure Method. The navigator uses his thumb, arm and eyes. Time-Measure Method. Keep track of your starting time and hiking pace.
PART 2 Intermediate Land Navigation Module 14 Travel Distance Estimation DETERMINING TRAVEL DISTANCEDETERMINE DISTANCE BY ESTIMATION 100-Meter Unit-of-Measure Method. There are factors that affect range estimation.
PART 2 Intermediate Land Navigation Module 14 Travel Distance Estimation DETERMINING TRAVEL DISTANCEDETERMINE DISTANCE BY ESTIMATION 100-Meter Unit-of-Measure Method. To use this method, the navigator must be able to visualize a distance of 100 meters on the ground. For ranges up to 500 meters, determine the number of 100-meter increments between the two objects he wishes to measure. Beyond 500 meters, the navigator must select a point halfway to the object and determine the number of 100-meter increments to the halfway point, then double it to find the range to the object. Example 1
PART 2 Intermediate Land Navigation Module 14 Travel Distance Estimation Example 2 1200m 400m tree line 800m 400m silo 400m 200m barn 200m 200m road Total Distance Estimated 1200 meters (1.2 kilometers) DETERMINING TRAVEL DISTANCEDETERMINE DISTANCE BY ESTIMATION 100-Meter Unit-of-Measure Method. 200 meters to the road from the starting point (200 meters). 400 meters to the barn from the starting point, or 200 meters from the road. 800 meters to the silo from the starting point, or 400 meters from the barn. 1200 meters to the tree line from the starting point, or 400 meters from the silo.
PART 2 Intermediate Land Navigation Module 14 Travel Distance Estimation 4400m 2000m hill top DETERMINING TRAVEL DISTANCEDETERMINE DISTANCE BY ESTIMATION 100-Meter Unit-of-Measure Method. 200 meters to the dirt road from the starting point (200 meters). 600 meters to the first tree patch from the starting point, or 400 meters from the dirt road. 1400 meters to the second tree patch from the starting point, or 800 meters from the first tree patch. 2400 meters to the mid point from the starting point, or 1000 meters from the second tree patch. 4400 meters to the hill top from the starting point, or 2000 meters from the mid point. Example 3 1000m mid point 2400m 1400m 800m tree patch 600m 400m tree patch 200m 200m dirt road Total Distance Estimated 4400 meters (4.4 kilometers)
PART 2 Intermediate Land Navigation Module 14 Travel Distance Estimation Any Questions?
PART 2 Intermediate Land Navigation Module 14 Travel Distance Estimation DETERMINING TRAVEL DISTANCEDETERMINE DISTANCE BY ESTIMATIONRule-of-Thumb Method YOUR ARM IS ten times longer than the distance between your eyes. With that fact, you can estimate the distance between you and any object of approximateknown size. Example, you're standing on the side of a hill, trying to decide how far it is to the top of a low hill on the other side of the valley. Just below the hilltop is a barn, about 100 feet wide on the side facing you. • Hold one arm straight out in front of you, elbow straight, thumb pointing up. • Close one eye, and align one edge of your thumb with one edge of the barn. • Without moving your head or arm, switch eyes, now sighting with the eye that was closed and closing the other. • Your thumb will appear to jump sideways as a result of the change in perspective. • How far did it move? (Sight the same edge of your thumb when you switch eyes). • Let's say it jumped about five times the width of the barn, or about 500 feet. • Now multiply that figure by the handy constant 10 (the ratio of the length of your arm to the distance between your eyes), and you get the distance between you and the barn -- 5,000 feet, or about one mile. With practice, you can perform a quick thumb-jump estimate in just a few seconds, and the result will usually be more accurate than an out-and-out guess.
PART 2 Intermediate Land Navigation Module 14 Travel Distance Estimation 20m 400m DETERMINING TRAVEL DISTANCEDETERMINE DISTANCE BY ESTIMATIONRule-of-Thumb Method • You estimate that the small barn is 20 meters wide. • You stretch your arm out, put your thumb up and close one eye. • You switch closed eye with open eye. • And find that your thumb moved the distance of two barn lengths. • 20 x 2 x 10 = 400m Example 1
PART 2 Intermediate Land Navigation Module 14 Travel Distance Estimation DETERMINING TRAVEL DISTANCEDETERMINE DISTANCE BY ESTIMATIONRule-of-Thumb Method • You estimate that the small barn in the far distance is 20 meters wide. • You stretch your arm out, put your thumb up and close one eye close. • You switch closed eye with open eye. • And find that your thumb moved the distance of four barn lengths. • 20 x 4 x 10 = 800m 20m Example 2 800m
PART 2 Intermediate Land Navigation Module 14 Travel Distance Estimation DETERMINING TRAVEL DISTANCEDETERMINE DISTANCE BY ESTIMATIONTime Method • Make it a habit of keeping your map and compass handy and refer to them every hour or so to locate your position (more often in low visibility). Keep track of your starting time, rest breaks and hiking pace. This will also give you an idea of how far you have traveled over a period of time. • This is based on knowing the speed at which you are walking and keeping a note of when you left your last known point. Walking speed varies and is dependent on a range of factors including fitness, weight of rucksack, length of journey, wind, conditions underfoot, slope angle. • The simplest formula combines the horizontal distance with the height gained. Allow 5 km per hour on the flat plus 10 minutes for every 100 meters height gain. But remember that it doesn't allow for rests or stops. SEE TIMING CHART (next slide) • Working out timing calculations mentally becomes straightforward with practice - Measure the distance and allow 1.2 minutes for every 100 meters, at a pace of 5kph (see chart next slide). • An easy way to work this out is to use the 12 times table and move the decimal point forward. TWO EXAMPLES – 300 meters 3 x 12 = 36 = 3.6 minutes = 3½ minutes (Round off to the nearest half minute) 650 meters6 x 12 = 72 = 7.2 minutes = 7 minutes (Round off to the nearest half minute) Add ½ minute for the extra 50 meters = 7½ minutes • NOTE: • None of this is of any use if you don't have a watch. It is useful to have a • stopwatch so you don't have to remember the time at the start of each leg.
PART 2 Intermediate Land Navigation Module 14 Travel Distance Estimation DETERMINING TRAVEL DISTANCEDETERMINE DISTANCE BY ESTIMATIONTime Method Using a Timing Chart for the horizontal component makes the calculations easy. Although many people prefer to do it mentally. For short navigation legs, break it down to 1.2 minutes per 100 meters horizontal distance and 1 minute for every 10 meters of ascent. You can only travel at the speed of the slowest person and so you may need to use a slower formula such as 4 kph which is calculated at 1.5 minutes per 100 meters. When going gently downhill, it is best to ignore the height loss and just use the horizontal component of the formula. When descending steep ground which will slow your rate of travel a rough estimate can be used – allow 1 minute for every 30 meters of descent, although this is only an approximation.
PART 2 Intermediate Land Navigation Module 14 Travel Distance Estimation Any Questions?
PART 2 Intermediate Land Navigation Module 14 Travel Distance Estimation Note: Prior to being issued any training *equipment, you will be required to sign a “statement of liability” agreeing to pay for anything you damage or lose. All items will be inspected and inventoried prior to your signature and at the end of the training day too. If you do not intend to sign this statement, then you may be denied training. *You may use your own equipment.
PART 2 Intermediate Land Navigation Module 14 Travel Distance Estimation TESTING Now it is time for the following . . . • Written exam • Hands-on / Outdoors exam
PART 2 Intermediate Land Navigation Module 14 Travel Distance Estimation THE END OFLAND NAVIGATIONPRESENTATIONPART 2Module 14Travel Distance Estimation