Download
1 / 12
120 likes | 326 Views
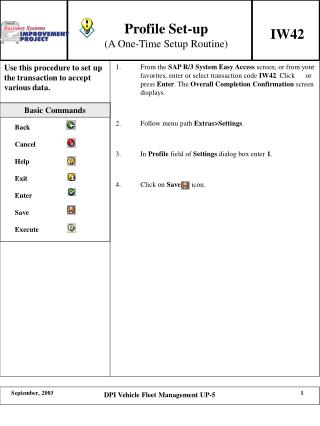
Welcome to the Web TPAX First-Time User Setup Procedures (Basic Log in and Profile). Initial Log In Screen. Enter your User ID . This should be your EMPLID. Then click the Forgot my Password button. Initial Verification Screen. Fill out the information as requested.

E N D
Welcome to theWeb TPAXFirst-Time User Setup Procedures(Basic Log in and Profile)
Initial Log In Screen • Enter your User ID.This should be your EMPLID. • Then click the Forgot my Passwordbutton
Initial Verification Screen • Fill out the information as requested. • Change any necessary information, such as the Grade/Rank field, then click Verify.
Traveler Profile – Personal Tab • Verify and correct any information on this tab, then click NEXT.
Traveler Profile – Address Tab • Verify your Mailing/Office Addresses are correct. • Ensure you enter and verify your Coast Guard Email address (@uscg.mil or @dhs.gov only). • Click NEXT.
Traveler Profile – Misc Info Tab This tab is only used for civilian employees. If you are a civilian employee, ensure your regular work schedule is checked, then click NEXT.
Traveler Profile – T-PAX Info Tab • Create Logon and Secondary Passwords using: • 9 Characters • 1 Upper case letter • 1 Lower case letter • 1 Number (can’t be the first character) • No Special Characters Ensure your Unit is correct. Click the Save button.
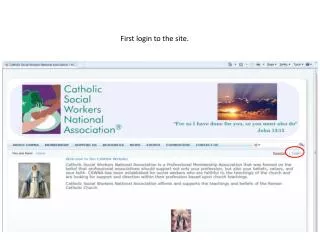
Back to the Log In Screen • This time, enter both your User ID and Password. • Then, click the Login to WebTPAX button. • This will associate your User ID and Password with your CAC. Click Logoutto continueestablishing your profile.
Back to the Log In Screen • Your CAC is now permanently assigned to your User ID. • If you have associated the wrong User ID and CAC, you must contact the System Administrator! • This time, you only need to click on Auto Login. Again…click Logout to continueestablishing your profile.
Logging In With Your CAC Card • For future logons, just go to the WEB TPAX page, and click the Auto Login button. • The Choose a digital certificate dialog will display. • Select the newest non-email DOD-CA certificate. If multiple DOD CA certificates are present, you may have to click the View Certificate button to determine the date. • Examine the Valid from dates on the Certificate detail panel to find the newest certificate.
Always choose the newest NON-emailcertificate! Do not choose an email certificate.
This concludes theWeb TPAXFirst-Time User Setup Procedures(Basic Log in and Profile) If you have any trouble, please submit a trouble ticket to PPC (Customer-Care).