Download
1 / 33
370 likes | 522 Views
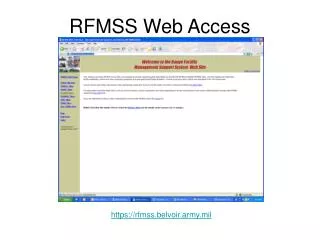
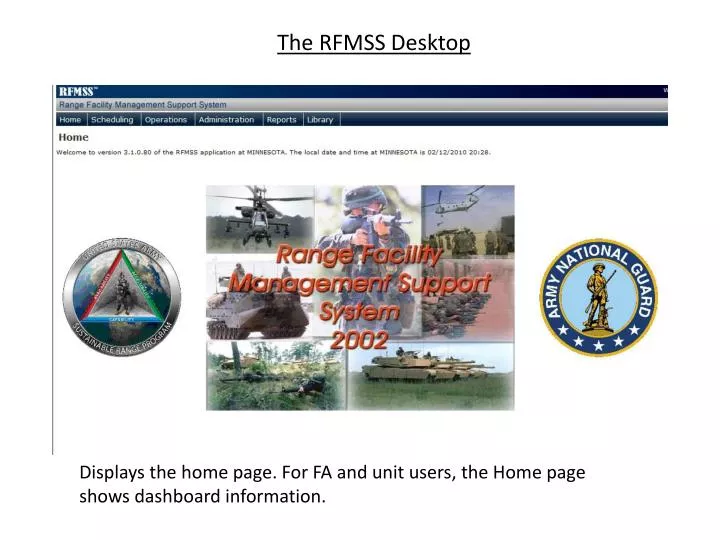
The RFMSS Desktop. Displays the home page. For FA and unit users, the Home page shows dashboard information. RFMSS Dashboard. For Functional Administrator and Unit users, the RFMSS dashboard on the Home page provides a quick view of the status of your requests or pending actions.

E N D
The RFMSS Desktop Displays the home page. For FA and unit users, the Home page shows dashboard information.
RFMSS Dashboard For Functional Administrator and Unit users, the RFMSS dashboard on the Home page provides a quick view of the status of your requests or pending actions. The Functional Administrator (FA) dashboard shows whether the FA has any pending user account requests. The FA can immediately access these pending requests from the dashboard by clicking the pending user account request link. The Unit dashboard shows the status of requests and co-use agreement requests for a specific unit or the units within a chain of command.
RFMSS Dashboard The FA has the ability to post announcements to the RFMSS Dashboard. The announcements can be targeted to specific user roles.
RFMSS Menus The Scheduling Menu contains predominately all of the functions used by a Range Control (RC) scheduler and Unit scheduler.
RFMSS Menus The Operations Menu contains the functions used by a Fire Desk Operator (FDO). The Fire Desk Operator focus is on current day operations.
RFMSS Menus The Administration Menu contains the tables used by the FA. The FA is able to customize the setup of RFMSS to reflect the installation’s range control daily operations. When the tables are properly setup the system will automatically populate many of the data fields required during daily operation for the RC & Unit Schedulers and FDO(s).
RFMSS Menus The Reports Menu contains the standard reports generated within RFMSS.
Navigation Path The path is located at the top of the application page underneath the menu. The path displays where you are in the menu tree of the application.
Viewing Information in the RFMSS Grid Most information in RFMSS is displayed in a tabular format, or grid. Using a grid allows you to easily modify and arrange information so that you see only what you need.
Working in the RFMSS Grid • The RFMSS grid lets you: • Add a new record, edit a record, or delete a record in the grid • Select a field value from a list of values • Select multiple records in a grid • Show deleted records • Show a modifications log for a selected record (where applicable) • Display / Export grid information in PDF, Microsoft Excel spreadsheet, or Microsoft Word document format • Print grid information
Viewing Information in the RFMSS Grid To rearrange the columns: • Click on the column header of a column that you want to move • Drag the column to the place where you want the column to appear, • and drop it in the grid. The page refreshes, then displays the column in its new location.
Viewing Information in the RFMSS Grid To hide columns: • Click the Choose Columns button above the upper-left corner of the grid. The Field Chooser window is displayed. • Click on the header of a column that you want to hide from the grid, drag the column to the Field Chooser window, and drop the column in the window. • The column name appears in the Field Chooser window and is hidden from view on the grid.
Viewing Information in the RFMSS Grid To sort the information in a column in ascending or descending order. • To sort a column in a grid, click the column heading. An arrow will appear in the column heading to indicate the sort order of the column: an up arrow indicates ascending order, a down arrow indicates descending order. • Click the column heading until the arrow indicates the sort order that you want to see.
Viewing Information in the RFMSS Grid Column Filtering Columns can be filtered so that only the information shown in the column filter is displayed in the grid. There are two ways to filter a column: Select from the Filter Drop-Down List Using the Filter Entry Line
Viewing Information in the RFMSS Grid Column Filtering You can select filter conditions by clicking the Filter Entry button in the Filter Entry Line.
Viewing Information in the RFMSS Grid Wrap Text in Grid Toggle Word Wrap lets you display multiple lines of text in a cell to fit the margins of the column or in a single line that extends the column margins. Wrapping multiple line text typically lengthens the row height, while not wrapping typically lengthens the row width.
Viewing Information in the RFMSS Grid Grid Pagination Some grids have so many records that they must be displayed on several "pages." To move through the pages in a grid: Select a specific page number (e.g., 1, 2, 3, 4, etc) Click the navigation buttons Click the Show All link, which shows the entire list of records
Entering Information in RFMSS Required Fields Required fields are indicated by an asterisk (*). You must enter information in a required field. Time Zone Indicator For fields that indicate time, a 'Z' next to the field means the time is Zulu time; an 'L' next to the fields means the time is Local time.
Entering Information in RFMSS Field Search A field that has a Search icon next to it has a list of values that you can choose from.
Working in the RFMSS Grid Grid Actions There are three basic actions that you can do in the grid: • Edit a record • Add a new record • Delete a record
Working in the RFMSS Grid Add a New Record • Click the New link. A new record is displayed in a new window. • Enter information in the new record. • Click the Save button. The record is added to the grid.
Working in the RFMSS Grid Edit a Record • Click the Edit link in the row of the record that you want to edit. The • record is displayed in a new window. • Make any changes to the fields in the record: • Clear the existing field entry by clicking Clear next to the field • that you want to edit. • Enter a different value in the field OR click Search and select a • value from the pop-up window. • Click the Save button. The modified record is saved in the grid.
Working in the RFMSS Grid Delete a Record • Click the Delete link in the row of the record that you want to delete. A message window is displayed prompting you to confirm that you want to delete the record. • Click Continue in the message window to delete the record. The record is deleted from the grid • . • You can view deleted records by clicking the Show Deleted link.
Working in the RFMSS Grid Multiple Record Selection • A single record, click the record so that a check is displayed in the check box. • Multiple records that are in sequence in the list, press the Shift key, click on the first record that you want to select, then click on the last record you want to select so that a block of records are selected • Multiple records that are not in sequence in the list, press the CTRL key and click on each record that you want to select.
Working in the RFMSS Grid Show Log Click the Log link in the record row. The modifications log for the selected is displayed. Click the Close button in the log to exit the log.
Working in the RFMSS Grid Printing Grid Information Click the Print button at the top left of the grid. 2. The File Download window is displayed. 3. Click the Open button in the File Download window to display the grid data . 4. A second window opens, and the grid data is displayed in Adobe Acrobat Reader. 5. Click the Print icon in the Adobe Reader window, OR select File: Print and click OK in the Print window.
Working in the RFMSS Grid Exporting Grid Information You can display and save (export) the data that is currently displayed in a grid. There are three formats for exporting: Microsoft Excel Microsoft Word Adobe PDF
Working with RFMSS Reports View Report or Grid You can view the report in two ways: Report: This shows the report data as a formatted report Grid: This shows the report data in grid format. For exporting data, it is better to view the report as a grid.
Working with RFMSS Reports Search Report
Working with RFMSS Reports Print Report 1. Click the Print Report button . The Print window is displayed. 2. If preferred, adjust any print settings. 3. Click OK in the Print window. Print Current Page of Report 1. Click the Print Current Report Page button . The Print window is displayed. 2. If preferred, adjust any print settings. 3. Click OK in the Print window. Navigating the Report To move from page to page in the report: Select the page number from the Page drop-down list. OR Click the navigation buttons: Go to the first page of report. Go to previous page. Go to the next page. Go to the last page of report.
Working with RFMSS Reports Export Report 1. Select Grid. 2. Select the type of file format (PDF, XLS, DOC) to export to from the top left of the report.
Working with RFMSS Reports Export Report 1. Select Report 2. Select the type of file format (PDF, XLS, DOC) to export to from the Drop-Down menu at top right of report