Download
1 / 16
170 likes | 335 Views
WORKSHOP 6 USING THE ASCII CONDUIT. WORKSHOP 6 – USING THE ASCII CONDUIT. Problem statement Use ADAMS/Insight and the ASCII conduit with ADAMS/Solver simulation files that represent a bungy-jump event. WORKSHOP 6 – USING THE ASCII CONDUIT. Getting started: testing the model

E N D
WORKSHOP 6 USING THE ASCII CONDUIT
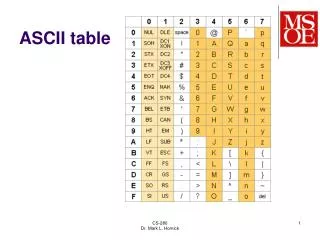
WORKSHOP 6 – USING THE ASCII CONDUIT • Problem statement Use ADAMS/Insight and the ASCII conduit with ADAMS/Solver simulation files that represent a bungy-jump event.
WORKSHOP 6 – USING THE ASCII CONDUIT • Getting started: testing the model • Here you will create your working directory and copy the necessary files. • Change to the exercise_dir/mod_06_ascii directory. • Test the provided example files to make sure that they run through ADAMS/Solver. Do this by submitting the bungy.acf file to ADAMS/Solver on the command line, like so: • On Windows: adams05r2 ru-s bungy.acf • On UNIX: adams05r2 -c ru-s i bungy.acf exit
WORKSHOP 6 – USING THE ASCII CONDUIT • Parameterizing the system • Next, you will create an ADAMS/Insight ASC system. You will first start the ADAMS/Insight ASC editor and import two text files, bungy.adm and bungy.acf. Each file will become an ASC ‘template’, to be parameterized. • Using the ADAMS/Insight ASC editor, the templates will be parameterized in order to define the Factors in the model.
WORKSHOP 6 – USING THE ASCII CONDUIT • To parameterize the system: • From the command prompt, start the ADAMS/Insight ASC Editor from the working directory as follows: • On Windows: adams05r2 ainsight -ascg • On UNIX: adams05r2 -c ainsight -ascg • From the File menu, select Import, or select the Import text file toolbar button. • Select the ADAMS/Solver model file, bungy.adm and select Open. • Repeat the import process and select bungy.acf. • Annotate the two ASCII templates by identifying the regions that will be substituted, as follows: • Highlight the text that is to be substituted. • Associate a variable with the highlighted text.
WORKSHOP 6 – USING THE ASCII CONDUIT For example, if you have a string such as, 'PART/02 , MASS = 160.0, CM = 203' and you want to alter the mass of the part, you would first highlight the numeric value of '160.0', and then right-click and assign the highlighted text to a variable (by either creating a new variable, or referencing an existing variable displayed in the shortcut menu). When creating a new variable, you can define the following: • Name: Descriptive name of the variable. • Format: Controls how the value will be printed. The convention follows the C printf() convention of %d for integer, %f for float, %e scientific, and %s for string. On UNIX, use the man printf command to get more information on this numeric formatting convention. In most cases, you don’t need to modify the default value. • Value: Default value that was originally highlighted. • Description: Optional supplemental information regarding the particular variable. Note: The double curly brace delimiters '{{' '}}' that appear in the text file are the default delimiters. You can change them on a template-by-template basis in the template properties.
WORKSHOP 6 – USING THE ASCII CONDUIT • From the Template menu, select bungy.adm. • Highlight the numeric value of the mass of the jumper (’160.0’). • Right-click and select Create. The Create Variable dialog box appears. • Change the value of the Name text box from F_05 to mass. • Leave the default values in the remaining text boxes. • Select OK. The corresponding text is modified as follows: From: PART/02 , MASS = 160.0, CM = 0203 To: PART/02 , MASS = {{mass=160.000000}}, CM = 0203
WORKSHOP 6 – USING THE ASCII CONDUIT • Highlight the numeric value of the function of the free-length variable. • Right-click and select Create. • In the Name text box, enter free_length. • Select OK. • Select the IC value of the free-length variable. • Right-click and select Replace. • Pick the variable free_length. The following shows how the corresponding text was modified: From: VARIABLE/01, IC=100.0, FUNCTION=100.0 To: VARIABLE/01, IC={{free_length}}, FUNCTION={{free_length=100.000000}}
WORKSHOP 6 – USING THE ASCII CONDUIT • Create another variable for the stiffness by repeating the steps above, using the following parameters: From: VARIABLE/02, IC=4.0, FUNCTION=4.0 To: VARIABLE/02, IC={{stiffness}}, FUNCTION={{stiffness=4.0}} • To parameterize the title of the simulation, add the predefined variable of ascTrialName to the title description so that the first line of bungy.adm ASC Template looks as follows: Bungy Jump (ADAMS/Insight ASCII Conduit) {{ascTrialName}}__bungy.adm Note: Be sure that there are two underscores between the closing curly brace and bungy. The parameterization of the bungy.adm ASC template is complete. Now, you parameterize the analysis names specified in the bungy.acf ASC template (first you open the appropriate ASC template and then parameterize it). • From the Template menu, select bungy.acf.
WORKSHOP 6 – USING THE ASCII CONDUIT • Parameterize the first two lines of the bungy.acf ASC template so they look like the following: {{ascTrialName}}__bungy.adm{{ascTrialName}}__bungy Note: Be sure that there are two underscores between the closing curly brace and bungy. • Specify ASC template properties specific to the bungy.acf ASC template: from the Edit menu, select Template Properties. The Template Properties dialog box appears. • Now you will specify how the simulations will be run. Do this by completing the following text boxes: • On Windows: • Execution Prefix: adams05r2 ru-s • On UNIX: • Execution Prefix: adams05r2 -c ru-stan i • Execution Postfix: exit
WORKSHOP 6 – USING THE ASCII CONDUIT • Enter the following Python dictionary definition in the Post Operations (Dict) text box: {'total_length':'plts:max:req_1:3', 'max_acc':'plts:max:req_1:4'} This string specifies what happens after the simulations are complete. Specifically, what parts of the simulation results files will be interrogated or how the postprocessing will occur. Note: You can see an example of this string on a commented-out line in the bungy.adm file. • Select OK. Now you will specify some optional ASC system attributes, such as a name and description. This can be helpful for future reference. • From the File menu, select ASC Properties. The ASC System Properties dialog box appears. • Complete the text boxes as follows: • Name: Jump • Description: Bungy jump tutorial example
WORKSHOP 6 – USING THE ASCII CONDUIT • To save the ASC system properties, select OK. • Save the ASC system to disk. • From the File menu, select Save As. • In the File name text box, enter jump. • Select Save. This creates a file on disk called jump.xml. This is the ASC system with the two ASC templates. You can view this file using a text editor or a browser. • From the File menu select Export Experiment. This automatically generates an ADAMS/Insight experiment with the factors and responses you defined in the ASC system. The default ADAMS/Insight experiment file is called jump_exp.xml. Note: Look in the DOS window that you used to start the ADAMS/Insight ASC editor for warning messages. Make corrections as necessary.
WORKSHOP 6 – USING THE ASCII CONDUIT • Creating the experiment • Here you will create your experiment. • Start ADAMS/Insight from the ASCII Conduit by selecting the ADAMS/Insight tool. Your experiment will automatically open in ADAMS/Insight. • Select the desired investigation strategy: • In the treeview, expand Design, and then select Specification. • In the Design Specification form, select a Full Factorial, DOE Screening strategy with Interactions as the model type. • Generate the workspace. You should now have a workspace with eight trials.
WORKSHOP 6 – USING THE ASCII CONDUIT • Check the AnaPostfix (Analysis Postfix) parameter in ADAMS/Insight. This parameter is found under the Simulation node, then the asc node. This directive helps ADAMS/Insight locate the proper output files from each trial. Set the AnaPostfix parameter to be: __bungy • Running your experiment • Select the Calculator button in ADAMS/Insight to run all of the design trials. Watch the original shell window that was used to start up ADAMS/Insight: the simulation progress is reported in this window along with any errors that might occur.
WORKSHOP 6 – USING THE ASCII CONDUIT • Review the results: • To review the workspace matrix, in the treeview, expand Design and then select Work Space. • Fit the results. • Export the model to an .htm file. • Review the model in a Web browser.