Download
1 / 31
310 likes | 316 Views
Creating and Processing Web Forms. Objectives. Design a form Create a form Create text fields Customize text fields. HTML 5 and CSS 3 – Illustrated Complete. Objectives (continued). Create check boxes Create option buttons Add drop-down menus Enable form submission.

E N D
Objectives • Design a form • Create a form • Create text fields • Customize text fields HTML 5 and CSS 3 – Illustrated Complete
Objectives (continued) • Create check boxes • Create option buttons • Add drop-down menus • Enable form submission HTML 5 and CSS 3 – Illustrated Complete
Design a Form • Useful to plan out a form before coding it • To increase usability: • Understand what information you need to collect • Identify the type of data required for each item • Ensure your form is logically organized and includes explanations HTML 5 and CSS 3 – Illustrated Complete
Design a Form (continued) • Fields/Controls: form elements in which users enter or select data • Identify the types of information you need to collect • Ask for information in distinct pieces • Example: ask for first and last names in two separate fields • Clarify what you are likely to need to do with the information • Break down into multiple fields only if necessary for processing HTML 5 and CSS 3 – Illustrated Complete
Design a Form (continued) • Create a logical flow • Display related fields near each other • Display fields in an order users are accustomed to • Example: first name, last name, street, city • If fields should be completed in a specific order, place them in top-to-bottom order on the form • Place fields for questions or information at the bottom of the form HTML 5 and CSS 3 – Illustrated Complete
Design a Form (continued) • Integrate labels and legends • Label: element containing descriptive text that is associated with a field • Associate each field with a label to make the significance of the field clear to users • Fieldset: group of fields that forms a logical unit • Legend: a descriptive title for a fieldset • Add legends to fieldsets to further increase usability of the form HTML 5 and CSS 3 – Illustrated Complete
Design a Form (continued) Figure J-1: Sketch of Lakeland Reeds contact form HTML 5 and CSS 3 – Illustrated Complete
Design a Form (continued) Figure J-1: Sketch of Lakeland Reeds contact form HTML 5 ad CSS 3 – Illustrated Complete
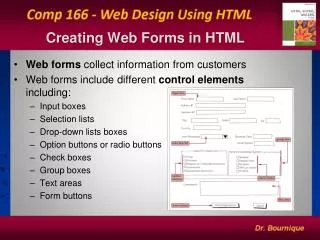
Create a Form • Web page form contains a series of nested elements • form element: marks form contents • fieldset element: contains elements in each section of the form • Includes a legend element describing the contents of the fieldset HTML 5 and CSS 3 – Illustrated Complete
Create a Form (continued) Figure J-2: Structuring code for the contact form HTML 5 and CSS 3 – Illustrated Complete
Create a Form (continued) Figure J-4: Styled form outline in browser HTML 5 and CSS 3 – Illustrated Complete
Create Text Fields • input element: used to create many types of fields in a form • Determine which type of field by setting the type attribute • For text box, set type attribute to text • Other type values create text boxes with specific semantic meanings • textarea element: creates a multiline text area • Visible size set using rows and cols HTML 5 and CSS 3 – Illustrated Complete
Create Text Fields (continued) Figure J-6: Text fields and associated labels displayed in form HTML 5 and CSS 3 – Illustrated Complete
Customize Text Fields • Labels and fields require styling • Good layout makes relationship between fields clear to users • Multiple options for organizing: • Positioning • CSS table styling • Use attributes to add usability features • Example: placeholder attribute HTML 5 and CSS 3 – Illustrated Complete
Customize Text Fields (continued) Figure J-7: Field and label styles HTML 5 and CSS 3 – Illustrated Complete
Customize Text Fields (continued) Figure J-8:placeholder attributes added to input elements Figure J-9: Text boxes with positioning, size, and text applied HTML 5 and CSS 3 – Illustrated Complete
Create Check Boxes • Check box: allows user to select one or more predefined choices independent of one another • User can click to select or deselect the checkbox • Defined using the type value checkbox • value attribute specifies text to be submitted with the form if a check box is selected HTML 5 and CSS 3 – Illustrated Complete
Create Check Boxes (continued) Figure J-10: HTML code for check boxes Figure J-11: CSS code to add space to the right of check box labels HTML 5 and CSS 3 – Illustrated Complete
Create Check Boxes (continued) Figure J-12: Check boxes displayed in form HTML 5 and CSS 3 – Illustrated Complete
Create Option Buttons • Option button: allows user to select only one of a predefined set of choices • Also known as a radio button • User can click to select the option button • Defined using the type value radio • Each item in set must have the same value for the name attribute as all other members of the set • Use checked attribute for one option to be selected by default HTML 5 and CSS 3 – Illustrated Complete
Create Option Buttons (continued) Figure J-13: HTML code for option buttons Figure J-14: CSS code to add space to the right of option button labels HTML 5 and CSS 3 – Illustrated Complete
Create Option Buttons (continued) Figure J-15: Option buttons displayed in form HTML 5 and CSS 3 – Illustrated Complete
Add Drop-Down Menus • Drop-down menu: method for creating a list of options from which user can select • Displayed as text box with arrowhead • User can select only one value from list • Created using the select element • Each of the options is created using an option element nested within the select element HTML 5 and CSS 3 – Illustrated Complete
Add Drop-Down Menus (continued) Figure J-16: HTML code for check-in drop-down menus HTML 5 and CSS 3 – Illustrated Complete
Add Drop-Down Menus (continued) Figure J-18: Drop-down menus for check-in date in browser HTML 5 and CSS 3 – Illustrated Complete
Enable Form Submission • Submit button: Form button that users click to submit their data • Created using the type value submit • Can use other type values for specialized submit buttons • action attribute used to specify name and location of script that will accept form data • User agents submit the name attribute of a field with its associated value HTML 5 and CSS 3 – Illustrated Complete
Enable Form Submission (continued) Figure J-19: HTML code for form action and submit button Figure J-22: results.html page showing submitted form data HTML 5 and CSS 3 – Illustrated Complete
Summary • Forms need to be planned and designed before coding • Identify types of information to be collected • Create logical flow • Use labels and legends • Form is created using form element • fieldset element groups fields in sections of the form HTML 5 and CSS 3 – Illustrated Complete
Summary (continued) • Text boxes are created with input element using type value of text • Text areas are created using textarea elements • Layout of text fields can be customized using CSS and attributes • Check boxes allow user to select multiple options and are created using the type value checkbox HTML 5 and CSS 3 – Illustrated Complete
Summary (continued) • Option buttons and drop-down menus allow a user to select one of several options • For option button, use type value radio • For drop-down menu, use select element and nested option elements • A submit button is clicked when user wants to submit data in a form, and is created using the type value submit HTML 5 and CSS 3 – Illustrated Complete