Download
1 / 36
370 likes | 461 Views
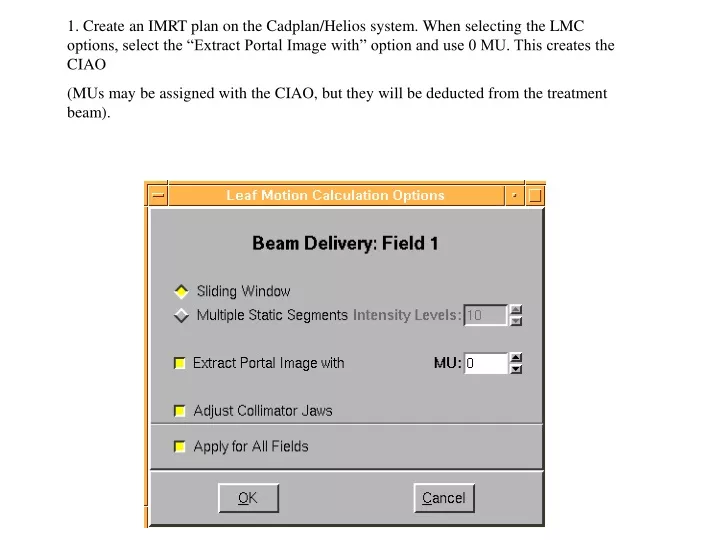
1. Create an IMRT plan on the Cadplan/Helios system. When selecting the LMC options, select the “Extract Portal Image with” option and use 0 MU. This creates the CIAO (MUs may be assigned with the CIAO, but they will be deducted from the treatment beam).

E N D
1. Create an IMRT plan on the Cadplan/Helios system. When selecting the LMC options, select the “Extract Portal Image with” option and use 0 MU. This creates the CIAO (MUs may be assigned with the CIAO, but they will be deducted from the treatment beam).
2. Upon Completion of the calculation, click on the IMRT tab to see the two DVA files created for each field . The one with a “p” in the file name is the CIAO. (See Appendix 1 for more details)
4. Apply a name mask Consider using a very short description to make the viewing of the files easier. Cadplan will add more info to this name including field number and “p” or “m”) (See Appendix 2 - The INI file must be set for export to the proper location)
5. Export the plan to Somavision 5A. Select the Patient ID to Soma Vision export
7. In Somavision - Plan Setup, import the plan (File-Import-from CadPlan)
9. You will get the the following warning about the dMLC being removed, ignore it for all fields.
10. The IMRT plan minus the DVA files are now imported and able to be viewed. Note the field sizes will be associated with the treatment ports, they will need to be changed to the CIAO field size if different. NOTE: This import will invalidate dose matrix on SomaVision, if you like to preserve it, you need to export plan from CadPlan twice (with different plan number) and import two plans in SomaVision, one for dose distribution review, the other one for CIAO definition.
11. Select a field in the Navigation window then import an MLC by choosing (File-Import-Import MLC Plan)
13. The MLC files will be on the Vision drive in the MLC directory (As mapped in the *.ini file)
14. After you have pointed to the correct directory, choose All Files (*.*) in the MLC File Window the choose the Varian IEC Import Scale, then select the correct filed DVA file.
16. View MLC in Beam’s Eye View option for appropriate shape and check beam properties for correct gantry angle, collimator angle and field size. Repeat steps 11 and 16 for all fields.
17. Beam’s Eye View Verification of Shape relative to CadPlan and all CIAOs with DVA imported. Beam’s Eye View CIAO’s with DVAs imported
21. At VoxelQ, open the patient’s study and select (Tools-Verification)
25. An isocenter must be established for the imported plan. An original VoxelQ plan with a traceable isocenter will allow you to properly position the imported plan. If the VQ plan selected in this option is the original isocenter, the imported plan will be placed at the original isocenter.
26. Select the treatment unit which matches the machine for the imported plan.
27. I believe this is for housekeeping on the mounted shared directory. We choose no. Although yes will work also.
28. Dicom import warning messages appear for structures and table positions. Ignore this.
30. The imported plan appears in the Plan list. Click on done at the bottom of the Connectivity window.
31. In the Verification window the imported plan will have all variables in red and it is not editable. Click on the Current Plan Tab.
33. There now is a copy of the imported plan labeled “your plan name-copy”
34. The copied plan is modifiable. You can now switch to Virtual Simulation and export the DRRs in the normal fashion