Download
1 / 50
500 likes | 576 Views
Variables, logic and sensors Day 3. Computer Programming through Robotics CPST 410 Summer 2009. Course organization. Course home page (http://robolab.tulane.edu/CPST410/) Lab (Newcomb 442) will be open for practice with 3-4 Macs, but you can bring your own laptop and all robots. Photos.

E N D
Variables, logic and sensorsDay 3 Computer Programming through Robotics CPST 410 Summer 2009
Course organization • Course home page • (http://robolab.tulane.edu/CPST410/) • Lab (Newcomb 442) will be open for practice with 3-4 Macs, but you can bring your own laptop and all robots. Harry Howard, CPST 410, Tulane University
Photos Harry Howard, CPST 410, Tulane University
Mindstorms NXT 2.0 • You can preorder it now, and it will ship by 1 Aug 2009. • $ 279.99 • http://shop.lego.com/ByTheme/Product.aspx?p=8547&cn=17 Harry Howard, CPST 410, Tulane University
Wired! Kelly §7
Hubs and wires • Kelly's introduction to wiring is not based on real NXT-G blocks, but rather on ones he made up for the sake of perspicuity. • I would rather you work with real blocks, so I will ignore his presentation. You should still read it, however. • We will go back to what we skipped in §3 (because it was wrong). Harry Howard, CPST 410, Tulane University
Data hubs • The settings of many blocks can be changed from other parts of the program through their data hub. • Create a new program "VariableMove". • Drop a MOVE block into it. • Change its duration to degrees. • Make sure your motors are set correctly. • Put your cursor at the bottom of the MOVE block and try to pull down the indented line. Harry Howard, CPST 410, Tulane University
The MOVE block data hub • Running the cursor over each icon reveals which setting it accepts. • If you have an Internet connection, click on the 'More help' link at the bottom right. Harry Howard, CPST 410, Tulane University
The VARIABLE block • To illustrate the usefulness of the data hub, we will try out a new block that does not come up in detail until §18, the VARIABLE block. • Change to the Complete palette (the three interlocking squares at the bottom left). • Select the big orange plus sign (Data), • pull out a suitcase (Variable), and • drop it in front of the MOVE block. Harry Howard, CPST 410, Tulane University
Using the VARIABLE block • The list shows the three types that a variable can have: Logic, Number, and Text. • Number and Text mean what they say; Logic we will take up later. • Change the type from Logic to Number. • Note that the action is set to Read and the value (0) is grayed out so that you cannot change it. • We want to change it, so set it to Write and change the value to 180. • In programming terms, we have declared a variable of type number and name 'Number 1' and set its value to 180. Harry Howard, CPST 410, Tulane University
Using the VARIABLE block, cont. • However, we cannot use the variable yet. • We have to make it available to the rest of the program by reading it, but a VARIABLE block can only be set to read or write, not both. • So drop another VARIABLE block after the first. • Set its type to Number. • Set its action to Read. • Now pull out a wire from its output plug and connect it to the MOVE input plug for Duration. • You might not get it right the first time, but persevere. Harry Howard, CPST 410, Tulane University
The program • Now we can use the variable. • Save, download, and run the program. • How far does your Tribot go? • 180 degrees, because the setting on the MOVE data hub for Duration only accepts degrees. Harry Howard, CPST 410, Tulane University
Let's display something • Drop a DISPLAY block after the MOVE block. • What should we display? • How about the number of degrees the wheels turn? • Pull down the data hub of the DISPLAY block. • Where would we connect the VARIABLE block to display its value? • CRUCIAL LIMITATION: Type cannot change. • Most of the input plugs are for numbers, but these numbers are used in positioning something on the LCD screen (and selecting the diameter of a circle). Harry Howard, CPST 410, Tulane University
Type conversion • The trick is to display the number 180 as the text "180". • But these two objects are of different types. • NXT-G only supplies one block for type conversion, in the Complete palette under the Advanced icon (four squares). • The NUMBER TO TEXT block. Harry Howard, CPST 410, Tulane University
The NUMBER TO TEXT block • Drop one between the MOVE and DISPLAY blocks. • Pull a wire out of the Duration output plug of the MOVE block and connect it to the input plug of the NUMBER TO TEXT block. • Again, this may take some trial and error. • Pull a wire out of the output plug of the NUMBER TO TEXT block and connect it to the Text input plug of the DISPLAY block. Harry Howard, CPST 410, Tulane University
The program • Remember that the DISPLAY block is very fast, so pull a TIME WAIT block out of the Common palette and drop it after the DISPLAY block. Set it to 10 s. • Save, download, and run the program. • What happens? Harry Howard, CPST 410, Tulane University
Wires and plugs [A] Input plug [B] Output plug [C] Number data wire (yellow) [D] Logic data wire (green) [E] Text data wire (orange) [F] Broken data wire (gray) Harry Howard, CPST 410, Tulane University
Play time • Take a few minutes to play with the program. Harry Howard, CPST 410, Tulane University
First look at BricxCC • Open BricxCC and move the Brick Command Center window to the left so that the Templates window is visible (see next slide). Harry Howard, CPST 410, Tulane University
Now go to the File menu and start a new program. Harry Howard, CPST 410, Tulane University
Reserved wordsidentifiers and keywords, p. 135 Harry Howard, CPST 410, Tulane University
Parsing errors • Usually because of missing or incorrect punctuation: } ; ) • The parser expects these things in certain places. • If its expectations are not met, it gives an error message. • It also gets thrown off track for the upcoming code and thus generates lots of error messages only because of the first one. Harry Howard, CPST 410, Tulane University
Variables in NXC Hansen p. 135ff
Variables • NXC has about 11 types of variables. • Today we will concentrate on the single numbers. • Since a number can take up a lot of storage space depending on how precisely it is specified, we want to be frugal with them. Harry Howard, CPST 410, Tulane University
Simple numerical variables Harry Howard, CPST 410, Tulane University
Variable declaration • Variables are declared using the keyword for the type, followed by a list of variable names which are separated by commas and terminated with a semicolon: int x; long y, z; • An equals sign can be followed by an initial value: int x=1, y=2, z; Harry Howard, CPST 410, Tulane University
Constants • When a program contains a value that does not change during execution, it's a good idea to give it a name to make the program easier to understand. • This is done in NXC with a macro definition using the compiler directive #define, e.g.; #define METER2MM 1000 #define DEG2ROT 360 • Compiler directives do not end in a semicolon. • During compilation, each macro is replaced by its value. Harry Howard, CPST 410, Tulane University
True or false?Feedback Kelly §8-9
The place of feedback Robot does something (motor cortex) feedback feedforward Environment changes (sensory cortex) Harry Howard, CPST 410, Tulane University
The complete system Robot does something (motor cortex) feedforward Robot decides (prefrontal cortex) ? Environment changes (sensory cortex) feedback Harry Howard, CPST 410, Tulane University
All the sensors are in the Complete palette Harry Howard, CPST 410, Tulane University
Sensor overview Harry Howard, CPST 410, Tulane University
Sensors and conditions • Once a sensor senses that its condition has been met, it produces a value of Yes (or True or 1). • Otherwise, it produces a value of No (or False or 0). • Such values of yes or no are known as logical values (though binary is just as accurate, and maybe more). Harry Howard, CPST 410, Tulane University
Check the sensors • Plug a sensor into a sensor port (the ones along the bottom). • Create a program that displays the output of the sensor on the screen • Hint: See if any of the output plugs on the data hub help. Harry Howard, CPST 410, Tulane University
DisplaySensor.rbt Harry Howard, CPST 410, Tulane University
Calibration Kelly §23
Different enviornments • The Light and Sound sensors can respond differently in different environments • For example, the maximum in a brightly lit room will be different from the maximum in a dimly lit room • NXT-G provides a CALIBRATION block to account for this kind of variation Harry Howard, CPST 410, Tulane University
The CALIBRATION block • Found in Complete > Advanced • Sets the minimum (0%) and maximum (100%) values detected by a sound or light sensor. Harry Howard, CPST 410, Tulane University
Usage • Although a single one can set both the min and max, it is safer to check each extreme separately, i.e. use one CALIBRATION block for the min and another for the max. • How do you decide the min and max? • Design a program to calibrate the light sensor for our room. Harry Howard, CPST 410, Tulane University
Sensor options • You may recall that the sensor blocks had lots of options. • These have to be set by special statements in NXC. • There are three things to set • the sensor port: 1, 2, 3, 4 • the sensor type: light, sound, touch, etc. • the sensor mode: how the data is collected Harry Howard, CPST 410, Tulane University
Sensor port names • There are three naming schemes • S1, S2, S3, S4 • IN_1, IN_2, IN_3, IN_4 • SENSOR_1, SENSOR_2, SENSOR_3, SENSOR_4 Harry Howard, CPST 410, Tulane University
Set sensor type to a port • SetSensorLight(port) • SetSensorSound(port) • SetSensorTouch(port) Harry Howard, CPST 410, Tulane University
Sensor type constants Harry Howard, CPST 410, Tulane University
Sensor mode constants Harry Howard, CPST 410, Tulane University
SetSensor function • It is convenient to set the type and the mode at the same time. • The SetSensor function makes this a little easier by providing a set of standard type/mode combinations (on the next slide) and a single function to call them: • SetSensor(port, constant configuration) • Example • SetSensor(S1, SENSOR_TOUCH); Harry Howard, CPST 410, Tulane University
Sensor type-mode constants Harry Howard, CPST 410, Tulane University
Reading sensor values • Once these options have been set, the processed sensor reading can be read from its port using the function: Sensor(port) • Example x = Sensor(S1); // read sensor at port 1 • The ultrasonic sensor has its own function: SensorUS(port) x = SensorUS(S1); // read ultrasonic sensor at port 1 Harry Howard, CPST 410, Tulane University
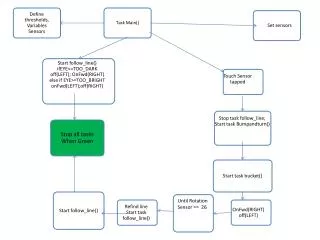
Next time • P1 • This will just be a quiz on the blocks • Whatever we did not finish today • Random numbers • 'Line Follower' - project done in class Harry Howard, CPST 410, Tulane University