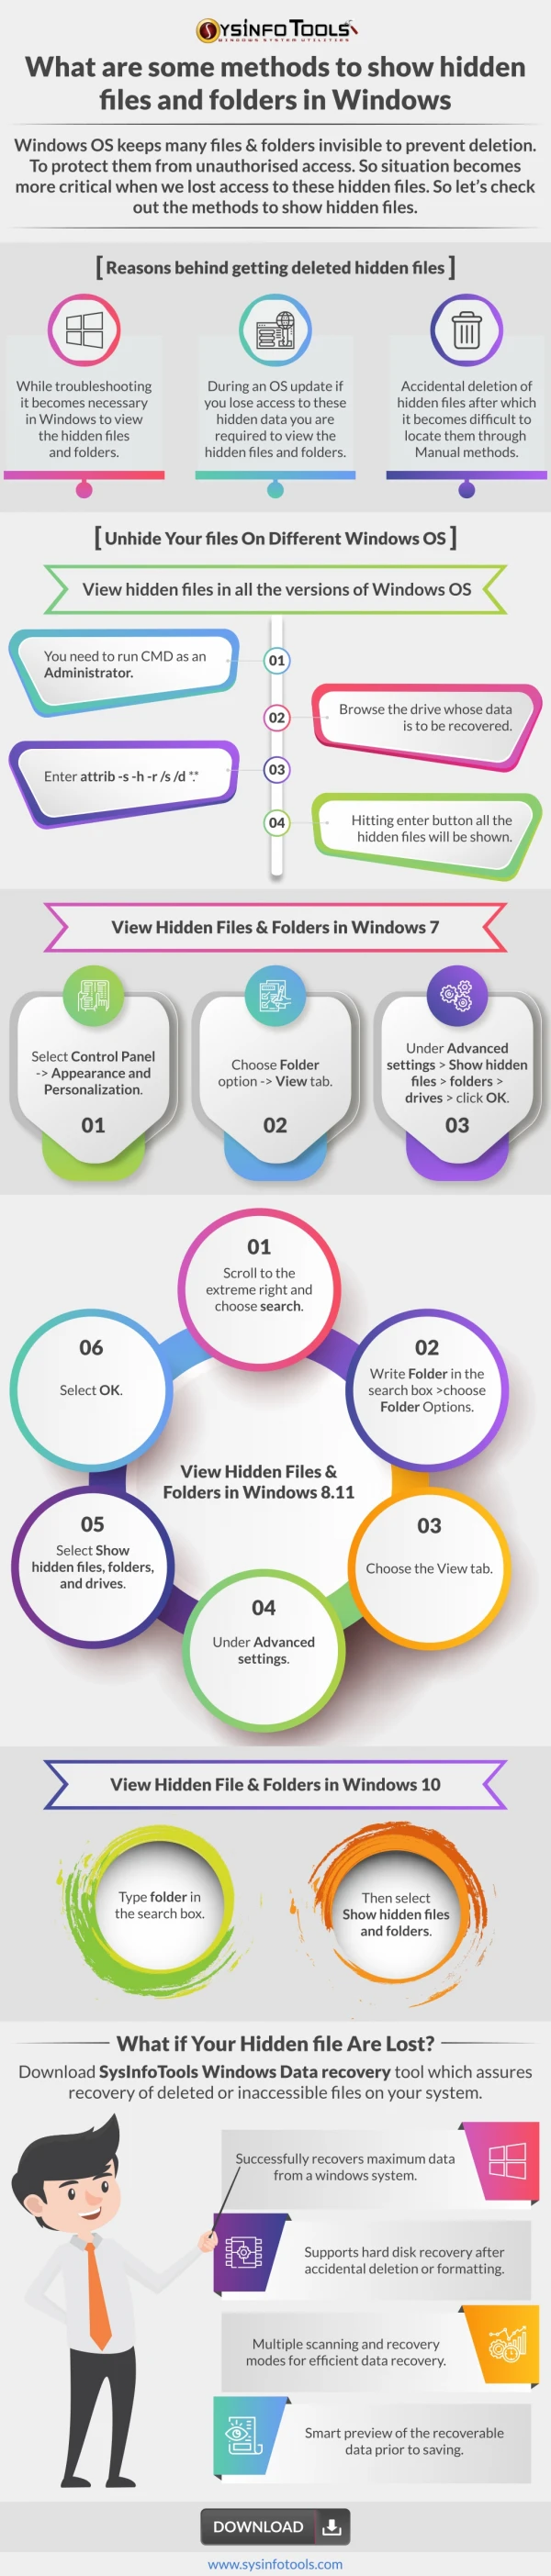
Download
1 / 38
400 likes | 564 Views
Using Folders to Organize Files. Windows 7 Operating System. Objectives. Open Windows Explorer View files and folders Navigate a folders list Create and rename files and folders. Objectives. Search for files and folders Organize files and folders Copy and move files and folders

E N D
Using Folders to Organize Files Windows 7 Operating System
Objectives • Open Windows Explorer • View files and folders • Navigate a folders list • Create and rename files and folders Microsoft Windows 7 Operating System
Objectives • Search for files and folders • Organize files and folders • Copy and move files and folders • Delete and restore files and folders • Work with libraries Microsoft Windows 7 Operating System
Unit Introduction • File management is organizing and keeping track of files and folders • Windows allows you to organize folders and files in a file hierarchyimitating the way paper documents are stored in real folders in a filing cabinet • The main file management window is Windows Explorer which provides access to file, folders, drives and disks on your local, Homegroup (a share home network and network computers Microsoft Windows 7 Operating System
Opening Windows Explorer • The keys to organizing files and folders effectively are to store related items together and to name folders informatively • Proper hierarchy and relevant names allow you to get a good idea of what is on your system just by looking at the higher levels of your file hierarchy • drives, folders, and files are represented by icons • each drive is assigned a drive letter, denoted with parentheses and a colon to help make it easier to identify • typically the hard drive is listed as Local Disk (C:) • if your computer includes additional hard or removable drives, they are assigned letters by your computer in alphabetical order Microsoft Windows 7 Operating System
Opening Windows Explorer (cont.) • The Windows Explorer window contains a toolbar, a Navigation pane, a Details pane, a menu bar, a status bar, providing information about the contents • The Navigation pane displays links to common folder and drive locations, including Favorites, Libraries, Homegroup, Computer, and Network • Libraries are special folders that catalog files and folders in a central location, regardless of where you actually store them on your hard drive to make finding files easier • a library can contain links to files, other folders and other subfolders anywhere on your computer Microsoft Windows 7 Operating System
Working with Libraries • Libraries are special folders that catalog files and folders in a central location, regardless of where you actually store them on your hard drive • a library can contain links to files, other folders, and other subfolders anywhere on your system • Windows 7 comes with four libraries, Documents, Music, Pictures, and Videos and additional ones can be created at any time • You can use your mouse or the Properties dialog box to include or remove folders and set options to optimize, share, and display the library • after one or more folders are added to a library, Windows 7 tracks your selected folders and updates them automatically in libraries whenever the content is changed Microsoft Windows 7 Operating System
Working with Libraries (cont.) • When you open a library, a detailed grouping view of the library indicates the files and subfolders within the monitored folders, letting you easily browse for the file or folder you want to open • If you are not sure where a file is located, you can use the Arrange by option to group and display the library contents by folder date modified, tag, type or name • Grouping displays a sequential list of all the files by heading type Microsoft Windows 7 Operating System
Opening Windows Explorer (cont.) Computer window Microsoft Windows 7 Operating System
Opening Windows Explorer(cont.) • Drives and folders are represented by icons in file management programs Microsoft Windows 7 Operating System
Viewing Files and Folders • When opening more than one folder, the Address bar helps you move quickly between folders in a window • when you open a folder, Windows keep track of where you have been • to go back or forward to a folder, click the Back or Forward button on the left of the Address bar • to go to a folder you viewed two or more locations ago, click the Recent Pages list arrow next to the Forward button to display a menu of placed you viewed • The Address bar displays the path you have taken, separated by arrows, to get from a disk drive to your current folder location • to quickly go back to a folder within the path, click the folder name in the Address bar or click an arrow to view the contents of each folder Microsoft Windows 7 Operating System
Viewing Files and Folders (cont.) • When viewing a folder, you can use the Views button on the toolbar to change the way you view file and folder icons • Available views include: • Extra Large, Large, Medium, and Small Icons • List, Details, Tiles and Content • Icon views display icons in different sizes, sorted alphabetically in horizontal rows, with the name of the file or folder below each icon • when viewing files using one of the Icon views, some file types, such as a bitmap, displayLive Icons (or thumbnails), which display the first page of documents, the image of the photo, or the album art for individual songs • The other views display additional information, such as file type, date modified, and size Microsoft Windows 7 Operating System
Viewing Files and Folders (cont.) Viewing files and folders in Tiles view Viewing files and folders in Details View Microsoft Windows 7 Operating System
Customizing Details view • When you view files and folders in Details view, a default list of file and folder information appears which consists of Name, Size, Type, and Date Modified • You can add and remove any file and folder information from Details view by clicking on the column indicator buttons Microsoft Windows 7 Operating System
Navigating a Folders List • When working in Windows Explorer, you can use the Navigation pane to display and manage files and folders • Windows Explorer splits the window into two panes, or frames, which allows you to view information from two different locations • Left pane displays drives and folders on you computer or network • Right pane displays the contents of the selected drive or folder • The Navigation pane on the left displays the file hierarchy of the drives and folders in a folders list Microsoft Windows 7 Operating System
Navigating a Folders List (cont.) • Use the Expand and Collapse indicators to the left of an icon in the Navigation pane to display different levels of the drives and folders on your computer without opening and displaying the contents of each folder • With the split window, it makes it easy to copy, move, delete and rename files and folders in in the Navigation pane Microsoft Windows 7 Operating System
Navigating a Folders List (cont.) Folders on the Removable drive Business Letters folder Microsoft Windows 7 Operating System
Customizing the Favorites list • The Favorites list in the Navigation pane provides links to commonly used folders and saved searches to reduce the number of clicks it takes to locate a file or folder • Windows provides a default list of Favorites including Desktop, Downloads, and Recent Places • you can customize the Favorite list to include folders or saved searches you want for your everyday use • you can move, current links, add or rename folders, save searches, or remove/restore an item Microsoft Windows 7 Operating System
Creating and Renaming Files and Folders • A hierarchy allows you to place files in folders, then place folders in other folders, so that your files are organized and easier to find • To create a hierarchy you create new folders within disks or folders and you store files in them • To create a new folder, select the location where you want the new folder, create the new folder, then name it • Name the folder meaningfully, so you can know its contents by reading the name • after naming a folder you can rename it at any time Microsoft Windows 7 Operating System
Creating and Renaming Files and Folders (cont.) Creating a new folder Renaming a file Microsoft Windows 7 Operating System
Changing the layout of Explorer windows • Windows gives you the option to customize the layout for each Explorer window depending on the information the window contains • The layout for each Explorer window can include a menu bar, Details pane, Preview pane, and Navigation pane. • The Organize menu shows or hides the layout elements • To change the Explorer layout, open the folder window you want to change, click the Organize button on the toolbar, point to Layout, select the layout item you want to show or hide: Menu Bar, Details Pane, Preview Pane, or Navigation Pane Microsoft Windows 7 Operating System
Saving a search • If you frequently perform the same search, you can save your search results like any file and perform or modify the search again later • once your search is completed, click the Save search button on the toolbar to open the Save As dialog box; the default file type is Saved search (*.search-ms);type a name for the search, then click Save and the search is saved by default in the Searches folder • To run a saved search, double-click it in the Searches window or click it in the Navigation pane • like any file or folder icon, you can move a saved search from the Searches folder to the Favorite section in the Navigation pane • to delete a saved search, select it, press [Delete], then click Yes to confirm Microsoft Windows 7 Operating System
Organizing Files and Folders • In Explorer windows, files appear in lists with headings at the top • You can use the headings to change how files are displayed in the window • There are several ways to organize your files by using file list headings including sorting, filtering, stacking, and grouping. • Sorting display files and folder in alphabetical order, either A to Z or Z to A • Filtering displays only files with the properties you select by heading type • when a filter is applied to a heading, a check mark appears in the heading, indicating a filter is enabled • if a filter does not display the files desired in the selected folder, use the subfolders options to include them in an expanded search Microsoft Windows 7 Operating System
Organizing Files and Folders (cont.) Menu to filter files and folders Filtering files and folders Microsoft Windows 7 Operating System
Adding property tags to files • When you create a file, Windows automatically adds properties to the files, such as the filename, creation date, modified date, and size • These properties are important to Windows, however, they may not be useful when you are searching for a file • You can create your own custom properties called tags to make it faster and easier to locate files in the future • a tag can be anything you choose, such as “QST” or “Important.” • You can add or modify properties using the Tags box in the Details pane in an Explorer window, the Details tab in the Properties dialog box, or in the Save As dialog box • if you want to remove some or all of the property information in a file, you can quickly remove it using the Properties dialog box • to open the Properties dialog box for a file, right-click the file, then click Properties Microsoft Windows 7 Operating System
Copying and Moving Files and Folders • Moving and/or copying a file from one folder to another can be accomplished using a variety of methods • if the file or folder and the location where you want to move it are visible in a window or on the desktop, you can simply drag the item from one location to the other • moving a file or folder on the same desk relocates it, whereas dragging if from one disk to another copies it so that is appears in both locations • one way to make sure that you move or copy an item properly is to right-click the file or folder, drag it to the new location still holding down the right mouse button, then choose move or copy from the shortcut menu • if the destination folder is not visible, you can use the Cut, Copy, and Paste commands or the Organize button Microsoft Windows 7 Operating System
Copying and Moving Files and Folders (cont.) Moving a file from folder to folder Copying a file from one location to another Microsoft Windows 7 Operating System
Sending files and folders • The Send To command on the shortcut menu that appears when you right-click an item on the desktop or a file management window lets you send a file or folder to a new location: • to a USB drive to make a quick back-up copy of the file or folder • to a mail recipient as an electronic attachment • to the desktop to create a shortcut • to move from one folder to another • Use the Send to command to move a file or folder to the Documents folder • to send a file or folder, right-click the file or folder, point to Send to on the shortcut menu, then click the destination you want Microsoft Windows 7 Operating System
Deleting and Restoring Files and Folders • You can delete, or remove, items you no longer need from the disk • If you delete a file or folder from the desktop or from the hard disk, it goes to the Recycle Bin • theRecycle Bin, located on the Desktop,is a temporary storage area for deleted files and stores all the files deleted from your hard disk • you can remove items from the Recycle Bin to restore it if necessary • if deleting a file was the last action you performed click the Organize button menu, then click Undo to restore the file or folder • Important - If you delete a file from a removable disk such as a USB it cannot be restored Microsoft Windows 7 Operating System
Deleting and Restoring Files and Folders (cont.) Selecting a file to drag to the Recycle Bin Deleted file from desktop in Recycle Bin Microsoft Windows 7 Operating System
Deleting and Restoring Files and Folders (cont.) • You can delete a file in several ways Microsoft Windows 7 Operating System
Recycle Bin properties • You can adjust Recycle Bin settings by right-clicking the Recycle Bin on the desktop, then clicking Properties on the shortcut menu • Settings options include: • deleting files from the hard drive immediately instead of placing them in the Recycle Bin • increasing or decreasing the amount of space allotted to the Recycle Bin by changing the value in the Maximum size text box Microsoft Windows 7 Operating System
Searching for Files and Folders • Windows provides a Search box and a Search Results folder to help you find and view all of the files or folders the meet your search criteria in one place • The Search folder provides easy access to all of your files, such as documents, pictures, music, and e-mail, and folders that match search criteria you set in a single view • items that match the search criteria appear highlighted • If you don’t find the file or folders you’re looking for, you can perform an advanced search • an advanced search gives you the option to find files or folders by name, title, author, location, date (taken, modified, or created), size, or tags, which are user-defined file properties, and filters (criteria) narrowing the search Microsoft Windows 7 Operating System
Searching for Files and Folders (cont.) Performing a search Results from a filtered search Microsoft Windows 7 Operating System
Working with Libraries (cont.) Creating a library Adding a folder to a library Microsoft Windows 7 Operating System
Creating and working with shortcuts • A shortcut is a link that you can place in any location to gain instant access to a particular file, folder, or program on your hard disk or on a network just by double-clicking • the actual file, folder, or program remains stored in its original location, and you place an icon representing the shortcut in a convenient location • to create a shortcut, right-click an icon, then click Create shortcut • All shortcuts are named the same as the files to which they link, but with the word “Shortcut” at the end of the original name and the file icon includes an arrow • Shortcuts to frequently used files, folders, and programs can be added to the Start menu or taskbar Microsoft Windows 7 Operating System
Summary • Windows Explorer provides the keys to organizing file and folders effectively • There are many ways to view and access files and folders using the Address bar, Back and Forward buttons, paths, and icons • The Navigation pane displays and manages files and folders • A hierarchy organizes files and folders making them easier to find • The Search box and Search Results folder helps to be able to find and view all of the files or folders that meet specified search criteria Microsoft Windows 7 Operating System
Summary (cont.) • In Explorer windows, files appear with headings at the top which can be used to change how files are displayed • There are several methods of copying and moving files such as using dragging as well as the Cut, Copy, and Paste commands • Files that are no longer needed can be deleted and if a file is deleted by accident they can be restored from the Recycle Bin • Libraries catalog files and folders in a central location • Shortcuts save time when looking for files and folders Microsoft Windows 7 Operating System