Download
1 / 8
80 likes | 197 Views
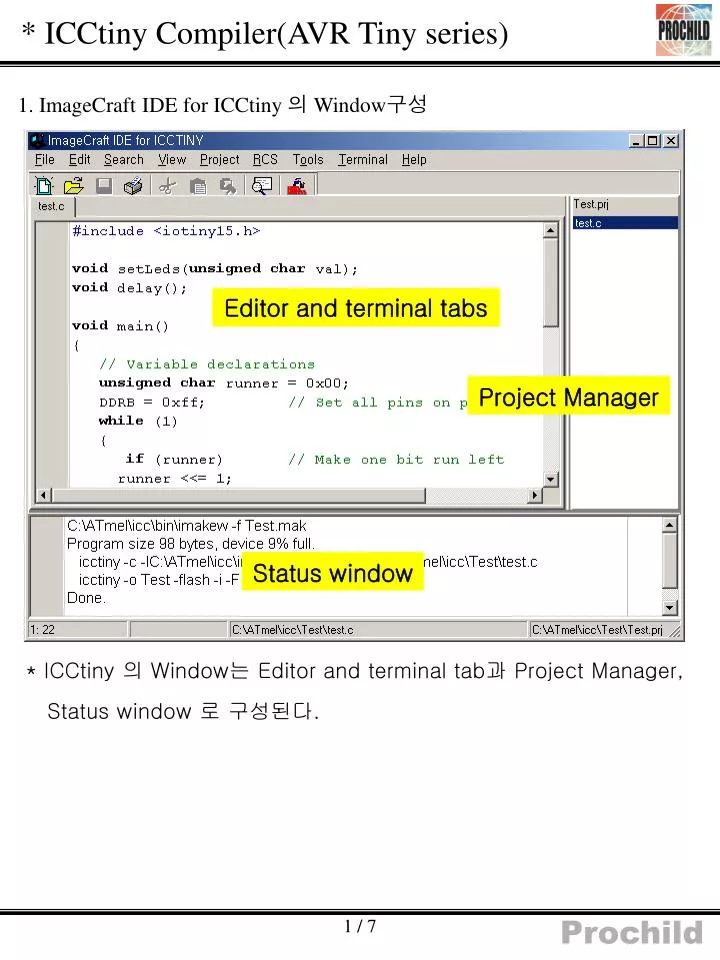
* ICCtiny Compiler(AVR Tiny series). 1. ImageCraft IDE for ICCtiny 의 Window 구성. Editor and terminal tabs. Project Manager. Status window. * ICCtiny 의 Window 는 Editor and terminal tab 과 Project Manager, Status window 로 구성된다. * ICCtiny Compiler(AVR Tiny series).

E N D
* ICCtiny Compiler(AVR Tiny series) 1. ImageCraft IDE for ICCtiny 의 Window구성 Editor and terminal tabs Project Manager Status window * ICCtiny 의 Window는 Editor and terminal tab과 Project Manager, Status window 로 구성된다.
* ICCtiny Compiler(AVR Tiny series) 2. Project와 Source File 등록하기 1) Project -> New를 선택한다. 2) 원하는 위치를 선택한 다음 파일이름을 입력하고 저장을 누른다. (여기서는 “Test 폴더에 파일명은 Test임) 3) 그럼 다음과 같이 Project Manager 윈도우에 Project가 등록된다.
* ICCtiny Compiler(AVR Tiny series) 4) File -> New 를 선택하여 Source 파일를 작성한다.(여기서는 Test.c)임. 5) Project -> Add File(s)을 선택하고 Source 파일을 열면 Project Manager 윈도우에 Source 파일이 등록된다.
* ICCtiny Compiler(AVR Tiny series) 3. Compiler Option 설정 1) Project -> Option를 선택한다. Include Path(s) : ICC가 설치된 경로와 Include 폴더의 경로가 맞게 설정되어 있는지 확인한다. Output Directory :에서 출력 파일을 저장할 디렉토리를 지정한다. (Full Path name ; 지정하지 않으면 Project가 생성된 디렉토리에 저장) Output Format : 출력 파일의 Format을 설정한다. COFF :Debugging 시에 필요한 파일 Intel HEX : Chip에 Writing하기위한 파일 Device Configuration : Flash Type에 따른 Target device를 설정한다. Stack Size : Stack Size를 설정한다.(최대 10) Number of Global Variables :전역변수의 개수를 설정(최대7) Number of Vector Entries : 사용할 인터럽트 벡터의 개수를 설정.
* ICCtiny Compiler(AVR Tiny series) 4. Compile 하기 1) Project -> Make Project 또는 Project -> Rebuild All 을 선택한다. 2) Status 윈도우에 Error 메시지가 없다면 성공적으로 Compile이 된 것이다. 3) Error 가 있다면 Status 윈도우에 Error 메시지와 함께 Error 가 발생한 Line number가 표시된다.
* ICCtiny Compiler(AVR Tiny series) 5. Simulation & Debuggig 1) 컴파일이 정상적으로 끝나고, Compiler Option에서 Output Directory를 지정하지 않았다면 Project를 생성한 디렉토리에 출력 파일이 생겼을 것이다. * Test.cof : debugging을 할 때 사용하는 파일 * Test.hex :Chip에 Writing을 하기 위한 파일 2) AVR Studio3.2 에서 Test.cof 파일로 Simulaton File -> Open -> Test.cof
* ICCtiny Compiler(AVR Tiny series) 6. 기타 자세한 사항은 도움말을 참조 하십시요. 7. 지원 Device Line Card(간략본)
* 별첨 1 1. 플로피에서 License 정보 가져오기(Import License from Floppy) *Help -> Import License from Floppy를 클릭 2. 플로피로 License 정보 옮기기 (Transfer License to Floppy) *Help ->Transfer License to Floppy를 클릭 * Floppy로 License를 옮기면 해당PC에서는 ICCtiny를 사용하실 수 없습니다. 또한 License를 Floppy에서 PC로 옮기면 Floppy에는 더 이상 License 정보가 포함되어 있지 않습니다. !!! 하드를 포맷하거나 프로그램을 재설치 하실땐 License를 Floppy로 옮겨주십시요 !!!