Download
1 / 49
540 likes | 802 Views
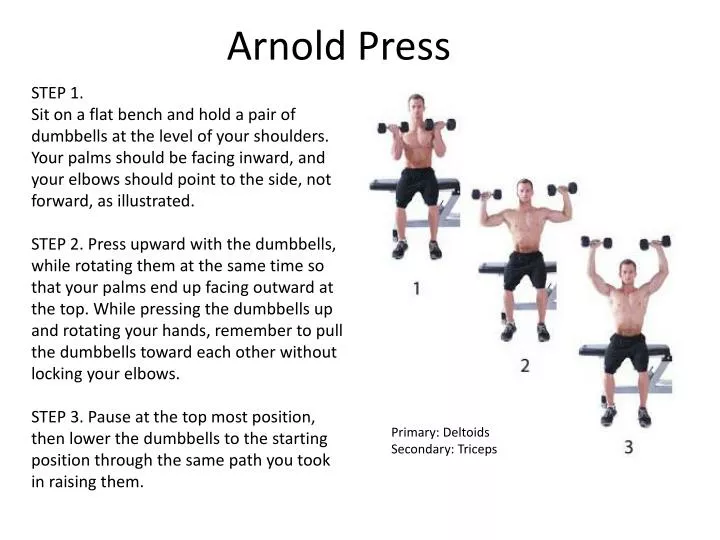
Arnold Press. STEP 1. Sit on a flat bench and hold a pair of dumbbells at the level of your shoulders. Your palms should be facing inward, and your elbows should point to the side, not forward, as illustrated.

E N D
Arnold Press STEP 1. Sit on a flat bench and hold a pair of dumbbells at the level of your shoulders. Your palms should be facing inward, and your elbows should point to the side, not forward, as illustrated. STEP 2. Press upward with the dumbbells, while rotating them at the same time so that your palms end up facing outward at the top. While pressing the dumbbells up and rotating your hands, remember to pull the dumbbells toward each other without locking your elbows. STEP 3. Pause at the top most position, then lower the dumbbells to the starting position through the same path you took in raising them. Primary: Deltoids Secondary: Triceps
Military Press This is one of the most effective of all the shoulder-building exercises, and should be incorporated in workout programs of all levels once the correct movement has been mastered and feels comfortable. STEP 1. Sit with your back on a bench that allows a steep incline - between 80° and 90°. Grasp the barbell with an overhand (pronated) grip with your hands just a little wider than shoulder-width apart and rest it on your upper chest. STEP 2. Brace your shoulders and back, then inhale and press the bar straight up, keeping your elbows slightly bent at the top. STEP 3. To finish, lower back down to the start position, keeping your abdominals and lower back braced, then repeat for the desired number of reps. Primary: Deltoids Secondary: Pectoralis, Triceps
Lat Pull This exercise works both the back and biceps effectively. STEP 1. Sitting on a bench, grab a bar with a false overhand - thumb on the same side as your fingers - shoulder-width grip. STEP 2. As you pull your shoulder blades together and down, while sticking your chest out, pull the bar to your chest. Then, pause with the bar an inch or so from your chest, and slowly let it rise to where it began. Throughout, keep your chest out. Primary: Latisumus Dorsi Secondary: Biceps, Trapezius
Seated Low Row This is a very good back exercise that also isolates the upper back effectively when you retract the shoulderblades during the movement. STEP 1. Place your feet on the platform, keeping a slight bend in your knees and making your posture "tall". Grasp the handles and extend your back forward while keeping your shoulders slightly retracted, and then pull your elbows in and back toward the sides of your torso - the handles should come all the way in until it reaches your navel. STEP 2. Hold the position for a second before returning back out, keeping the movement under control: your arms returning to the extended position; your back going slightly forward; and with your knees slightly bent. STEP 3. Repeat for the desired number of reps. Primary: Trapezius Secondary: Latissimus Dorsi,
Bench Press STEP 1. Lie on your back with your feet supported either by a raised platform or the floor. Make sure that you do not over-extend your lower back and keep your buttocks in contract with the bench. Take an overhand grip on the bar, slightly wider than a shoulder-width apart. Inhale and push the bar off the rack then move it lower down to the midline of your chest. STEP 2. Try to keep the bar, your wrists, elbows, and your shoulders working on the same line of axis - straight up and down. STEP 3. Hold for a second then push the bar back up, making sure that you shoulders do not hunch forward away from the bench and that it is your triceps muscles and chest that are pushing. STEP 4. Keep your upper body in contract with the bench as much as possible and keep your breathing rhythmical - exhale when you push the bar back up. Primary: Pectoralis Secondary: Deltoids, Triceps
Dumbbell Pull-Over This exercise develops the entire chest and also works the triceps muscles and back muscles STEP 1. Lie on a flat bench with your head supported and your feet either in contract with the floor. Hold a dumbbell with both hands, encircling it with your palms against the underside of the top set of plates. Raise the dumbbell up in front of your chest, with your elbows slightly bent STEP 2. Inhale and lower the dumbbell back past your head and back to the limit of your range of motion, keeping your elbows slightly bent at all times. Hold the stretch for a second before exhaling and returning the dumbbell back up to the starting position. STEP 3. Repeat for the number of repetitions desired, maintaining correct posture. Primary:Pectoralis Secondary: Latissimus Dorsi, Triceps
Seated Triceps Extensions STEP 1. Sit on a bench, and grab a pair of dumbbells. Hold them so that they are at arm's length above your head with palms facing inward together. STEP 2. Keep your upper arms stable as you lower the dumbbells behind your head until your forearms are just past parallel to the floor. STEP 3. Pause, then straighten your arms to return the dumbbells to starting position. Primary: Triceps Secondary: Deltoids
Bicep Curls This is a useful exercise for beginners because it helps correct any imbalance between the strength of the two biceps and allows for variations of hand grip that help develop biceps further. STEP 1. Stand tall, maintaining good posture, with your feet hip-distance apart, and your knees slightly flexed, leaving your arms by your sides with your palms facing forward. STEP 2. Inhale, then raise the dumbbells slowly toward your shoulders as you exhale, keeping your elbows close to your sides. Make sure that you do not allow your elbows to travel forward. STEP 3. When you have raised the dumbbells to your shoulders inhale and slowly lower them back to the starting position. Primary: Biceps
Dumbbell Squat STEP 1. While holding two dumbbells by your side at arm's length, keep your feet roughly a shoulder-width apart and pull your shoulder blades back. STEP 2. Slowly bend your knees and lower your body. Stop when you find that your thighs are parallel to the floor. STEP 3. It is important to keep your knees from moving forward past your toes and have your lower back in its natural arched alignment. Slowly return to the starting position in the same manner. Primary: Quadriceps Secondary: Glutes
Dumbbell Lunges STEP 1. Stand tall with your feet hip-distance apart and grasp a dumbbell in each hand with your palms facing inward; make sure that your toes face forward. STEP 2. Slowly inhale and step one leg forward, keeping your knee above your ankle and dropping the knee of your rear leg toward the floor. Stop the movement when the rear knee is 2 to 3 inches (5 to 7.5 centimeters) from the floor. STEP 3. Exhale and push yourself back to the starting position off your front leg. STEP 4. Repeat for the desired number of repetitions, then repeat the exercise stepping your other leg forward Primary: Quadriceps Secondary: Glutes
Leg Curl This is a basic but effective exercise that promotes the development of the hamstrings. STEP 1. Lay face down on the machine, with its leg pad just above your heels and make sure that your knees line up with its pivot points. STEP 2. Slowly exhale and pull your heels toward your hips, flexing your knees as much as you need to for comfort. STEP 3. When you have moved as far as you can without any sense of straining, inhale and slowly return your heels to the starting position Primary: Hamstrings Secondary: Glutes
Dumbbell Calf Jumps STEP 1. Stand with your feet hip-width apart. Grab a pair of dumbbells and hold them at your sides at arm's length. STEP 2. Dip our knees so they're bent about 45 degrees and jump as high as you can. Point your toes toward the floor when you jump. STEP 3. Allow your knees to bend 45 degrees when you land, then immediately jump again. Primary: Castrocnemius Secondary: Hamstrings, Quadriceps
Reverse Crunch This exercise works the lower of your abdominal muscle and when performed correctly can eliminate the use of other muscles to cheat the movement. STEP 1. Lie flat on a bench and reach back to hold on to the underside of the bench behind your head. Bend your legs at the knee, raising your feet off the bench so that your knees are over your hips. STEP 2. Slowly draw your abdominal muscles toward your spine, then slowly exhale and push your spine into the bench - start with your lower back and make the movement flow up your spine until your hips roll up off the bench. STEP 3 Imagine that the bench is made of soft plastic and try to leave an imprint of your spine in it. STEP 4. When you have rolled the full length of your spine, inhale slowly and return to the starting position, pushing your spine into the bench as you roll back down. Primary: Rectus Abdominis Secondary: Obliques
Abdominal Twists STEP 1. Lie on your back, extend your legs straight up, and place your hands out to your sides at the level of your shoulders. STEP 2. While keeping your upper body stable, roll your legs downward toward one side - bringing your feet toward the floor. STEP 3. Roll your legs back up to the starting position and toward the opposite side. Then, return to the upright position again. Primary: Obliques
Reverse Flys • STEP 1. Sit on the front edge of a bench while holding a pair of fairly light dumbbells. Lean forward at the hips to get your chest as close to your thighs as you can without rounding your back. • STEP 2. As you hold the dumbbells with a neutral grip., let your arms hang down from your sides in line with your cables. • STEP 3. Raise the dumbbells up to either side of your body by making a wide, arcing motion with your arms until they are parallel to the floor and your elbows are just below shoulder level. Your wrists should be in the same plane as your ears before you return to your original position. • Variations: Changing your grip from neutral to under-hand-grip directs the workout toward your external rotators while switching to an overhand grip shifts more work to your rear delts.
T-Bar • STEP 1. Straddle a T-bar - row machine and grab the handles with an overhand grip. Make sure you are standing with your feet shoulder-width apart and your knees slightly bent, as shown. • STEP 2. Keep your back flat and bend your waist until your upper body is about 45 degrees from the vertical, the bar hanging at arm's length directly below your shoulders. • STEP 3. Then, squeezing your shoulder blades together , lift the bar as close as you can to your lower chest. Pause, then slowly lower the bar back to the starting position.
Preacher Curl • STEP 1. Using an underhand grip, hold onto a EZ-curl bar. Rest your upper arms on the sloping preacher bench, as illustrated, while holding the bar at an arm's length in front. Try to have a slight bend in your elbows of 5-10 degrees. • STEP 2. Lift the bar as high as possible while keeping your upper arms firmly planted on the pad. • STEP 3. Pause, then slowly return the bar to the starting position.
Incline DB Curl • STEP 1. Sit on an incline bench, and grab a pair of dumbbells. Position the bench so it has roughly a 45-degree bend. • STEP 2. Curl the dumbbells toward your chest as far as possible without moving your upper arms forward. • STEP 3. Return to the start position in a controlled manner.
Shrugs • STEP 1. Stand upright and hold two fairly heavy dumbbells at your sides, with your palms facing each other (neutral-grip). • STEP 2. Keep your shoulders relaxed. Shrug your shoulders as if you were trying to touch them to your ears. • STEP 3. Hold the top most position, then gradually lower them to the starting position. Do not bend your elbows or shift your head forward during the motion.
French Curl • STEP 1. Sit at the end of a bench and grab the barbell with a full, overhand grip slightly shy of being shoulder width. Hold the bar over your head with your arms straight but your elbows unlocked. • STEP 2. Bend your elbows slowly and lower the bar toward the back of your neck. • STEP 3. Pause, then press back up the starting position while making sure that your upper arms are in the same position throughout the workout movement.
Hammer Curl • STEP 1. Sit on the edge of the workout bench and hold a pair of dumbbells using a neutral grip (as shown on the diagram) and let them just hang at arm's length. • STEP 2. Without changing your wrist positioning, slowly curl the weights up toward your shoulders. Remember to keep your upper arms tucked against your sides as you go through the motion.
Good Mornings • STEP 1. Hold a barbell with an overhand grip so that it rests on your upper back and not on your neck. Set your feet a shoulder-width apart and knees slightly bent while keeping your back straight. Focus your eyes forward. • STEP 2. Gradually bend forward using your hips to lower your chest while maintaining the natural arch in your lower back. Keep your head up and maintain about the same angle of your knees. • STEP 3. Lift your upper body back into starting position.
Step Ups • STEP 1. Hold a pair of dumbbells and stand 2-3 feet from an exercise bench. Place your right foot on the bench and the left foot on the floor. • STEP 2. Drive your right heel down and pull your left leg up but only allow your left toes to touch the bench. • STEP 3. Lower your left leg first, and then your right. Repeat, this time lunging up with your left leg.
Leg Curl • STEP 1. Lay face down on the machine, with its leg pad just above your heels and make sure that your knees line up with its pivot points. • STEP 2. Slowly exhale and pull your heels toward your hips, flexing your knees as much as you need to for comfort. • STEP 3. When you have moved as far as you can without any sense of straining, inhale and slowly return your heels to the starting position.
Leg Extension • STEP 1. Position your lower legs behind the shin pad, making sure that the pad is on the lower part of your shins rather than your ankles. Line your knee up with the pivot points on the machine and make sure that your starting position is comfortable. • STEP 2. Exhale and extend your legs at the knee - stop the movement just before your legs become straight. • STEP 3. Inhale and slowly return your legs to the starting position.
Push Press • STEP 1. Place a loaded barbell on a rack at about your upper-chest level. Grasp the bar with both hands, and lift it off the rack and support it on your shoulders. • STEP 2. Dip your body by slightly bending the knees, hips, and ankles. • STEP 3. Suddenly drive upward with your legs, pushing the barbell up off your shoulders and vigorously extending your arms overhead until your elbows are locked.
Leg Press • STEP 1. Place your feet a hip-distance apart on the footplate with your toes facing forward, and set the seat so that you have a 90 degree angle at the knee. • STEP 2. Exhale and slowly push your feet away, making sure that you keep them flat on the footplate. • STEP 3. Push out to a point at which you still have a slight amount of flexion at your knees. • STEP 4. Inhale and slowly return to the starting position
Side Lunge • STEP 1. Grab a single dumbbell or weight plate and hold it with both hands in front of your chest as you stand with your feet shoulder-width apart. • STEP 2. Step as far as you can to your weaker side, keeping that foot pointing straight ahead. Push your hips back and squat down as far as possible, keeping your bent knee directly over your corresponding foot. • STEP 3. Push through your left heel to return to the starting position, then immediately lunge to your other side to finish one repetition.
T Push-ups/Plank Rotations • STEP 1. Place a pair of dumbbells at the spot where you position your hands for a standard pushup - slightly wider than shoulder-width apart. Grasp the dumbbell handles and set yourself up in pushup position with feet hip-width apart. • STEP 2. Lower our body to the floor. • STEP 3. As you push yourself back up, rotate the right side of your body upward as you bend your right arm and pull the right dumbbell to your torso. Then straighten your arm so that the dumbbell is above your shoulder. Your arms should form a T with your body. • STEP 3. Lower the dumbbell bak down, and repeat, this time perfuming the move to your left. Raise the dumbbell and rotate your body in one fluid motion.
Front Raises • STEP 1. Stand straight with your feet hip-width apart and a light dumbbell in each hand. • STEP 2. Your arms should be hanging down in front of your thighs - turn your wrists so that your palms face back behind you. • STEP 3. Keeping your arms perfectly straight, slowly raise the weights out and up in front of your until your arms are parallel to the floor. • STEP 4. Hold for a second, then slowly lower the weights back down.
Lateral Raise • STEP 1. Stand with your feet a shoulder-width apart, keeping your back straight and arms slightly in front of your torso. With your elbows slightly bent, take a dumbbell in each hand. • STEP 2. Raise the dumbbells out and up to the level of your shoulders. Keep your palms facing the ground. • STEP 3. Keeping your elbows bent, lower slowly back to the start position and repeat for the desired number of reps.
Single Arm Snatch • STEP 1. Begin by squatting lower over a dumbbell. Maintain a locked and rigid lower back and have your feet placed a shoulder width apart. • STEP 2. Grasp the dumbbell and tighten the abdominal muscles. In a rapid and continuous motion, lift the dumbbell upward until your arm is straight and locked, as illustrated. The dumbbell should travel close to the body and not swing out or away. • STEP 3. Briefly hold it above your head, then bring it down to the starting position.
Incline Bench Press • STEP 1. Lie on your back on a bench set at a low incline (30-45 degrees). Hold the barbell at roughly shoulder-width length. • STEP 2. Lift the bar so that it is over your eyes. • STEP 3. Slowly lower the weight to your chest, pause, then push it back up over your eyes.
Decline Bench Press • Avoid rounding your back during this exercise as it not only strains the back, but cheats your chest muscles from doing the work. Keep your back flat on the bench. Choose heavier weights for a decline bench press than a regular bench press since it is generally easier to lift the weight. • STEP 1. Lie flat on an decline exercise bench - feet secured at the high end of the bench for support. Position the weights along the sides of your chest, elbows aimed at the floor. • STEP 2. Turn the weights so that your palms face forward. • STEP 3. Keeping your back flat on the bench, slowly press the weights up until your arms are fully extended above your chest, elbows unlocked. • STEP 4. Slowly lower the weights back down along the sides of your chest and repeat.
Kickbacks • STEP 1. Take a dumbbell in one hand, then place your opposite knee on a bench, together with your other hand, and place your other foot on the floor, flexing it slightly at the knee. Then pull the arm holding the dumbbell straight back and up to your side, making it parallel to the floor - keep your back straight. • STEP 2. Holding the dumbbell so that you have a 90 degree angle at your elbow, exhale slowly and extend your arm as far as it will go, or until your wrist, elbow, and shoulder are in line. • STEP 3. Inhale and lower the dumbbell slowly, but only until you reach an angle of 90 degrees at your elbow. Repeat for the required number of reps. • STEP 4. Repeat holding the dumbbell in the other hand
Calf Raise • STEP 1. Position yourself on a leg press machine with the toes of both feet on the platform, a little closer than shoulder-width apart. • STEP 2. Flex your feet so that they're flat on the platform.
Dips • STEP 1. Grab hold of the parallel bars on a dip station and lift yourself until your arms are fully extended, as illustrated. Keep your knees bent and lock your ankles together. • STEP 2. Gradually lower your body by bending your elbows until you find your upper arms are parallel to the bars. • STEP 3. Pause, then push yourself back to the starting position.
Diamond Push Ups • STEP 1. Place yourself in the standard pushup position but have your hands placed directly under your chest with your index fingers and thumbs spread and touching so they form a "diamond". • STEP 2. Keep your back flat as you lower your body until your chest is nearly touching your hands. • STEP 3. Pause, then push yourself back up the starting position.
Chest Fly • STEP 1. Grasp a light-to-moderate pair of dumbbells, then lie back with your arms extended up over your upper chest. Your elbows should be slightly bent and your arms facing each other. • STEP 2. Inhale, then slowly lower your arms out to the sides of your torso in a semi-circle - keep the movement under control with your elbows still slightly bent - until there is a full, comfortable stretch in the area of your chest and shoulders around the level of shoulder-height. • STEP 3. Hold the stretch for a second before bringing the dumbbells back in to meet at the top of the movement - exhale as you return to the starting position.
Back Extensions • STEP 1. Position yourself into a back-extension station by placing your feet under the leg brace/anchor so that it is hooked there. • STEP 2. With your upper thighs resting on the bad, lock your hands behind your head and bend forward at the hips until your upper body is just short of being 90 degrees to the floor. • STEP 3. Slowly raise your torso until it's in line with your lower body, then lower it. Alternatively, you can hold onto a weight by bracing it with your arms across your chest and do the same motions.
Incline Fly • STEP 1. Lie on an incline bench while holding a dumbbell in each hand. • STEP 2. Extend your arms straight up above your chest, palms facing in toward each other with your elbows slightly bent. • STEP 3. Keeping your arms fixed in this position, slowly lower your arms out to your sides - in an arc like motion - until the weights are level with your chest. • STEP 4. Slowly bring your arms back up in the reverse of the previous arc motion, until the weights are once again above your chest.
Bench Dip • STEP 1. Place your palms on a bench so they face forward, and position yourself as illustrated. keep your legs relatively straight out in front, with both heels firmly on the floor. Straighten your arms and move your torso forward so that your behind and back are just in front of the bench. • STEP 2. Bend your arms to right angles, lowering your behind toward the floor as shown. You can make the exercise easier by by bending your knees and moving your feet closer to the bench
V-Ups • STEP 1. With your back on the floor, and your legs straight, hold your arms straight above your chest, and have your fingers point upwards. • STEP 2. Fold your body upward by lifting your legs off the floor and stretching your arms toward your toes, while consciously contracting your abdominal muscles. • STEP 3. Then, pause for a short time, and return to starting position.
Bent-over Row • STEP 1. With your feet shoulder-width apart and your knees bent roughly 15 to 30 degrees, keep your torso straight with a slight arch in your back as you lean forward at the hips. Your torso should be, at this point, roughly parallel to the floor. Grab the barbell off the floor using a false overhand grip (thumbs should be in line with the rest of your fingers) that's slightly wider than shoulder width. Let this bar hang at arm's length in front of you. • STEP 2. Slowly retract your shoulder blades as to have the bar pull up to the lower part of your sternum. Try not to use your arm muscles, and focus on getting the most activity out of your middle-back muscles. • STEP 3. Pause at the top where your chest should be sticking out toward the bar. Then, slowly return to the starting position while keeping your torso in the same position throughout the movement. Remember that your bent knees should provide all of the suspension your torso requires to be steady.
Concentration Curl • STEP 1. Sit on a bench, hold a dumbbell in one arm with your elbow resting on your inner thigh. Keep your forearm straight, as illustrated. • STEP 2. Raise the dumbbell up toward your shoulder while only bending at the elbow. Keep your wrist straight through the movement.
Plate Raise • STEP 1. Stand upright, grab a single weight plate with one hand on each side of the plate - similar to a car steering wheel. • STEP 2. Raise the plate in front of you until you can see down the center. • STEP 3. Pause for a few seconds, then lower it in a controlled and slow motion.
Skull Crusher • STEP 1. Lie on a bench with your knees bent and feet flat on the floor. Hold a fairly light dumbbell in your left hand and straighten the arm so that the weight is above your shoulder. Use your right hand to reach across your chest and up the upper part of your left arm to help stabilize it. • STEP 2. Turn the weight so that your palm faces in. Without moving your upper arm, bend your elbow and slowly lower the dumbbell until it reaches the side of your head. • STEP 3. Slowly press the weight back up above you. Finish the set, then switch positions to work your
Upright Row • STEP 1. Stand with your feet slightly wider than a shoulder-width apart and take an overhand grip on a barbell with your hands also a shoulder-width apart. • STEP 2. Pull up to the level of your chin, keeping the bar close to your body and keeping your elbows higher than the bar. • STEP 3. Hold for a few seconds before lowering back to the start position, ensuring that your elbows remain slightly bent and avoiding any bouncing or jerking movements.